
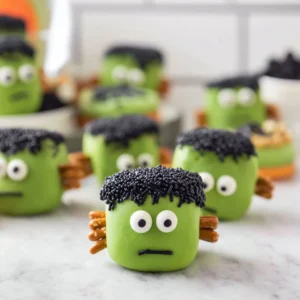
If you are searching for a fun and delicious dessert to celebrate Halloween, look no further than Frankenstein Oreo Balls! These whimsical treats not only make for a delightful dessert but also bring a touch of creativity and festivity to any gathering. With their charming green color, unique shape, and adorable candy eyes, these little monster bites are sure to make a lasting impression on your friends and family. Let’s dive into the world of Frankenstein Oreo Balls, where spooky meets scrumptious!
Why We Love This Frankenstein Oreo Balls Recipe
The beauty of this Halloween treat lies in its simplicity and delightful flavors. It’s no wonder why Frankenstein Oreo Balls have become a favorite among dessert enthusiasts. First off, they require minimal effort to prepare, making them an excellent option for anyone, regardless of baking skills. This recipe combines the iconic taste of Oreos with the luscious creaminess of cream cheese, resulting in a flavor that appeals to both children and adults alike.
Moreover, these no-bake treats are perfect for parties, potlucks, or just a fun family night at home. You can unleash your creativity by decorating each ball differently or sticking to the classic Frankenstein theme. Plus, they are as enjoyable to make as they are to eat! Your kids will love helping you in the kitchen as you transform simple ingredients into mini Halloween monsters.
So roll up your sleeves, gather your ingredients, and let’s make some delicious and festive Frankenstein Oreo Balls!
Ingredients for Frankenstein Oreo Balls
Here’s what you need to create your very own Frankenstein Oreo Balls:
- 36 Oreos, finely crushed
- 8 oz cream cheese, softened at room temperature
- 1 teaspoon vanilla extract
- 2 cups light green melting wafers
- 1/2 cup black or dark chocolate melting wafers
- 1-1/2 tablespoons Crisco shortening
- Black sprinkles (long, not round)
- Pretzel sticks
- Small candy eyes
Gathering these ingredients will set you up for success in creating these enchanting treats.
How to Make Frankenstein Oreo Balls Directions
Creating Frankenstein Oreo Balls is a straightforward process that allows you to enjoy time in the kitchen while whipping up a delicious treat. Follow these steps to bring your spooky creations to life:
Combine the Core Ingredients: Start by taking a large mixing bowl and combine the finely crushed Oreos, softened cream cheese, and vanilla extract. The mixture should resemble a dough, so it’s best to use an electric mixer for about 1-2 minutes. Mix until everything is blended together seamlessly.
Shape the Balls: With the mixture ready, turn your attention to forming the balls. Using a 2-tablespoon cookie scoop, take a portion of the dough and roll it into a smooth, round ball in your hands. You should aim for even-sized balls to ensure consistent presentation. Once formed, place each ball onto a large cookie sheet lined with parchment paper.
Create the Square Shape: This step adds a unique twist to your Oreo balls! Gently press down on each ball with your fingers to flatten the top slightly. Rotate the ball on its side and repeat this step for all sides until you create a square shape, similar to Frankenstein’s head. This gives the treats their distinct character.
Chill: Once you have shaped all the balls, pop the cookie sheet into the refrigerator and allow them to chill for around 2 hours. This chilling process helps the balls firm up, making them easier to dip in chocolate later.
Prepare the Green Coating: As the Oreo balls chill, it’s time to prepare the green melting wafers. Place these wafers in a microwave-safe bowl, and heat them on 50% power for 1 minute. Stir well and add 1 tablespoon of Crisco to help achieve a smooth consistency. If needed, continue heating in 30-second bursts, stirring in between, until the mixture becomes silky and has the consistency of dressing.
Dip and Decorate: Retrieve your chilled Oreo balls and carefully dip each one into the green melted chocolate. Use two forks or specially designed dipping tools. Ensure each ball is fully coated, then allow the excess chocolate to drip off by scraping the bottom of the dipping tool.
Add Sprinkles and Eyes: Immediately after dipping, add black sprinkles to one of the flattened sides of the ball to mimic Frankenstein’s hair. Next, position small candy eyes on the front face of each ball for that adorable yet spooky look.
Add the Pretzel Sticks: Break the round ends off the pretzel sticks to about an inch in length. Gently push these into the sides of the Oreo balls, acting as Frankenstein’s bolts, which adds an extra layer of charm to your creations.
Pipe on Features: Melt the black or dark chocolate wafers in a similar way, using Crisco to ensure a smooth consistency. Pour melted chocolate into a small Ziploc bag, removing the air before sealing. Snip a tiny corner of the bag to pipe features, such as Frankenstein’s smile or frown, onto each ball.
Final Chill: Allow the decorated Oreo balls to chill in the refrigerator for an additional 30 minutes, ensuring all the chocolate is set perfectly.
Now you have a batch of delightful Frankenstein Oreo Balls ready for enjoyment!
How to Serve Frankenstein Oreo Balls
Serving your Frankenstein Oreo Balls can be just as fun as making them! For a Halloween-themed party, consider presenting these adorable treats on a spooky platter. Arrange them with decorative black and green napkins, and you could even place some edible decorations around them to elevate the spooky vibe.
If you’re hosting a movie night, set them out as a fun snack along with popcorn and candy corn. They’re great conversation starters and will be a hit with everyone. Kids will love seeing these cute treats, and adults will appreciate the nostalgic Oreo flavor.
Moreover, you can serve them individually wrapped in small treat bags if you’re planning to give them away as party favors. These mouthwatering bites are great for sharing, and you can easily put one or two in each bag for your guests to take home.
Expert Tips: Frankenstein Oreo Balls
Don’t Skip Chilling: Make sure to allow enough time for your Oreo balls to chill properly. This step is crucial for helping the balls hold their shape and making them easier to dip.
Mix and Match Coatings: While this recipe calls for green and black, feel free to experiment with other melting chocolate colors. A variety of colors can add a playful twist to your treats.
Melt Chocolate Carefully: When melting the chocolate, avoid overheating, which can lead to clumping. Stir frequently and remember that a little bit of Crisco goes a long way in achieving that smooth texture.
Personalize: You can decorate your Frankenstein Oreo Balls beyond just sprinkles and eyes. Consider adding other fun edible decorations like edible glitter, colored candy melts, or even small candy pieces to enhance the overall appearance.
Be Creative with Designs: Instead of sticking with basic shapes, try varying the designs you pipe on each ball. Some can have straight lines, while others can have zigzags or smiles—get creative!
How to Store Frankenstein Oreo Balls
If you happen to have leftover Frankenstein Oreo Balls (although that may be unlikely!), storing them is easy. Place them in an airtight container and keep them in the refrigerator. They will stay fresh for about a week, maintaining their flavor and texture. You want to ensure they are well-separated, so consider placing parchment paper in between layers if they are stacked.
If you want to keep some for a future occasion, these treats can also be frozen. Place them in a freezer-safe container, ensuring they are not touching. When ready to eat, simply allow them to thaw in the refrigerator before serving.
Variation of Frankenstein Oreo Balls
While the classic Frankenstein Oreo Balls are undoubtedly fun, there are several variations you can explore.
Seasonal Themes: Change up the colors to match different holidays. Red and green for Christmas, pastel colors for Easter, or red and black for a spooky vampire theme.
Different Flavors: Mix in flavor extracts, such as mint or almond, into the cream cheese mixture for a unique twist. You could also use flavored Oreos or cookies to change the taste profile.
Gourmet Coatings: Experiment with gourmet chocolate or white chocolate melted with food coloring. These options can add a unique taste that elevates your Frankenstein Oreo Balls.
Indulgent Center: For an added surprise, you could insert a piece of candy or caramel in the center of each ball before shaping. This unexpected filling can delight those who take a bite.
FAQ About Frankenstein Oreo Balls
How long does it take to make Frankenstein Oreo Balls?
The total time can vary, but typically, the preparation and assembly take about an hour, excluding the chilling time, which is about two hours. Overall, you’re looking at approximately three hours to complete the recipe.
Can I prepare Frankenstein Oreo Balls in advance?
Absolutely! These treats can be made up to a week in advance and stored properly in the refrigerator or freezer, making them a convenient option for parties or gatherings.
What can I use instead of melting wafers?
If you can’t find melting wafers, you can use chocolate chips, but keep in mind that they might not melt as smoothly. Adding a little shortening can help with consistency.
Frankenstein Oreo Balls
Equipment
- Mixing Bowl
- Cookie sheet
- Parchment Paper
- Microwave-safe bowl
Ingredients
- 36 Oreos finely crushed
- 8 oz cream cheese softened at room temperature
- 1 teaspoon vanilla extract
- 2 cups light green melting wafers
- 1/2 cup black or dark chocolate melting wafers
- 1 1/2 tablespoons Crisco shortening
- black sprinkles long, not round
- pretzel sticks
- small candy eyes


Instructions
- In a large mixing bowl, combine crushed Oreos, softened cream cheese, and vanilla extract, mixing until a dough forms.
- Using a 2-tablespoon scoop, roll the mixture into balls and place them on a parchment-lined cookie sheet.
- Gently press down on each ball to flatten the top and shape them into squares for Frankenstein’s head.
- Chill the Oreo balls in the refrigerator for about 2 hours.
- While chilling, melt the green melting wafers in a microwave-safe bowl, adding Crisco for smooth consistency.
- Once chilled, dip each Oreo ball into the green melted chocolate, allowing excess to drip off.
- Immediately sprinkle black sprinkles on the flattened top and position candy eyes on the front of each ball.
- Break pretzel sticks into 1-inch pieces and insert them into the sides of the Oreo balls as Frankenstein’s bolts.
- Melt the black chocolate wafers and pipe features onto each ball using a small Ziploc bag.
- Chill the decorated Oreo balls for another 30 minutes to set the chocolate.
Send me this recipe!
Just enter your email below and get it sent straight to your inbox!