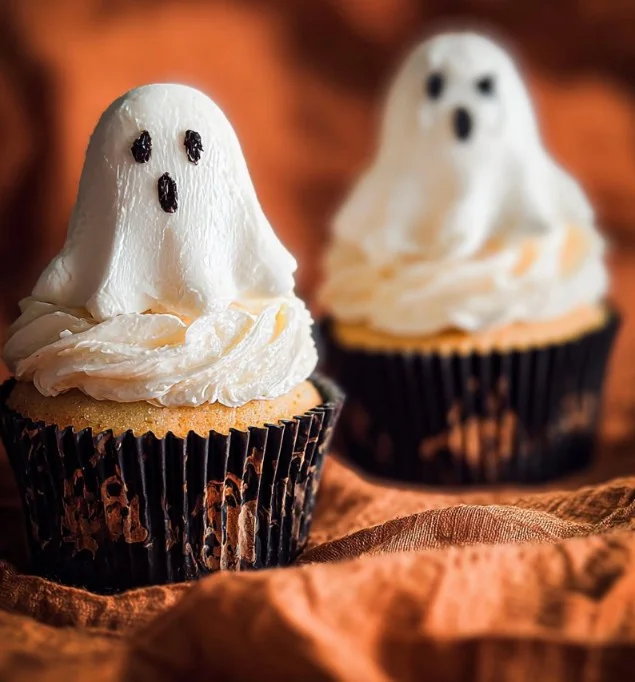
When it comes to Halloween, the excitement fills the air with an enchanting blend of thrills and chills. Amongst the haunting decorations and thrilling costumes, tasty treats take center stage, and what better way to celebrate this spooky season than with Halloween Ghost Cupcakes? These adorable, fluffy cupcakes topped with a delightful swirl of frosting evoke a sense of fun and eeriness, perfect for both kids and adults alike. With their ghostly appearances and rich chocolate flavor, these cupcakes are sure to steal the spotlight at any Halloween gathering or party.
Why We Love This Halloween Ghost Cupcakes Recipe
Halloween brings out the kid in all of us, and there’s something purely magical about creating specialty treats for this festival. One of the main reasons to love this Halloween Ghost Cupcakes recipe is its simplicity. You don’t need to be a professional baker to achieve delicious results. By using a boxed chocolate cake mix and ready-made frosting, you’ll save time, allowing you to enjoy more of the Halloween festivities.


Moreover, the ghostly design is ridiculously cute and lends itself to a fun decorating session – a perfect activity for kids and adults. These cupcakes capture the essence of Halloween while being easy to make and delightful to eat. Plus, they make for great additions to Halloween parties, school snacks, or just as a spooky surprise at home. Everyone loves a sweet treat, and these cupcakes are sure to please!
Ingredients about Halloween Ghost Cupcakes
To create your spooky Halloween Ghost Cupcakes, gather the following ingredients:
- 1 package chocolate cake mix (also ensure to check for ingredients required on the back)
- 1 can of vanilla frosting (you can also opt for white frosting if preferred)
- 1 package of candy eyes (these will help bring your ghostly cupcakes to life)
These simple ingredients will transform into delightful cupcakes that embody the spirit of Halloween.
How to Make Halloween Ghost Cupcakes Directions
Baking your Halloween Ghost Cupcakes is a fun endeavor that, when accomplished, will fill your kitchen with delicious scents and a sense of accomplishment. Here’s how you can create these spooky delights step by step:
Prep Your Baking Area: Start by preheating your oven according to the instructions on the chocolate cake mix package. In the meantime, line your cupcake tins with cute Halloween-themed liners to add an extra festive touch.
Mix the Batter: In a large mixing bowl, pour the chocolate cake mix, then follow the instructions on the pack to combine it with the necessary wet ingredients, usually water, oil, and eggs. Mix thoroughly until you achieve a smooth batter free from lumps.
Fill the Tins: Now, equally divide the cake batter into the lined cupcake tins, filling each about two-thirds full to allow for rising while baking.
Bake the Cupcakes: Place the cupcake trays in the preheated oven and bake for the time specified on the package. A toothpick inserted into the center of a cupcake should come out clean when they are ready.
Cool the Cupcakes: Once baked, remove the cupcakes from the oven and allow them to cool in the tins for a few minutes before transferring them to a wire rack. This will prevent them from becoming soggy from condensation. Let them cool completely; decorating them while warm may cause the frosting to melt.
Frost and Decorate: Using a piping bag, or just a regular spatula if you don’t have one, pipe the vanilla frosting on top of each cooled cupcake. Aim for a dollop shape to give your cupcakes a ghostly appearance. Smooth it out to create curves that resemble a ghost’s form.
Finish with Eyes: Add two candy eyes on each ghost cupcake, pressing gently so they stick into the frosting. Step back and admire your work – you have created delightful Halloween Ghost Cupcakes!
Now that you’ve made your ghostly delights, it’s time to share them with family and friends!
How to Serve Halloween Ghost Cupcakes
Once you’ve whipped up your Halloween Ghost Cupcakes, it’s time to present them in a fun and appealing way. For serving, consider using a platter decorated with other Halloween-themed elements, such as small pumpkins, cobweb decorations, or spooky-themed napkins.
To enhance the festive vibe, you can arrange the cupcakes in a tiered stand, allowing guests to see these delightful treats clearly. If you’re making these cupcakes for a party, consider labeling them as “Ghost Cupcakes” with a spooky sign nearby to add to the ambiance.
For added enjoyment, encourage your guests, especially the kids, to create their own ghostly designs. Set out extra candy eyes or even spooky sprinkles that they can add on, making it a fun interactive experience.
Expert Tips: Halloween Ghost Cupcakes
To ensure your Halloween Ghost Cupcakes turn out perfectly, consider these expert tips that can enhance your baking experience:
Use Room Temperature Ingredients: If you’re adding eggs or any other ingredients that require mixing, it’s advisable to have them at room temperature. This allows for better mixing and a fluffier texture.
Don’t Overmix the Batter: Once you combine the ingredients, mix until just combined. Overmixing can lead to dense cupcakes.
Check Your Oven’s Calibration: Ovens can vary in temperature. It’s always a good idea to use an oven thermometer to ensure your oven is accurately preheating to the required temperature.
Let Cool Completely: Make sure to let your cupcakes cool entirely before frosting. Warm cupcakes can melt the frosting, causing a gooey mess.
Experiment with Frosting: If you want to elevate the taste, consider adding a hint of vanilla or almond extract into your frosting, giving it an extra dimension of flavor.
By keeping these tips in mind, you can ensure that your Halloween Ghost Cupcakes are not only adorable but also truly delicious!
How to Store Halloween Ghost Cupcakes
If you have any leftover Halloween Ghost Cupcakes (and that’s a big if, considering they’re so delectable), proper storage is key to maintaining their freshness. Here’s how to keep your spooky treats:
Room Temperature: Place your cupcakes in an airtight container. They can stay at room temperature for about 2-3 days. Ensure the container is sealed properly to keep them moist.
Refrigeration: If you plan to keep them for longer than that, it’s best to store them in the refrigerator, where they can last for up to a week. However, be aware that cold temperatures may alter the texture of the frosting slightly.
Freezing: If you want to store them for an extended period, consider freezing the cupcakes. Wrap each cupcake tightly in plastic wrap, then place them in a freezer-safe container. Make sure to frost them after thawing, as it’s best to freeze unfrosted cupcakes. They should last for about three months in the freezer.
By following these storage tips, you can enjoy your spooky treats for days to come!
Variation of Halloween Ghost Cupcakes
While the classic Halloween Ghost Cupcakes are a delight on their own, there are numerous variations you can explore to keep things exciting:
Flavor Variations: Instead of sticking to chocolate, consider using a vanilla or even a pumpkin-flavored cake mix. This can provide a different taste that ties in with the autumn season.
Frosting Options: While vanilla frosting is traditional, try using cream cheese frosting for a tangy twist or whipped cream for a lighter texture.
Decorative Additions: Instead of just candy eyes, consider adding little chocolate sprinkles or edible glitter to enhance the ghostly effect. You might even create mini tombstones using chocolate cookies or make spooky spider webs with strands of frosting.
Cupcake Base Alternatives: Explore using different cupcake bases, such as a brownie base instead of cake, for a fudgier treat.
Dietary Adjustments: For gluten-free options, check for gluten-free chocolate cake mixes, ensuring everyone can enjoy the festivities. You can also consider vegan frostings if necessary.
By experimenting with these variations, you can create a unique Halloween treat every year!
FAQ Section
What are Halloween Ghost Cupcakes?
Halloween Ghost Cupcakes are delightful chocolate cupcakes decorated to resemble friendly ghosts. They are topped with vanilla frosting shaped to look like a ghost and adorned with candy eyes.
How long does it take to make Halloween Ghost Cupcakes?
From preparation through to baking and decorating, you can make Halloween Ghost Cupcakes in about 1 to 1.5 hours, depending on your skills in the kitchen.
Can I use homemade cake mix for Halloween Ghost Cupcakes?
Absolutely! Feel free to replace the boxed mix with your homemade chocolate cake recipe if you prefer a personalized touch.
What can I do if my frosting is too runny?
If you find your frosting too runny, consider mixing in a little powdered sugar until you achieve the desired consistency. This can help it hold its shape better.
How can I make the cupcakes look more frightful?
To add an extra spooky effect, consider flavorful fillings in the center of the cupcakes, such as a ghostly white chocolate ganache. You could also use black frosting and a mix of candy to create varying decorations for a frightful assortment.
Halloween Ghost Cupcakes
Equipment
- Mixing Bowls:
- Cupcake tins
- Piping Bag
- Wire Rack
Ingredients
- 1 package chocolate cake mix check for additional ingredients on package
- 1 can vanilla frosting or white frosting if preferred
- 1 package candy eyes
Instructions
- Preheat your oven according to the chocolate cake mix package instructions and line cupcake tins with Halloween-themed liners.
- In a large mixing bowl, combine the chocolate cake mix with the required wet ingredients as per package instructions. Mix until smooth.
- Fill each cupcake liner about two-thirds full with batter.
- Bake according to package instructions, typically around 18-22 minutes, until a toothpick comes out clean.
- Remove from the oven and cool in the tins for a few minutes before transferring to a wire rack to cool completely.
- Once cooled, use a piping bag to pipe dollops of vanilla frosting on top of each cupcake to create a ghostly shape.
- Add two candy eyes on each ghost cupcake, pressing gently into the frosting.
Send me this recipe!
Just enter your email below and get it sent straight to your inbox!