
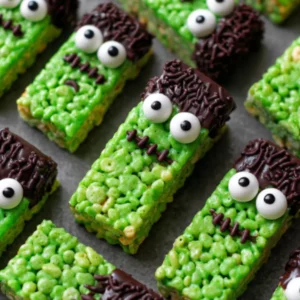
Frankenstein Rice Krispies are a fun and easy Halloween treat you can make at home without much effort. They’re colorful, kid-friendly, and perfect for parties or school snacks. With their bright green color, chocolate hair, and candy eyes, these no-bake bars bring spooky charm to your table in just a few steps.
Why We Love This Frankenstein Rice Krispies Recipe
There’s something truly satisfying about a dessert that’s both fun to look at and easy to make. Frankenstein Rice Krispies hit the mark in every way. First, they’re a no-bake recipe, which means less time in the kitchen and more time enjoying the season. Second, they’re totally kid-friendly, from start to finish.
You’ll love how this recipe combines a few pantry staples with simple steps. It starts with melted marshmallows and a splash of vanilla, then adds a few drops of green coloring to bring Frankenstein to life. After shaping and slicing, you decorate the tops with a melted chocolate “haircut,” candy eyes, and stitched chocolate mouths.
The playful look of these bars makes them stand out on any dessert table. But don’t let the cute factor fool you—they’re seriously tasty. You get a soft, chewy bite with every piece, thanks to the condensed milk and extra marshmallows stirred in.
And the best part? You can make these in advance, which is great for party prep. Let them set, store them, and they’ll be ready when you are. This recipe brings joy, flavor, and spooky fun together in a way that never gets old.
Ingredients about Frankenstein Rice Krispies
- 5 tablespoons unsalted butter
- ¼ cup sweetened condensed milk
- Splash of vanilla extract
- Pinch of sea salt
- 10 oz marshmallows (regular or mini)
- A few drops of green food coloring
- 6 cups Rice Krispies cereal
- 1 cup mini marshmallows (optional)
- 1 cup semi-sweet chocolate chips
- 1 teaspoon coconut oil
- Edible googly eyes (as many as needed)
How to Make Frankenstein Rice Krispies Directions
Start by preparing a large pot and greasing a 9×13 inch pan. This will keep your mixture from sticking when it’s time to shape your treats. Melt the butter in the pot over medium heat, then stir in the sweetened condensed milk. Let the mixture bubble gently for about 30 seconds to blend the flavors.
Next, stir in a splash of vanilla and a pinch of sea salt. Reduce the heat slightly, then pour in the marshmallows. Stir the marshmallows continuously until they are completely melted and smooth. Add in a few drops of green food coloring and mix well until the entire mixture turns a vibrant Frankenstein green.
Now it’s time to bring in the crunch. Remove the pot from the heat and add the Rice Krispies cereal. Stir until everything is coated evenly. If you’re using the extra mini marshmallows, mix them in now for added texture. Pour the mixture into your greased pan and use greased hands or a spatula to press it down gently and evenly.
Let the treats set for a few minutes while you prepare the decorations. In a microwave-safe bowl or using a double boiler, melt the chocolate chips with the coconut oil. Stir until completely smooth. Pour about ¼ cup of the melted chocolate into a zip-top sandwich bag. Leave the rest in the bowl for dipping.
Cut your set treats into 16 equal-sized bars. Make them tall and rectangular so they resemble Frankenstein’s face. Dip one end of each treat into the melted chocolate to create Frankenstein’s “hair.” Gently scrape off any excess chocolate, then place the bars onto waxed or parchment paper, flat side up.
With your chocolate bag, snip a tiny corner off so you can pipe details. Add two small chocolate dots to each bar where you want the eyes, then gently press an edible googly eye onto each dot. Pipe a stitched smile and a pair of eyebrows to complete the monster’s face.
Let your Frankenstein treats cool and dry completely before serving or storing. The chocolate will firm up and hold all the features in place. You now have a batch of festive, spooky treats that are as fun to make as they are to eat.
How to Serve Frankenstein Rice Krispies
Serving Frankenstein Rice Krispies is part of the fun. You can lay them out on a platter lined with black and orange paper, or place each one in a mini cupcake liner for easy grab-and-go snacking. Their bold green color and funny faces make them the highlight of any Halloween dessert table.
If you’re hosting a party, stack them up like blocks or arrange them in rows to make a Frankenstein army. They also work great for school classroom treats—just pack them in individual snack bags to make sharing simple and mess-free.
These treats can also double as party favors. Wrap each one in clear plastic and tie it with a Halloween ribbon for a festive touch. No matter how you present them, they’re guaranteed to bring smiles and excitement to everyone who sees (and eats) them.
Expert Tips: Frankenstein Rice Krispies
To make the process even easier, here are a few helpful tips. First, always grease your hands before pressing the mixture into the pan—this will keep the sticky marshmallow mixture from clinging to your fingers.
When melting your marshmallows, keep the heat on medium or medium-low. High heat can burn them or make your treats too stiff. Stir constantly for a smooth and creamy texture.
For the coloring, start with just one or two drops of food coloring and add more as needed. It’s easier to go darker than to fix an overly bright or neon shade. Choose a soft, monster-green to get the look just right.
When decorating, let the melted chocolate cool slightly before piping. If it’s too hot, it may run or spread too much. Use a small snip in your bag’s corner to control the flow and create cleaner lines for stitches and brows.
And don’t worry about making each Frankenstein perfect—part of the charm is that they all look a little different. It adds to their monster appeal!
How to Store Frankenstein Rice Krispies
Once your treats have cooled and the chocolate has set, transfer them to an airtight container. Place sheets of wax paper between each layer to prevent sticking or smudging. Keep them at room temperature in a cool, dry spot.
These bars stay fresh for up to four days. If you’re making them ahead for a party, it’s best to store them undecorated and add the chocolate and faces the night before. This keeps the eyes and details looking clean and sharp.
Avoid refrigerating these treats, as the moisture can make the cereal go soft and affect the texture. Room temperature is the sweet spot for keeping them crunchy and chewy.
Variation of Frankenstein Rice Krispies
If you want to get creative, there are several ways to change up your Frankenstein Rice Krispies while still keeping the fun Halloween theme.
Try using flavored marshmallows or cereal for a twist. Fruity or cocoa-flavored versions add a new layer of taste and color. You can also swap the green coloring for purple or orange to make different monsters.
Instead of piping stitches, use black decorating gel for an easier option, especially if kids are helping. Or skip the chocolate hair altogether and use chocolate sprinkles pressed into the tops while the bars are still warm.
For a gluten-free version, make sure to use certified gluten-free crisp rice cereal and marshmallows. You can also try making mini Frankensteins by slicing the bars into bite-sized squares—perfect for little hands and smaller servings.
Want a nutty twist? Add a handful of sunflower seeds or pumpkin seeds into the mix before pressing it into the pan. They add crunch and a fun fall flavor that works perfectly with the Halloween theme.
FAQ – Frankenstein Rice Krispies
Can I make Frankenstein Rice Krispies ahead of time?
Yes, you can make them up to 4 days in advance. Just let them cool and dry fully, then store in an airtight container with wax paper between layers.
What kind of food coloring works best for these treats?
Gel food coloring gives the most vibrant results without watering down the mixture. Start small and add more as needed.
Do I have to use sweetened condensed milk?
It adds creaminess and flavor, but if you don’t have it, you can skip it. Just note the texture will be a bit less chewy.
How do I keep the marshmallow mixture from sticking to my hands?
Lightly grease your hands with butter or cooking spray before pressing the mixture into the pan. This makes it much easier to handle.
Are there nut-free options for decorating?
Yes, all the ingredients listed are nut-free, but always double-check labels—especially the chocolate chips and candy eyes—to make sure they’re safe for allergies.
Frankenstein Rice Krispies
Ingredients
- 5 tablespoons unsalted butter
- ¼ cup sweetened condensed milk
- splash vanilla extract
- pinch sea salt
- 10 oz marshmallows (regular or mini)
- few drops green food coloring
- 6 cups Rice Krispies cereal
- 1 cup mini marshmallows (optional)
- 1 cup semi-sweet chocolate chips
- 1 teaspoon coconut oil
- as needed edible googly eyes


Instructions
- Grease a 9×13 inch pan. Melt the butter in a large pot over medium heat. Stir in the sweetened condensed milk and let it bubble gently for about 30 seconds.
- Add a splash of vanilla and a pinch of sea salt. Pour in the marshmallows and stir continuously until melted and smooth. Add in green food coloring until desired color is reached.
- Remove from heat and stir in Rice Krispies until well coated. If using mini marshmallows, add them now. Pour mixture into the greased pan and press down evenly.
- Let set for a few minutes. Melt chocolate chips with coconut oil in a microwave-safe bowl. Pour about ¼ cup into a zip-top bag and set aside.
- Cut treats into 16 bars. Dip one end of each bar into melted chocolate for Frankenstein’s hair, then place on wax paper.
- Pipe chocolate dots for eyes and press on edible googly eyes. Use the chocolate bag to pipe a stitched smile and eyebrows.
- Let cool completely before serving or storing.
Send me this recipe!
Just enter your email below and get it sent straight to your inbox!