Cookie butter cake is a no-bake masterpiece that uses crushed Biscoff cookies as its base and creamy cookie butter in its filling. Unlike traditional cakes, this dessert doesn’t require baking, making it an effortless yet impressive addition to your dessert repertoire. It’s a perfect blend of spiced cookie goodness and creamy decadence, offering a unique flavor profile that sets it apart from other cakes.
Why You’ll Love This Cookie Butter Cake
This cookie butter cake isn’t just another dessert—it’s a culinary delight that checks all the right boxes. Here’s what makes it truly irresistible:
1. No Oven Needed
Forget the stress of preheating your oven or worrying about baking times. This no-bake cake saves you time and effort, making it a hassle-free option for busy days. Plus, you don’t have to deal with a hot kitchen, which is a lifesaver during warm weather.
2. Versatile and Customizable
This cake is like a blank canvas for your creativity. Craving something extra indulgent? Add a drizzle of caramel or a sprinkle of sea salt. Need a twist of flavor? Try incorporating chocolate chips, fruit layers, or even nuts. You can also adapt it for specific dietary needs by substituting ingredients, such as using a dairy-free cream cheese for a vegan-friendly option.
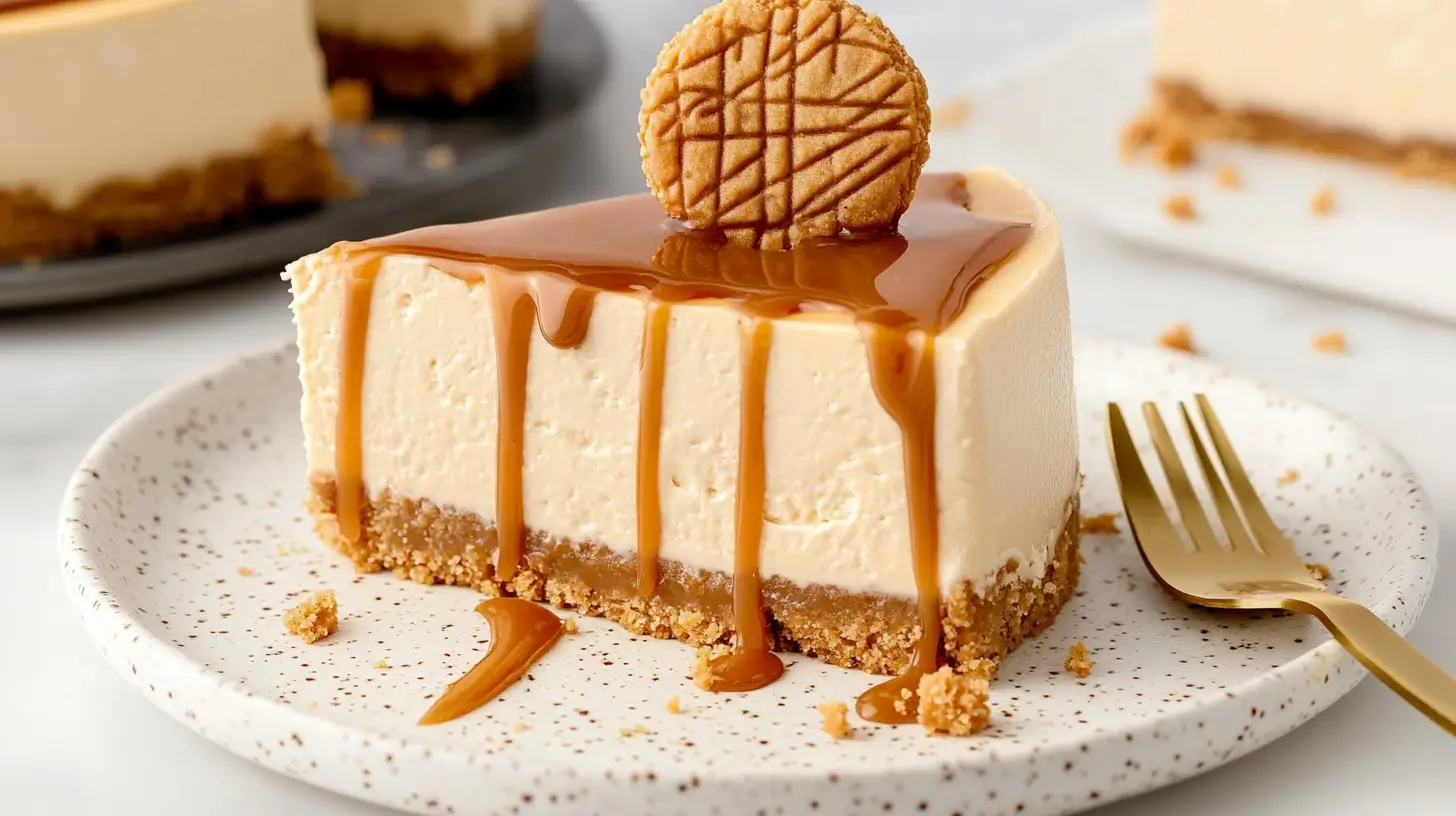
3. Show-Stopping Presentation
Cookie butter cake isn’t just delicious—it’s a feast for the eyes! The smooth, creamy filling contrasted with the crumbly Biscoff crust creates a visually stunning dessert. When topped with cookie crumbs, melted cookie butter, or whipped cream, it transforms into a centerpiece that’s guaranteed to impress at any gathering.
4. Perfect for Any Occasion
From festive holidays to intimate celebrations or even a quiet treat-yourself moment, this cake is the perfect choice. Its rich flavor and elegant appearance make it a crowd-pleaser at parties, yet it’s simple enough to whip up for a cozy night in.
This cake blends simplicity with sophistication, ensuring it becomes a favorite in your dessert repertoire!
Ingredients for Cookie Butter Cake
Biscoff Cookies – These cookies form the base of the cookie butter cake’s crust. They are spiced, and crispy, and have a distinctive flavor that pairs perfectly with the creamy filling. If you don’t have Biscoff cookies, you can substitute them with speculoos cookies, gingersnaps, or another similar spiced cookie, though the flavor may vary slightly.
Salted Butter – This ingredient adds richness and helps bind the crust together. If you’re using unsalted butter, add a pinch of salt to the crust mixture to maintain the flavor balance.
Cream Cheese – Full-fat cream cheese is crucial for the creamy texture of the filling in your cookie butter cake. Using reduced-fat cream cheese will result in a less rich, slightly firmer filling. Allow the cream cheese to come to room temperature before using to achieve a smoother, lump-free mixture.
Cookie Butter – The star ingredient of the cookie butter cake, cookie butter is a creamy spread made from ground Biscoff cookies. It adds depth and richness to the filling. If you prefer a different flavor, you could try using another type of cookie spread, such as speculoos spread, though it might alter the flavor slightly.
Powdered Sugar – Used to sweeten the filling without affecting its texture. Unlike granulated sugar, powdered sugar dissolves easily into the creamy filling, ensuring smoothness and sweetness without grittiness.
Vanilla Extract – Adds a warm, aromatic flavor that complements the spices in the cookie butter and cream cheese. Avoid substituting with imitation vanilla, as it can affect the flavor profile.
Ground Cinnamon – This spice enhances the flavor of the cookie butter and gives the filling a lovely warmth. You can experiment with adding a little more or using a blend of spices like nutmeg or ginger for variation.
Heavy Whipping Cream – The key ingredient for making the filling light and fluffy. The higher fat content in heavy whipping cream creates the desired smooth, whipped texture. Do not substitute with half-and-half or milk, as they won’t provide the same creaminess and volume.
How to Make Cookie Butter Cake
Step 1: Prepare the Crust
Coat a 9-inch springform pan with a thin layer of grease or line it with parchment paper to ensure easy removal of the cake. Combine the crushed Biscoff cookies and melted butter in a bowl. Press the mixture firmly into the bottom of the pan to form an even crust. Refrigerate the pan to let the crust chill while you prepare the filling.
Step 2: Make the Filling
In a large bowl, combine softened cream cheese, cookie butter, powdered sugar, vanilla extract, and cinnamon. Use an electric mixer to beat the ingredients, starting on low speed and gradually increasing to high, until smooth and creamy. Slowly add the heavy whipping cream, and continue mixing at high speed for about one minute, until the filling becomes light and fluffy.

Step 3: Assemble the Cake

Remove the chilled crust from the refrigerator. Spread the creamy filling evenly over the crust, smoothing the top with a spatula. Wrap the pan tightly with plastic wrap and refrigerate it for a minimum of 4 hours or, for optimal results, leave it overnight.
Step 4: Add the Finishing Touches
Before serving, drizzle melted cookie butter over the top and sprinkle crushed cookies for extra texture. For an indulgent touch, add whipped cream on top if desired.
Expert Tips for the Perfect Cookie Butter Cake
- Room Temperature Cream Cheese: Letting the cream cheese soften ensures a smoother, lump-free filling.
- Chill the Crust: Refrigerating the crust before adding the filling prevents it from crumbling.
- Whip Thoroughly: The more you whip the filling, the lighter and fluffier the texture will be.
- Experiment with Toppings: Crushed nuts, caramel sauce, or even chocolate chips can take this dessert to the next level.
Common Mistakes to Avoid When Making Cookie Butter Cake
- Skipping the Chill Time: The cake needs time to set for a firm and sliceable texture.
- Overmixing the Filling: While whipping is essential, overmixing can break down the cream and result in a dense texture.
- Using Low-Fat Ingredients: Full-fat cream cheese and heavy cream are key for a rich and creamy result.
Variations to Try
Elevate your Cookie butter cake with these creative twists to suit your taste or the occasion. These variations add unique flavors and textures, making this dessert even more versatile and irresistible:
1. Chocolate Drizzle
Enhance the decadence by drizzling melted dark or milk chocolate over the top of the cake. The rich chocolate pairs perfectly with the cookie butter’s warm, spiced notes, creating a luxurious flavor combination.
- Tip: Use a piping bag or a spoon to create elegant swirls or patterns for added visual appeal.
2. Nutty Addition
For a delightful crunch, mix in chopped almonds, pecans, or hazelnuts into the crust. These nuts not only provide texture but also complement the buttery flavor of the Biscoff cookies.
- Why it works: The contrast between the creamy filling and the crunchy crust creates a satisfying bite.
3. Citrus Zest
Brighten the cake’s flavor profile with a hint of citrus. Add finely grated orange or lemon zest to the filling for a refreshing twist. The citrus adds a subtle tanginess that balances the cake’s sweetness beautifully.
- Pro Tip: A little zest goes a long way—start with a teaspoon and adjust to taste.
Experimenting with these variations lets you customize the cookie butter cake to your liking, ensuring it’s always a hit, no matter the occasion.
Serving Suggestions for Cookie Butter Cake
Your cookie butter cake is a masterpiece, but how you serve it can elevate the experience even further. Here are some serving ideas to complement its rich and creamy flavors:
1. Serve Chilled with Coffee or Tea:
Keep the cake chilled for that perfect creamy texture. Pair it with a steaming cup of coffee or tea to create a delightful contrast between the cool dessert and the warm beverage. The spiced notes in the cookie butter harmonize beautifully with bold coffee or herbal teas.
- Perfect Pairings: Try pairing with a spiced chai, Earl Grey, or a strong espresso for an enhanced flavor profile.
2. Pair with Fresh Berries:
Add a pop of freshness to the richness of the cake by serving it alongside fresh berries like raspberries, strawberries, or blueberries. The natural tartness of the fruit cuts through the creamy sweetness, providing a balanced bite.
- Why it works: Berries not only add flavor but also brighten the presentation with their vibrant colors.
3. Dress It Up with Vanilla Ice Cream:
Take indulgence to the next level by serving a slice of Cookie butter cake with a scoop of velvety vanilla ice cream. The combination of creamy filling and cold, smooth ice cream is a match made in dessert heaven.
- Pro Tip: Add a drizzle of caramel or chocolate sauce over the ice cream for extra flair.
Whether you’re keeping it simple or going all out, these serving suggestions ensure your cookie butter cake shines on every plate!
How to Store Cookie Butter Cake
Proper storage of your cookie butter cake ensures its flavor and texture remain fresh, allowing you to enjoy it for several days or even weeks. Here’s how to store it effectively, whether you’re refrigerating it for short-term use or freezing it for later.
Refrigerator Storage
To keep your cookie butter cake fresh in the refrigerator, transfer it to an airtight container. This prevents the cake from absorbing odors from other foods and keeps it moist. If you don’t have a container that fits, tightly cover the cake with plastic wrap, ensuring no part of the surface is exposed to air. Stored this way, the cake will remain fresh for up to five days.
- Why it works: The airtight seal minimizes exposure to air, which can cause the cake to dry out or develop an off taste. Refrigeration also helps maintain the creamy filling’s structure.
Freezer Storage
For longer storage, freezing is your best option. Start by slicing the cake into individual portions. This makes it easier to defrost only what you need instead of the entire cake. Wrap each individual slice securely in plastic wrap to prevent freezer burn. Place the wrapped portions in a freezer-safe container or resealable bag for an extra layer of protection. When you’re ready to enjoy the cake, thaw it in the refrigerator overnight to ensure it defrosts evenly.
- Why slice first? Smaller portions are quicker to thaw and allow you to enjoy just the right amount without unnecessary waste.
- Why use plastic wrap? Wrapping each slice tightly prevents ice crystals from forming, which could alter the cake’s texture and flavor during freezing.
- Why thaw in the refrigerator? Thawing slowly in a cool environment preserves the cake’s creamy texture and prevents the crust from becoming soggy.
FAQ Section
Who made the original gooey butter cake?
The original gooey butter cake traces its roots back to St. Louis, Missouri, where it was created in the 1930s by accident when a baker mismeasured ingredients.
Does Crumbl Cookies use cake mix?
While Crumbl Cookies’ recipes are proprietary, many home bakers use cake mix as a shortcut to replicate their dense, flavorful cookies at home.
More Cake recipes you will love!
Easy peach cobbler recipe using cake mix
Old fashioned apple cobbler with cake mix

Old fashioned cookie butter cake recipe
Ingredients
For the Crust:
- 2 ¼ cups of crushed Biscoff cookies about one sleeve
- ½ cup of salted butter melted
For the Filling:
- 16 ounces of full-fat cream cheese softened to room temperature
- 1 cup of creamy cookie butter
- ½ cup of powdered sugar
- 2 teaspoons of vanilla extract
- ½ teaspoon of ground cinnamon
- 1 cup of heavy whipping cream


Instructions
Step 1: Prepare the Crust
- Lightly grease a 9-inch springform pan or line it with parchment paper for easy removal.
- Combine the crushed Biscoff cookies and melted butter in a mixing bowl.
- Press the mixture firmly into the bottom of the prepared pan to form an even crust.
- Place the pan in the refrigerator to chill while you prepare the filling.
Step 2: Make the Filling
- In a large bowl, combine the softened cream cheese, cookie butter, powdered sugar, vanilla extract, and cinnamon.
- Use an electric mixer to beat the ingredients, starting at a low speed and gradually increasing to high until the mixture is smooth and creamy.
- Slowly pour in the heavy whipping cream while continuing to mix. Beat at high speed for about one minute or until the filling becomes fluffy and whipped.
Step 3: Assemble the Cake
- Remove the crust from the refrigerator.
- Spread the creamy filling over the crust, smoothing the top with a spatula.
- Cover the pan with plastic wrap and refrigerate for at least 4 hours or overnight for the best results.
Step 4: Add the Finishing Touches
- Before serving, drizzle melted cookie butter over the top and sprinkle crushed cookies for added texture.
- Add whipped cream for an extra layer of indulgence, if desired.
Send me this recipe!
Just enter your email below and get it sent straight to your inbox!