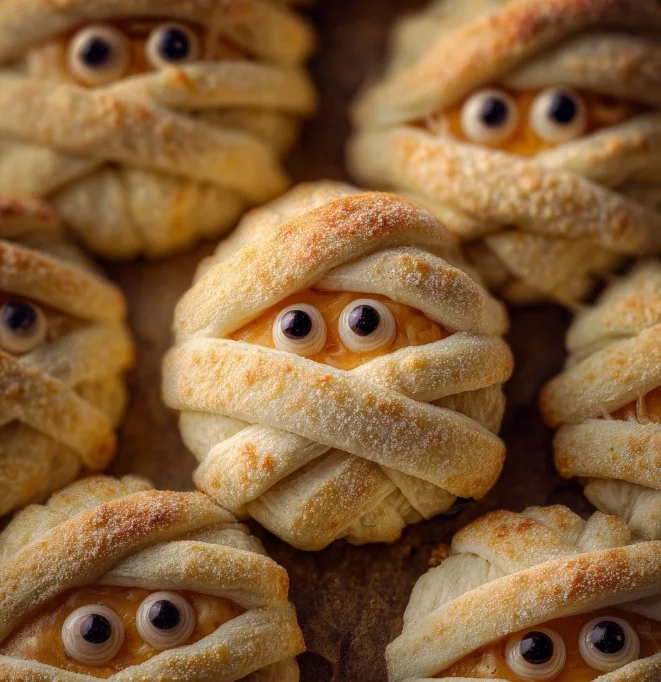
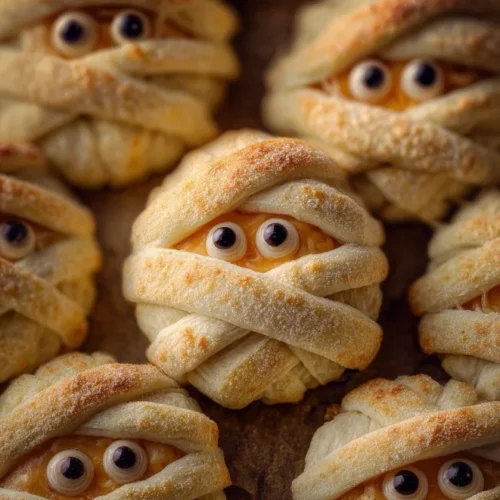
Are you ready to bring some delight and fun to your kitchen? If so, you’re in for a treat with Baked Cheese Mummies! These delicious bites are perfect for Halloween parties, family gatherings, or simply a fun snack for any day. They combine the rich flavors of melted cheese wrapped in buttery, flaky puff pastry, and the playful appearance of spooky mummies!
Why We Love This Baked Cheese Mummies Recipe
The enjoyment of Baked Cheese Mummies goes beyond their novelty appearance. Here are some reasons this recipe has become a favorite for many:


Fun Presentation: The way the pastry wraps around the cheese mimics a mummy, making it a perfect treat for Halloween or any festive occasion.
Easy to Make: With just a few ingredients and steps, you can easily prepare this dish without stress. This is designed for everyone, from beginners to experienced cooks.
Customizable: You can modify the filling or even the jams according to your taste, making them suitable for various flavor preferences.
Kid-Friendly: The playful aesthetics and mild flavors ensure that kids will love both making and eating these delightful snacks.
Now that you’re excited about making Baked Cheese Mummies let’s look at what you need.
Ingredients for Baked Cheese Mummies
Here’s a list of the ingredients you’ll need for this spooky yet scrumptious recipe:
- 2 sheets thawed puff pastry
- 14 Mini Babybel® cheeses (wax removed)
- 1/3 cup honey or your favorite jam
- 1 egg (beaten with 1 teaspoon water for egg wash)
- 28 candy eyes or mini chocolate chips
These ingredients come together to create a deliciously cheesy, flaky snack that is hard to resist! Make sure you have everything on hand before you start.
How to Make Baked Cheese Mummies
Creating your Baked Cheese Mummies is as enjoyable as it is straightforward! Follow these steps to craft your spooky treats.
Preheat Your Oven: Begin by preheating your oven to 400°F (205°C). This ensures that your mummies bake perfectly and achieve that golden-brown color.
Prepare the Puff Pastry: Dust your counter with a little flour to prevent sticking. Place the thawed puff pastry sheets on this surface and roll each sheet into a rough 11-inch square.
Cut the Pastry: Now, take each sheet and cut it into 9 squares. Reserve 4 of those squares for later as they’ll be used for the mummy bandages.
Assemble the Cheese: Take the Mini Babybel cheeses, and drizzle honey or your chosen jam over each cheese piece. Place the cheeses honey side down onto the puff pastry squares.
Fold the Pastry: Carefully cut the edges of the pastry around each cheese to create a circle. Then, fold the pastry over each cheese, pressing the edges together to seal them.
Transfer to Baking Sheet: Position the wrapped cheeses seam side down on a parchment-lined baking sheet. This will keep them from sticking and ensure easy cleanup.
Prepare the Bandages: From the reserved pastry squares, cut out 12 strips that will serve as the mummy’s bandages. Gently wrap these strips around each pastry-covered cheese to give them the authentic mummy appearance.
Egg Wash: Brush the prepared mummies with the egg wash you made earlier (beaten egg mixed with water). This gives them a rich, golden finish once baked.
Bake: Now it’s time to bake! Slide the baking sheet into the preheated oven and let the mummies bake for 15-20 minutes. You’ll know they’re done when the cheese is melty and the pastry is golden brown.
Add the Eyes: Once baked, take the mummies out of the oven, and immediately decorate them with candy eyes or mini chocolate chips. This adds the final spooky touch!
Serve Warm: Allow them to cool slightly, and then serve these delightful mummies warm for the best experience.
Making Baked Cheese Mummies is not only easy, but it also doubles as an exciting activity to do with friends or family. The anticipation as they bake and the lovely aroma filling your kitchen will surely create lasting memories.
How to Serve Baked Cheese Mummies
Serving Baked Cheese Mummies is part of the fun! You can present them in various ways to make the experience even more enjoyable:
Arrange on a Platter: Create a spooky platter by carefully arranging the mummies on a Halloween-themed serving tray. Add some fake spider webs or Halloween decorations for an extra festive touch!
Dipping Sauces: Include a selection of dipping sauces to enhance your cheese mummies. Honey, marinara sauce, or a spicy dip can elevate the flavors and give your guests unique options.
Serve with Drinks: Pair these mummies with your favorite drinks or warm beverages, especially during chilly evenings. A warm apple cider or a refreshing fruit punch complements the cheesy snack perfectly.
These delightful mummies will be a hit at any gathering, so make sure to share them with friends and family!
Expert Tips for Baked Cheese Mummies
Keep the Pastry Cold: If your puff pastry starts to get too warm, pop it in the refrigerator for a few minutes before cutting and wrapping. This helps in achieving extra crispiness while baking.
Vary the Fillings: While Mini Babybel cheese is perfect for this recipe, you can experiment with different cheese types. Cheddar or mozzarella can also be delicious alternatives!
Customize the Jam: Depending on your preference, feel free to switch up the honey for different jams or even savory spreads like pesto.
Create Different Looks: Instead of just using strips for bandages, you could create fun designs with the leftover pastry scraps. Think of different shapes like ghosts or spiders to get creative!
Watch the Baking Time: Keep an eye on your mummies in the oven. Every oven is different, so they may need a bit more or less time to achieve that perfect golden brown.
How to Store Baked Cheese Mummies
If you happen to have leftovers (though, let’s be honest, they’re hard to resist), you want to make sure they’re stored properly to maintain their deliciousness. Here’s how to do it effectively:
Refrigerate: Place any uneaten mummies in an airtight container and store them in the refrigerator. They can last for about 2-3 days this way.
Reheat: When you’re ready to enjoy your leftovers, reheat them in the oven at 350°F (175°C) for about 10-15 minutes. This will help them crisp up nicely again.
Freezing: If you’d like to prepare them ahead of time, you can assemble the mummies without baking and freeze them. Simply place them on a baking sheet first until frozen and then transfer to a freezer-safe bag. When you’re ready to bake, just follow the baking instructions straight from the freezer, adding a few extra minutes to the baking time.
Variations of Baked Cheese Mummies
While the original Baked Cheese Mummies are a fun and tasty treat, there’s always room for creativity. Here are some variations to try:
Spicy Mummies: Add a hint of spice by mixing a little chili powder or cayenne pepper into your jam. This adds a surprising kick that many will enjoy.
Herb-Infused Cheese: Try using cheeses infused with herbs, such as garlic or basil. This will give your mummies a gourmet twist.
Sweet Mummies: For a sweeter treat, consider filling the pastry with chocolate or a favorite sweet spread instead of cheese. Wrap it like a mummy and bake—it makes a great dessert.
Vegetable Mummies: If you want a veggie option, you can substitute cheese with a small amount of roasted vegetables, like squash or mushrooms, for a healthier twist.
Gluten-Free Option: For those following a gluten-free diet, look for gluten-free puff pastry options available in stores. The flavors remain delicious!
These variations can add a new layer of excitement to your Baked Cheese Mummies, allowing you to explore different tastes and preferences!
FAQ About Baked Cheese Mummies
How long does it take to make Baked Cheese Mummies?
The preparation and baking time for Baked Cheese Mummies is about 30-40 minutes total. This includes rolling out the pastry, assembling the mummies, and baking them to perfection.
Can I prepare these mummies in advance?
Absolutely! You can assemble the mummies a day ahead and store them in the refrigerator before baking. They can also be frozen for longer storage, which makes it easier to enjoy them fresh.
What can I use instead of Babybel cheese?
While Mini Babybel cheeses work wonderfully, you can definitely substitute them with other soft cheeses, such as mozzarella balls or any cheese of your preference.
Are Baked Cheese Mummies kid-friendly?
Yes! This recipe is a great way to get kids involved in the kitchen. They’ll love helping to assemble the mummies, and the cheesy, flaky pastry is a favorite among young ones.
How do I keep them from getting soggy?
To maintain the crispiness of the pastry, ensure to bake them until they are fully golden brown. Store them correctly and reheat them in the oven when enjoying leftovers.
Baked Cheese Mummies
Equipment
- Oven
- Baking Sheet
- Parchment Paper
- Pizza Cutter
Ingredients
- 2 sheets thawed puff pastry
- 14 Mini Babybel® cheeses wax removed
- 1/3 cup honey or your favorite jam
- 28 candy eyes
Instructions
- Place mozzarella sticks in the freezer for 2-4 hours before starting.
- Preheat your oven to 400°F (205°C).
- Dust your counter with flour and roll out the puff pastry into roughly 11-inch squares.
- Cut each sheet into 9 squares. Reserve 4 squares for the mummy bandages.
- Drizzle honey or jam over each cheese piece and place them onto the pastry squares.
- Wrap the pastry around each cheese stick, pressing the edges to seal.
- Use a pizza cutter to slice the reserved pastry into strips and wrap around the cheese sticks to create bandages.
- Place the wrapped mummies seam side down on a parchment-lined baking sheet and brush with egg wash.
- Chill the mummies in the refrigerator for at least 30 minutes before baking.
- Bake for 15-20 minutes until golden brown and puffy.
- Press candy eyes into the warm mummies before serving.
Send me this recipe!
Just enter your email below and get it sent straight to your inbox!