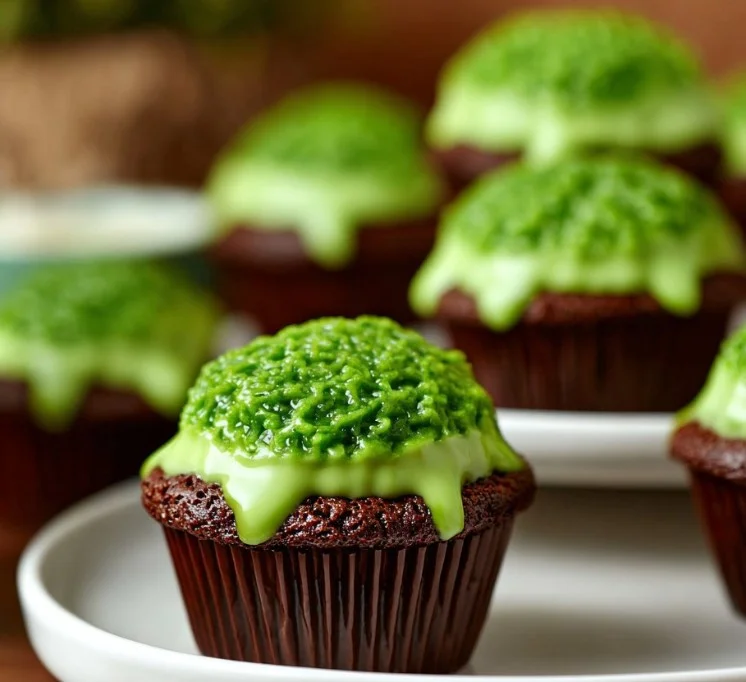
When it comes to Halloween or a ghoulish-themed party, few desserts can capture the eerie fun quite like Zombie Brain Brownie Bites. These sweet, chocolatey treats not only fulfill your indulgent cravings but are also a conversation starter that adds a playful twist to your celebration. The blend of rich brownies with vibrant green candy coating mimics the appearance of brains, making it a perfect choice for horror enthusiasts. Whether you’re hosting a spooky soirée or simply looking to surprise your family with a unique dessert, this recipe is sure to impress.
Why We Love These Zombie Brain Brownie Bites
There’s something special about crafting a fun and frightening treat that brings everyone together. Zombie Brain Brownie Bites are not just visually appealing—they’re also incredibly delicious. The gooey chocolate brownie base provides a perfect foundation, while the creamy ganache and playful strawberry jelly give a burst of flavor. The contrast between the rich brownie and the sweet candy coating creates a delightful experience for your taste buds. Plus, these bites are easy to assemble, making them ideal for anyone, from novice bakers to seasoned pros.
Ingredients for Zombie Brain Brownie Bites
Here are the key ingredients you’ll need to whip up these spooky delights:
For the Brownies:
- 1 box brownie mix
- Ingredients required to prepare the brownie mix (usually eggs, water, and oil)
For the Brain Coating:
- 1 lb vibrant green candy coating melts
- 1/3 cup heavy cream
For the Filling:
- 2 tablespoons strawberry jelly
- A few drops of green gel food coloring
For the Mold:
- Brain candy mold
How to Make Zombie Brain Brownie Bites
Let’s dive into the step-by-step process to create these eyebrow-raising Zombie Brain Brownie Bites.
Preheat Your Oven: Start by preheating your oven to 350°F. This ensures that your brownies bake evenly and become the perfect texture.
Prepare the Pans: Grab two mini cupcake pans and give them a generous spray with nonstick cooking spray. This prevents the brownies from sticking and makes for easy removal.
Mix the Brownies: Follow the instructions on your brownie mix box, combining it with the required ingredients. Make sure the mix is well blended for a smooth, delectable batter.
Fill the Pans: Using a cookie scoop or a large spoon, fill each mini cupcake cavity almost to the top with the brownie mixture. Be careful not to overfill, as the brownies will puff up while baking.
Bake: Place the pans in your preheated oven and bake for about 15 minutes. Keep an eye on them; the aim is to achieve a puffy, crackly appearance with a toothpick inserting cleanly but with a few moist crumbs.
Cool the Brownies: Once baked, allow the brownie bites to cool completely in the pan. When they’re cool, gently pop them out of the pans and place them on a cooling rack.
Prepare the Ganache: In a microwave-safe bowl, combine 8 oz of candy coating and 1/3 cup of heavy cream. Heat this mixture in the microwave for one minute, then whisk until it’s smooth. Refrigerate for at least two hours to let it set.
Melt the Remaining Candy Coating: With the remaining 8 oz of candy coating, melt it according to package instructions.
Mold the Brains: To create the brain appearance, fill the cavities of your brain candy mold with the melted green coating, making sure to brush it up the sides. Freeze these molds for about 10 minutes until solid.
Assemble the Bites: Carefully remove the brain shapes from the molds. For each brownie bite, press a small hole into the top. Fill that hole with the ganache you prepared earlier, and gently place a chocolate brain on top.
Add the Finishing Touches: Mix the strawberry jelly with a drop of green gel food coloring to create a brain-like look. Use this mixture to paint the chocolaty brains, giving them depth and character.
Serve: Let the brownie bites sit at room temperature before serving.
How to Serve Zombie Brain Brownie Bites
Serving your Zombie Brain Brownie Bites can be as fun as making them. You can enhance the spooky vibe by placing them on a themed platter or cake stand. Adding some faux spider webs or plastic spiders around the display can elevate the eerie atmosphere. You may also consider pairing these brownie bites with other Halloween-themed treats like ghostly cupcakes or creepy candy apples for a delightful dessert table.
As you serve these treats, watch for the surprised faces of your guests as they dig into these deliciously grotesque bites. They pair beautifully with a glass of milk or hot cocoa—perfect for the chilly autumn nights when ghoulish fun is in the air.
Expert Tips for Making Zombie Brain Brownie Bites
Creating the perfect Zombie Brain Brownie Bites is all about attention to detail and a sprinkle of creativity. Here are some pro tips to help you along the way:
Check Your Oven Temperature: Every oven is different. If this is your first time making these brownie bites, you might want to do a toothpick test a minute or two before the recommended baking time.
Cooling the Brownies is Key: Be patient while cooling the brownies. Removing them too soon can lead to crumbling. Let them cool completely for the best results.
Gently Remove the Brains from the Mold: If the candy coating is sticking to the mold, try using a slight twist motion. If needed, pop them in the freezer for another few minutes to harden.
Experiment with Colors: While the vibrant green is a classic for Halloween, feel free to make variations with different colors of candy coating to match your Halloween theme or preferences.
Don’t Skip the Decoration: The painting of the jelly may seem optional, but it truly adds an authentic touch that elevates the overall presentation. Be creative!
How to Store Zombie Brain Brownie Bites
To keep your Zombie Brain Brownie Bites fresh and tasty, store them in an airtight container. They can be kept at room temperature for a few days, allowing the flavors to meld beautifully. If you want them to last longer, you can refrigerate them for up to a week. Just be sure to separate layers with parchment paper to avoid sticking.
For those who love to plan ahead, these brownie bites can also be frozen. Simply place them in a single layer on a baking sheet until solid. Once frozen, transfer them to an airtight container or freezer bag, where they’ll keep for several months. Simply thaw in the refrigerator before serving!
Variations of Zombie Brain Brownie Bites
While the classic Zombie Brain Brownie Bites are incredibly fun, don’t hesitate to put your own spin on them. Here are a few ideas to get your creativity flowing:
Bloody Guts Version: Instead of strawberry jelly, try using raspberry or cherry filling for a bloodier appearance. The tartness will add an interesting flavor to balance the sweetness.
Nutty Twist: Include chopped nuts in your brownie mix for added texture and flavor. An assortment of walnuts or pecans can enhance the taste experience.
Vegan Option: Substitute the brownie mix with a vegan version. You can find plant-based brownie mixes, or try making your own with apple sauce and flaxseed as egg replacements.
Different Shapes: Instead of using a brain mold, explore other themed mold shapes like skulls or spooky ghosts to create your own variety of spooky treats.
Chocolate Coating: For an extra chocolatey punch, dip the completed brownie bites in melted chocolate before adding the brain topping.
Frequently Asked Questions about Zombie Brain Brownie Bites
If you’re curious about making these delightful treats, here are some common questions that you might have:
What is the best way to serve Zombie Brain Brownie Bites?
The best way to serve them is to arrange on a spooky-themed platter, complete with creepy decorations like fake spiders or spider webs.
How long do Zombie Brain Brownie Bites last?
These brownie bites can last for several days at room temperature and longer if refrigerated or frozen. Just store them in an airtight container!
Can I make Zombie Brain Brownie Bites ahead of time?
Absolutely! You can prepare these brownie bites a day or two in advance, allowing the flavors to integrate beautifully.
Are there alternatives to green candy coating?
Yes! While vibrant green is fun, you can also use other colors for holiday themes or special occasions. Just ensure the candy coating melts smoothly for the best results.
Zombie Brain Brownie Bites
Equipment
- Oven
- Mini cupcake pans
- Brain candy mold
- Microwave-safe bowl
Ingredients
- 1 box brownie mix
- Ingredients required to prepare the brownie mix usually eggs, water, and oil
- 1 lb vibrant green candy coating melts
- 1/3 cup heavy cream
- 2 tbsp strawberry jelly
- a few drops green gel food coloring


Instructions
- Preheat your oven to 350°F (175°C).
- Prepare the mini cupcake pans with nonstick spray.
- Mix the brownie batter according to the package instructions.
- Fill the pans with the brownie mixture and bake for 15 minutes.
- Allow the brownie bites to cool completely before removing them from the pans.
- Prepare the ganache by melting the candy coating with heavy cream in the microwave.
- Once cooled, scoop out a small hole in the top of each brownie bite and fill it with strawberry jelly.
- Dip the brownie bites in the green candy coating to resemble brains and let set.
- Use the jelly with green food coloring to paint the chocolate for a more realistic effect.
- Serve and enjoy your spooky Zombie Brain Brownie Bites!
Send me this recipe!
Just enter your email below and get it sent straight to your inbox!