
When summer arrives or a special occasion calls, there’s nothing quite like the creamy, dreamy layers of an Oreo Ice Cream Cake. This delightful dessert combines the iconic chocolatey crunch of Oreo cookies with the rich creaminess of ice cream, making it a favorite among both kids and adults.
Why We Love This Oreo Ice Cream Cake Recipe
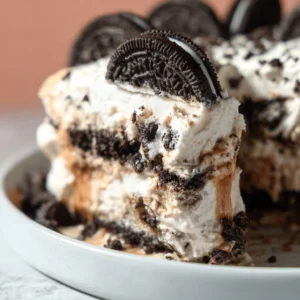
There’s a reason why Oreo Ice Cream Cake continues to be a crowd favorite. This delightful dessert offers an ideal blend of flavors and textures that appeal to everyone. The buttery Oreo crust serves as a sturdy foundation, holding together layers of cookies and cream ice cream, while the hot fudge adds a gooey sweetness that takes it over the top. It’s simple enough to make yet impressive enough to serve at gatherings. Plus, you can easily customize it to suit various tastes and make it your own. It’s the type of dessert that creates lasting memories as you enjoy it with family and friends.
Ingredients for Oreo Ice Cream Cake
Creating a delicious Oreo Ice Cream Cake is as simple as gathering a few key ingredients. Each element plays a vital role in ensuring that your dessert is both rich in flavor and enjoyable in every bite. Here’s what you’ll need to get started:
- 19 ounces Oreo cookies
- 6 tablespoons unsalted butter, melted
- 1/2 gallon cookies and cream ice cream, softened
- 15 ounces hot fudge sauce
- 8 ounces whipped cream, room temperature
- Crushed Oreos for optional garnish
Each ingredient adds its unique charm to the dessert, making each slice an enticing masterpiece.
How to Make Oreo Ice Cream Cake Directions
Now that you have gathered your ingredients, it’s time to bring your Oreo Ice Cream Cake to life! Follow these straightforward directions to create a stunning dessert that will have everyone asking for seconds.
Begin by lining a 9-inch by 13-inch pan with parchment paper. This step will make it easier to remove the cake later and keeps the edges clean.
Next, crush the Oreo cookies. You can do this by using a food processor for a quick and fine crumb or by placing them in a plastic bag and smashing them with a rolling pin for a more hands-on approach. Either way, you’re aiming for fine crumbs that will form a solid base.
Pour the melted butter over the crushed Oreos and pulse the mixture until it combines evenly. The melted butter helps the crumbs stick together, forming a solid crust.
Press this mixture into the bottom of your prepared pan, ensuring it forms an even layer across the entire base. Take your time to compact the crust well, as this will provide stability to the layers above.
Scoop the softened cookies and cream ice cream directly onto the Oreo crust. Using a spatula, smooth it out into a uniform layer that fully covers the crust. This is where the cake starts to take shape!
Once the ice cream is evenly spread, cover the pan with plastic wrap and place it in the freezer for about an hour. This initial freeze will help the layers firm up.
After an hour, remove the cake from the freezer. Drizzle the hot fudge sauce over the ice cream layer and use a knife or spatula to swirl it gently. This will create beautiful ribbons of fudge that are visually appealing and delicious.
After swirling the fudge, cover the cake again and return it to the freezer for an additional hour to ensure everything sets properly.
Once the fudge layer has firmed up, spread the whipped cream over the top. Ensure it’s evenly distributed, as this adds a delightful creaminess to the cake.
If desired, you can garnish the top with crushed Oreos or chocolate chips for an extra decorative touch. The garnish not only makes your cake look fabulous but also adds texture.
Lastly, return the cake to the freezer for about 30 minutes to let everything set perfectly. When ready to serve, remove the cake from the freezer and let it thaw for a few minutes before cutting into squares. This ensures that slicing is easy and allows the layers to blend beautifully.
How to Serve Oreo Ice Cream Cake
Serving Oreo Ice Cream Cake is just as fun as making it! When it’s time for dessert, follow these simple steps to elevate the experience for your guests.
Presentation: Cut the cake into squares, keeping the portions generous. Place each square on a dessert plate, showcasing the beautiful layers of cookies, ice cream, and whipped cream.
Add Extra Treats: Consider serving each slice with a drizzle of additional hot fudge sauce or a dollop of whipped cream on top. This playful addition can enhance the presentation and flavor.
Pair with Beverages: You may want to offer a refreshing drink alongside your cake. A glass of cold milk pairs beautifully, contrasting the richness of the dessert and satisfying any sweet tooth.
Garnish: For an extra touch, sprinkle some crushed Oreos or chocolate chips on each plate just before serving. It adds an appealing presentation that guests will appreciate.
Enjoy: Sit back, relax, and enjoy the satisfied smiles as your guests indulge in this creamy, crunchy delight. Each bite is sure to spark joy and memories.
Expert Tips for Making Oreo Ice Cream Cake
To ensure your Oreo Ice Cream Cake is a smashing success, keep these expert tips in mind:
Use Quality Ingredients: The better the ingredients, the better the final cake. Opt for fresh Oreos and quality ice cream for the best flavor.
Soften Ice Cream Gradually: Allow the ice cream to soften slightly at room temperature before spreading it on the crust. This helps it spread smoothly without tearing up the base layer.
Don’t Rush Freezing: As painful as it may be to wait, allowing the cake to freeze for the recommended times is essential. This ensures it holds its shape when sliced and served.
When Cutting, Use a Hot Knife: For clean slices, dip your knife in hot water before cutting the cake. Wipe it clean before each cut to keep the edges sharp.
Customization Ideas: Feel free to swap out the cookies and cream ice cream for other flavors like vanilla or mint chocolate chip. Altering the flavor can give the cake a whole new spin.
How to Store Oreo Ice Cream Cake
If you find yourself with leftovers (or planning ahead), storing your Oreo Ice Cream Cake properly is key to maintaining its deliciousness. Follow these storage tips:
Cover Tightly: To prevent freezer burn and preserve flavor, wrap your cake tightly in plastic wrap. Alternatively, you can store it in an airtight container.
Freezing Time: Homemade ice cream cakes can last in the freezer for up to two weeks. After that, the flavors may diminish, and the texture could change.
Thawing: When you’re ready to enjoy more, allow the cake to thaw in the refrigerator for about 15 to 20 minutes before serving. This makes it easier to slice and enhances the creaminess of the ice cream.
Variations of Oreo Ice Cream Cake
The beauty of an Oreo Ice Cream Cake lies in its versatility. You can easily transform this dessert to cater to your taste or occasion. Consider these variations:
Flavored Ice Cream: Swap cookies and cream for chocolate, vanilla, or even strawberry ice cream. Each flavor will bring a new dimension to your cake.
Add-In Options: Incorporate chopped nuts, candy pieces, or fruit like bananas for added texture and flavor. These additions can personalize the cake for your guests’ preferences.
Create Layers: Instead of a single layer of ice cream, you can alternate different flavors or layers of fudge and whipped cream for a tiered effect, making it more visually striking.
Cookies and Cream Crust: Instead of the classic Oreo crust, you could mix in some crushed chocolate wafer cookies for even deeper chocolate flavor.
Birthday Bash Option: For a birthday celebration, consider adding sprinkles to the whipped cream layer for a festive appearance.
FAQ about Oreo Ice Cream Cake
What is Oreo Ice Cream Cake?
Oreo Ice Cream Cake is a delicious dessert made with layers of crushed Oreo cookies, cookies and cream ice cream, hot fudge sauce, whipped cream, and optional garnishes. It is a frozen treat that combines rich, creamy, and crunchy textures all in one cake.
Can I customize my Oreo Ice Cream Cake?
Absolutely! You can alter the ice cream flavor, add fun toppings, or even use different cookie bases. The possibilities for customization are endless, allowing it to cater to any occasion or personal preference.
How long can I store Oreo Ice Cream Cake?
When stored correctly in the freezer, an Oreo Ice Cream Cake can last for up to two weeks. Just make sure it is tightly wrapped or placed in an airtight container to keep it fresh.
Is it necessary to thaw the cake before serving?
Yes, it’s recommended to let the cake thaw slightly at room temperature or in the refrigerator for about 15-20 minutes before cutting. This will make slicing easier and enhance the texture and flavor upon serving.
Oreo Ice Cream Cake
Equipment
- 9×13 inch Pan
- Food Processor
- Spatula
Ingredients
- 19 oz. Oreo cookies
- 6 Tbsp. unsalted butter melted
- 1/2 gallon cookies and cream ice cream softened
- 15 oz. hot fudge sauce
- 8 oz. whipped cream room temperature
- Crushed Oreos for optional garnish


Instructions
- Line a 9×13 inch pan with parchment paper for easy removal.
- Crush Oreo cookies using a food processor or by smashing them in a plastic bag until fine crumbs form.
- Pour melted butter over the crushed Oreos and mix until combined. Press the mixture firmly into the bottom of the prepared pan to form a crust.
- Scoop softened cookies and cream ice cream onto the Oreo crust and smooth it into an even layer. Cover with plastic wrap and freeze for 1 hour.
- Remove from the freezer and drizzle hot fudge sauce over the ice cream. Swirl gently with a knife or spatula. Return to the freezer for another hour.
- Spread whipped cream over the fudge layer, garnishing with crushed Oreos or chocolate chips if desired. Freeze for an additional 30 minutes.
- When ready to serve, let the cake thaw for a few minutes before cutting into squares.
Send me this recipe!
Just enter your email below and get it sent straight to your inbox!