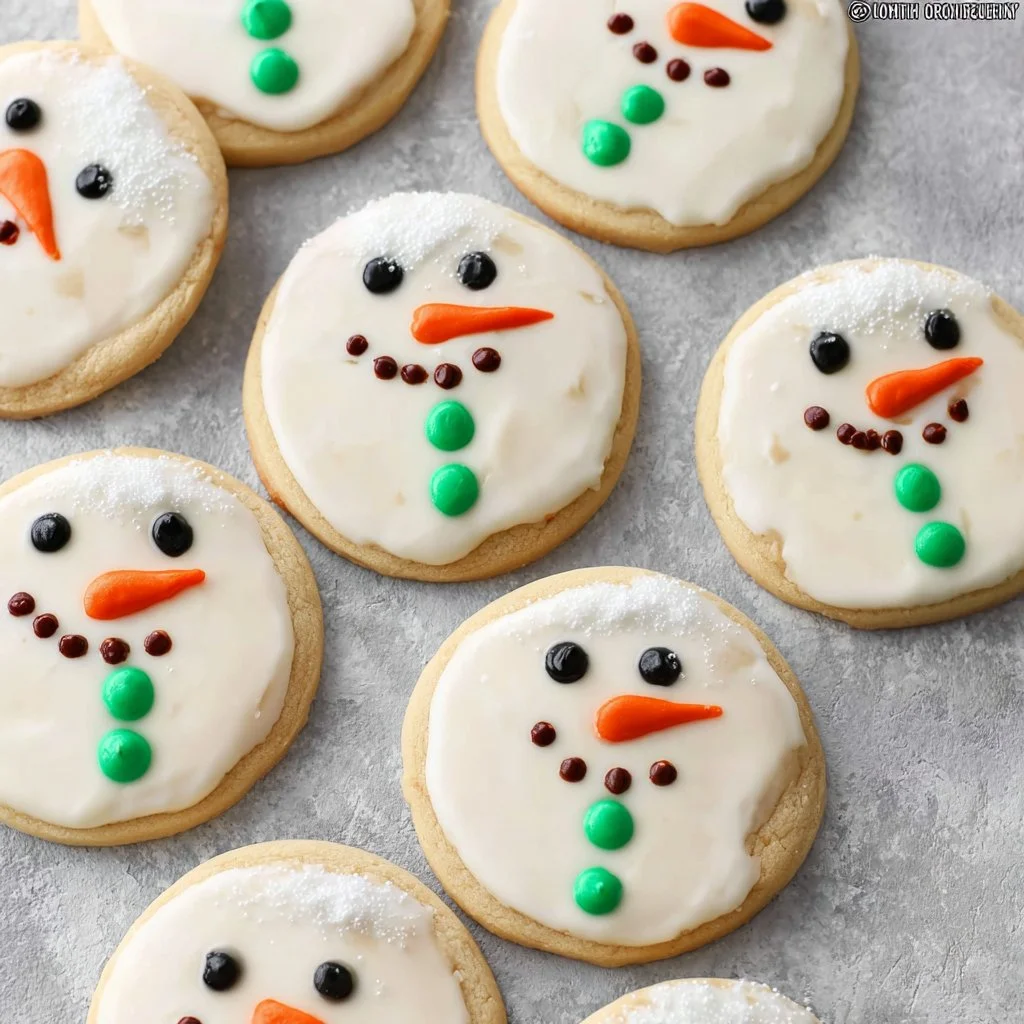
As the winter season rolls in and snow begins to blanket the ground, there’s something truly magical about creating festive treats that capture the spirit of the season. One of the most delightful ways to celebrate this time of year is by making Melting Snowman Cookies. These charming cookies not only look adorable but also offer a mouthwatering flavor that will warm your heart. Gather your family or friends and embark on a creative baking adventure that results in whimsical cookies resembling adorable snowmen taking a delightful plunge.
Why We Love This Melting Snowman Cookies Recipe
The appeal of Melting Snowman Cookies goes beyond their cute appearance. They are incredibly fun to decorate, making them a perfect activity for both seasoned bakers and those new to cookie decorating. Using royal icing, these cookies become a canvas for your imagination, and the decorating process can serve as a joyful bonding experience with loved ones. Plus, the cookies taste deliciously sweet, with a delightful soft and chewy texture that complements the royal icing’s decorative touch.
Whether you’re preparing for a festive holiday party, a cozy winter gathering, or simply indulging your baking passions, this recipe is a crowd-pleaser that you and your guests will adore.
Ingredients for Melting Snowman Cookies
To create these irresistible cookies, you’ll need a selection of simple ingredients that come together to form a delightful winter treat.
- Cookie Dough: A basic sugar or gingerbread cookie dough works well.
- Royal Icing: Prepared according to your favorite recipe.
- Food Coloring:
- Black
- Brown
- Orange
- White
- Green (or other colors as desired)
- Disposable Decorating Bags: For easy icing application.
- Couplers: To easily switch decorating tips.
- Decorating Tips: Sizes 2 and 3 for various icing applications.
How to Make Melting Snowman Cookies Directions
Creating Melting Snowman Cookies is an enjoyable process that allows the creativity to flow. Here’s a detailed step-by-step guide to help you craft these festive delights:
- Prepare the Cookie Dough: Follow your chosen recipe for cookie dough. If you need a suggestion, a classic sugar or gingerbread dough works wonderfully for this cookie.
- Chill and Roll Out: Once prepared, chill the dough according to the recipe instructions. After chilling, roll out the dough on a lightly floured surface until it’s about 1/4 inch thick.
- Cut Out Circles: Use a round cookie cutter to cut out circles from the rolled-out dough, which will form the base for your snowman.
- Bake and Cool: Lay the cookie circles on a baking sheet lined with parchment paper. Bake in the preheated oven according to your dough recipe instructions. Allow them to cool completely on a wire rack before proceeding to decorate.
- Prepare Royal Icing: While the cookies cool, prepare your royal icing. Make a batch and divide it into smaller bowls. Tint portions of the icing using food coloring: reserve some white, and color the rest black, brown, orange, and green.
- Prepare Decorating Bags: Set up your decorating bags with couplers and the appropriate tips. Fill the bags with the colored royal icing, ensuring they’re tied securely with rubber bands.
- Decorate the Cookies:
- Pipe the Snowman’s Body: Using the size 3 tip, pipe blob shapes on each cookie circle using the white icing.
- Flood the Icing: Thin the reserved white icing with a few drops of water until it reaches a consistency that flows smoothly. Fill another decorating bag with this thinned icing, snip the tip, and carefully pipe back and forth to fill the outlined blobs, creating a smooth white surface. Allow this icing to set slightly.
- Add Features: Switch to the size 2 tip for the black icing to pipe the eyes and mouth. Use the brown icing for the stick arms. With the orange icing, create carrot noses, and pipe colorful buttons using any color icing you fancy.
- Dry the Cookies: Let the decorated cookies dry completely, ideally overnight, so the icing sets properly.
How to Serve Melting Snowman Cookies
Presenting your Melting Snowman Cookies can be as fun as making them! Consider using decorative platters or cookie stands to display these delightful treats. You can also package them in clear cellophane bags tied with festive ribbons for gifts or party favors.
Pair these cookies with warm beverages like hot chocolate or coffee to enhance the wintery experience. Their charming appearance makes them a perfect centerpiece for holiday gatherings or as a delightful treat during a cozy family night at home.
Expert Tips: Melting Snowman Cookies
To ensure your Melting Snowman Cookies turn out perfectly, here are some expert tips:
- Icing Consistency: Pay close attention to royal icing consistency. The thicker icing is great for outlining, while thinned icing is essential for flooding the cookies.
- Chilling Dough: Make sure to chill your cookie dough adequately. This step prevents the cookies from spreading too much while baking.
- Precision in Decorating: Use a turntable or lazy Susan when decorating for better control over your icing application.
- Practice Piping: If you’re new to piping, practice on parchment paper before decorating your cookies. This will build your confidence.
- Get Creative: Feel free to customize your snowmen. Add hats, scarves, or different facial expressions using additional colors to make each cookie unique!
How to Store Melting Snowman Cookies
Once your Melting Snowman Cookies are decorated and dry, you can store them to keep their freshness. Place them in an airtight container at room temperature. If properly stored, they can last for up to a week without losing their delightful taste and texture. If you’re hoping to keep them longer, consider freezing them before icing. Just thaw them completely before decorating.
Variations of Melting Snowman Cookies
While the classic melting snowman design is adorable, you can explore various variations to give these cookies a new twist:
- Gingerbread Snowmen: Swap out the sugar cookie dough for gingerbread dough for a spiced flavor profile that pairs beautifully with royal icing.
- Colorful Scarves: Instead of sticking with traditional colors for the accessories, add vibrant scarves or hats with extra colored icing.
- Mini Snowmen: Use a smaller round cookie cutter to make tiny snowmen. They can serve as delightful bite-sized treats at parties.
- Sprinkles and Edible Glitter: Add some sparkle by using edible glitter or sprinkles for snow effects or for the cookie toppings.
- Flavor Variations: Experiment with flavored extracts like peppermint, almond, or vanilla in your cookie dough for a unique taste.
FAQ: Melting Snowman Cookies
What is the best way to pipe royal icing?
To pipe royal icing effectively, ensure your icing is at the right consistency: thicker for outlining and thinner for flooding. Use proper decorating bags and tips to suit your design needs, and practice on parchment paper if you’re a beginner.
How do I prevent cookies from spreading while baking?
Chilling your cookie dough before rolling and cutting out shapes is essential, as it helps maintain the cookie shape and structure during baking.
Can I make Melting Snowman Cookies ahead of time?
Absolutely! You can bake the cookies ahead of time and store them without icing. Decorate them closer to the event for the freshest appearance.
Are there alternatives to royal icing for decorating?
If royal icing isn’t your preference, you can use fondant or even simple glaze made from powdered sugar and milk for a different decorating experience.
Can the cookies be frozen?
Yes, you can freeze the undecorated cookies. Just ensure they are properly wrapped to avoid freezer burn, then thaw before decorating.
Melting Snowman Cookies
Ingredients
For the Cookie Dough
- 2 cups basic sugar or gingerbread cookie dough A classic recipe works well.
For the Royal Icing
- 2 cups royal icing Prepare according to your favorite recipe.
- 1 tub food coloring Black, brown, orange, white, and green (or other colors as desired).
For Decorating
- 5 pieces disposable decorating bags For easy icing application.
- 2 pieces couplers To easily switch decorating tips.
- 2 pieces decorating tips Sizes 2 and 3 for various icing applications.


Instructions
Preparation
- Prepare the cookie dough according to your chosen recipe.
- Chill the dough as per the recipe instructions.
- Roll out the dough on a lightly floured surface to about 1/4 inch thickness.
- Use a round cookie cutter to cut out circles from the rolled dough.
Baking and Cooling
- Place cookie circles on a baking sheet lined with parchment paper.
- Bake in the preheated oven according to your dough recipe instructions.
- Allow cookies to cool completely on a wire rack.
Making Icing
- Prepare royal icing and divide it into smaller bowls.
- Tint portions of the icing using food coloring.
Decorating
- Set up decorating bags with couplers and appropriate tips.
- Pipe blob shapes on each cookie circle using the white icing for the snowman’s body.
- Thin the reserved white icing with water for flooding, fill another bag, and pipe back and forth to fill the outlined blobs.
- Use black icing to pipe the eyes and mouth, and create stick arms with brown icing.
- Pipe orange icing for the carrot noses and colorful buttons for decoration.
- Let the decorated cookies dry completely, ideally overnight.
Send me this recipe!
Just enter your email below and get it sent straight to your inbox!