When winter rolls around, the excitement of the holiday season fills the air. The chilly weather invites cozy gatherings and the joy of baking. Among the many delightful treats you can whip up during this festive season, Melted Snowman Biscuits stand out for their whimsy and charm. Not only are these biscuits adorable, but they also spark creativity and are sure to bring smiles to your family and friends. They’re perfect for parties, classrooms, or any holiday get-together. Let’s dive into the world of Melted Snowman Biscuits and discover why they’re a must-try this winter!
Why We Love This Melted Snowman Biscuits Recipe
One of the main reasons this recipe is beloved by many is its simplicity. Utilizing refrigerated biscuit dough makes preparation a breeze, allowing you to focus on the fun of decorating instead of spending too much time in the kitchen. The melted snowman concept is an imaginative twist that encourages creativity, especially for children who enjoy getting hands-on in the kitchen.
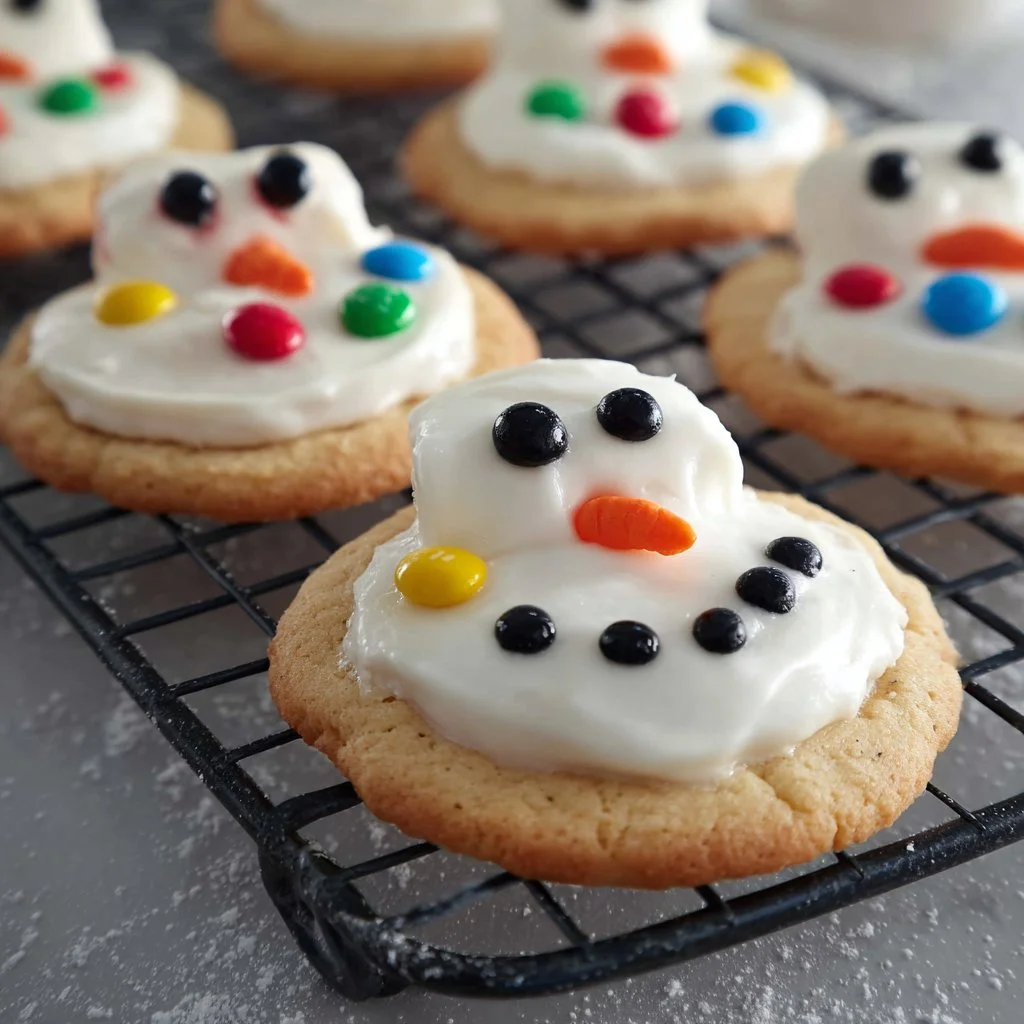
Each biscuit, frosted with white icing, transforms into a snowman who’s just melted a bit, capturing the playful spirit of winter. It allows you to personalize each snowman with unique expressions and decorations, making them not only tasty but also a fun artistic project. You’ll love engaging everyone in the decorating process, making it a wonderful bonding activity!
Ingredients for Melted Snowman Biscuits
To create these melting little snowmen, you’ll need a few ingredients that are easy to find in your local grocery store. Here’s what you will need:
- 1 package Refrigerated biscuit dough (about 16 oz)
- 1 cup White icing (store-bought or homemade)
- ½ cup Chocolate chips (for the eyes)
- 1 cup Mini marshmallows (for the melted effect)
- ¼ cup Candy corn (for the nose)
- Decorative icing (for details like eyes and buttons)
These ingredients combine seamlessly to create delightful biscuits that you and your loved ones will enjoy.
How to Make Melted Snowman Biscuits
Creating your Melted Snowman Biscuits is a straightforward process that anyone can follow. Here’s how you can do it step-by-step:
- Preheat Your Oven: Start by preheating your oven according to the instructions on the refrigerated biscuit dough package. This usually means setting it to around 350°F (175°C), but check your specific dough for accuracy.
- Prepare the Biscuits: Open the package of refrigerated biscuit dough and separate each biscuit. Arrange them on a baking sheet lined with parchment paper, ensuring they have enough space to expand while baking.
- Bake the Biscuits: Place the baking sheet in the preheated oven and bake until the biscuits are golden brown, following the recommended baking time on the package—typically around 10 to 15 minutes.
- Cool the Biscuits: Once baked, remove the biscuits from the oven and allow them to cool on a wire rack. This step is essential to prevent the icing from melting when you apply it.
- Frosting the Biscuits: Once completely cooled, use a spatula or knife to spread a generous layer of white icing over the top of each biscuit. This creates the snowman’s body and adds a sweet and creamy flavor.
- Creating the Melted Effect: Take the mini marshmallows and place them at the top of the iced biscuits in a way that resembles a melting snowman. You can pile them thickly for a whimsical effect or spread them out for a more subtle look.
- Adding Features: Now it’s time to give your snowmen personality! Use chocolate chips to create eyes, placing them firmly in the icing. For the nose, use a piece of candy corn, sticking it right below the eyes to form a cute face.
- Decorate with Icing: With your decorative icing, add tiny buttons down the front of your biscuits and any other details you wish, like scarves or hats. This is where you can let your creativity shine!
- Arrange and Serve: Once your snowmen are fully decorated, arrange them on a platter. These charming treats are now ready to be served at your holiday gathering, delighting everyone with their cuteness and flavor.
How to Serve Melted Snowman Biscuits
Presentation can elevate your Melted Snowman Biscuits, making them even more enticing to your guests. Consider placing your biscuits on a festive platter with a winter-themed background to enhance the winter wonderland vibe. You could sprinkle some edible glitter around the biscuits for a magical touch or surround them with candy canes and holiday-themed confetti.
These treats are perfect for any winter occasion—be it a children’s party, a family gathering, or a cozy evening at home. They also make great conversation starters and can invite stories about your favorite winter memories. Make sure to set them out early if you’re hosting a gathering, so guests can enjoy them as soon as they arrive!
Expert Tips: Melted Snowman Biscuits
Creating the perfect Melted Snowman Biscuits is as much about technique as it is about creativity. Here are some expert tips to help you elevate your biscuit-making game:
- Choosing the Dough: If you want to experiment with flavors, consider using flavored biscuit dough, like buttermilk or even sweet cinnamon rolls, for a unique twist.
- Decorating Icing: If you’re using store-bought icing, make sure it’s thick enough to hold the decorations without running off. If it’s too runny, consider adding powdered sugar to thicken it.
- Marshmallow Placement: For a whimsical touch, use marshmallows of different sizes to create variation among your melted snowmen. Mini marshmallows work perfectly, but you can also cut regular-sized marshmallows in half for added dimension.
- Freshness Matters: If you make the biscuits ahead of time, wait until just before serving to add the icing and decorations. This keeps them looking fresh and prevents the biscuits from becoming soggy.
- Involve Everyone: Make biscuit decorating a family activity! Let kids get creative with their snowman designs, fostering teamwork and providing fun memories.
How to Store Melted Snowman Biscuits
If you happen to have any biscuits left over, storing them properly will keep them fresh for your next snack. Place any uneaten Melted Snowman Biscuits in an airtight container. These biscuits are best enjoyed within two days for optimal taste and texture, as the icing can cause them to become soggy over time.
If you want to keep them for a longer period, consider freezing the baked biscuits without decorations. When you’re ready to serve them again, let them thaw at room temperature, then decorate as desired.
Variation of Melted Snowman Biscuits
While the classic Melted Snowman Biscuits are delightful, you can play around with different variations to suit your taste and style. Here are some fun ideas to inspire you:
- Chocolate Drizzle: For a richer flavor, drizzle melted chocolate over the iced biscuits before adding the marshmallows. This adds a delicious layer and complements the sweetness.
- Different Icings: Experiment with colorful icing! Add food coloring to your icing to create vibrant snowmen that can match your party theme or the season.
- Seasonal Treats: Instead of just snowmen, create other winter characters such as gingerbread men or reindeer using biscuits as your base. Get creative with the decorations!
- Nut-Free Options: Whenever applicable, ensure your ingredients are allergy-friendly. Substitute chocolate chips with carob chips or seeds for those with nut allergies.
- Healthy Twist: Use yogurt or cream cheese as a base instead of icing. This offers a tangy flavor and a healthier alternative to heavy sugary icings.
FAQ About Melted Snowman Biscuits
What are Melted Snowman Biscuits?
Melted Snowman Biscuits are whimsical winter treats made from baked biscuit dough, decorated to resemble adorable snowmen that look like they’re melting. They are created using simple ingredients such as icing, chocolate chips, and marshmallows.
Can I use homemade biscuit dough?
Absolutely! While this recipe uses refrigerated biscuit dough for convenience, you can certainly make your own biscuit dough from scratch for a more personalized touch.
How long can I store Melted Snowman Biscuits?
For the best taste and texture, enjoy your Melted Snowman Biscuits within two days. If you have leftovers, store them in an airtight container, or freeze them un-iced for later enjoyment.
Can children help with making these biscuits?
Yes! This recipe is perfect for involving kids. They can help with frosting, adding decorations, and creating their own unique designs, making it a fun family activity.
How do I make these biscuits allergy-friendly?
Check your ingredient labels for potential allergens. Opt for gluten-free biscuit dough and allergy-safe decorations to ensure everyone can enjoy these treats.
Melted Snowman Biscuits
Ingredients
For the biscuits
- 1 package Refrigerated biscuit dough (about 16 oz)
For decorating
- 1 cup White icing (store-bought or homemade)
- ½ cup Chocolate chips (for the eyes)
- 1 cup Mini marshmallows (for the melted effect)
- ¼ cup Candy corn (for the nose)
- Decorative icing (for details like eyes and buttons)


Instructions
Preparation
- Preheat your oven according to the instructions on the refrigerated biscuit dough package, usually to around 350°F (175°C).
- Open the package of refrigerated biscuit dough and separate each biscuit. Arrange them on a baking sheet lined with parchment paper.
Baking
- Bake the biscuits in the preheated oven until golden brown, about 10 to 15 minutes as per package instructions.
- Once baked, remove the biscuits from the oven and allow them to cool on a wire rack.
Decorating
- Spread a generous layer of white icing over the top of each cooled biscuit.
- Place mini marshmallows at the top of the iced biscuits to resemble a melting snowman.
- Use chocolate chips to create eyes and a piece of candy corn for the nose.
- Decorate with icing for additional details like buttons, scarves, or hats.
Serving
- Arrange the decorated biscuits on a festive platter and serve at your holiday gathering.
Send me this recipe!
Just enter your email below and get it sent straight to your inbox!