
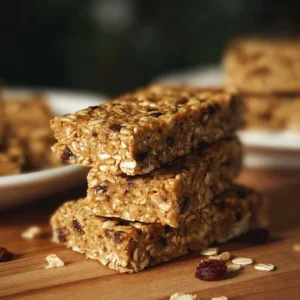
When you’re in search of a nutritious and delicious snack, look no further than homemade granola bars. Packed with wholesome ingredients, these bars offer the perfect balance of flavor and nutrition. You can whip them up in no time, customize them to your liking, and enjoy them as an on-the-go snack, a breakfast option, or a sweet treat. Let’s delve into why these homemade granola bars are a fantastic option and how you can easily make them at home.
Why We Love This Homemade Granola Bars Recipe
There’s something truly special about homemade granola bars. Not only can you tailor them to suit your taste buds, but you also have complete control over what goes into these delightful snacks. The combination of Medjool dates, chunky peanut butter, and hearty oats creates a texture and flavor that’s simply irresistible. Plus, they’re perfect for meal prep! You can make a batch and have them handy whenever hunger strikes. Whether you need a quick breakfast, a midday energy boost, or a sweet treat after dinner, these bars are versatile and satisfying.


Ingredients for Homemade Granola Bars
To create your perfect batch of homemade granola bars, gather the following ingredients:
- 1 cup Medjool dates, pitted
- 1/2 cup chunky peanut butter
- 1/4 cup walnuts, chopped
- 1/2 teaspoon ground cinnamon
- 1/4 teaspoon sea salt
- 1 1/2 cups quick rolled oats
- 1/4 cup honey
- 2 tablespoons dark chocolate chips
These ingredients combine to create a deliciously chewy and satisfying texture, all while keeping things simple and wholesome.
How to Make Homemade Granola Bars
Making your homemade granola bars is easier than you might think. Here’s a step-by-step guide to help you create the perfect snack.
Gather Your Ingredients: Start by assembling all the ingredients on your countertop. This way, you won’t miss anything while you’re preparing your bars.
Date Processing: In a food processor, add the pitted Medjool dates. Blend them until they become a thick and sticky paste, forming a large ball of ‘dough’. This acts as the sweet and binding element in your granola bars.
Combine Ingredients: Take the date ‘dough’ and place it in a large mixing bowl. Add the chunky peanut butter, chopped walnuts, ground cinnamon, sea salt, quick rolled oats, honey, and dark chocolate chips. Mix everything thoroughly by hand until well combined. It’s a bit sticky, but that’s part of the fun!
Prepare Your Baking Dish: Line an 8×8 baking dish with parchment paper, allowing some overhang on the sides for easy removal later.
Spread the Mixture: Transfer the granola bar mixture into the prepared dish. Use a spatula or your hands to press it down firmly, ensuring an even layer. The more tightly packed it is, the better it will hold together.
Chill Your Bars: Place the dish in the freezer and allow it to chill for 1 to 2 hours. The mixture should become firm but not rock-hard, which is perfect for cutting.
Cut into Bars: Once your granola mixture is set, remove it from the freezer. Lift it out of the dish using the parchment paper overhang and place it on a cutting board. Use a sharp knife to cut it into rectangles, squares, or any shape you prefer.
Serve or Store: Your homemade granola bars are now ready to enjoy! You can eat them immediately or store them for later.
How to Serve Homemade Granola Bars
You can enjoy your homemade granola bars in countless ways, making them a versatile snack choice. For breakfast, serve them alongside a dollop of yogurt or a handful of fresh fruit for a balanced meal. If you prefer a sweet treat, drizzle a bit of honey or maple syrup on top, along with a sprinkle of cinnamon for added flavor.
These bars make a fantastic post-workout snack as well. Just grab one on the go for a quick energy boost! You can even crumble them over your morning oatmeal or smoothie bowl, adding a delightful crunch that you’ll love.
Expert Tips: Homemade Granola Bars
Use Fresh Ingredients: Make sure your dates are fresh and not overly dried out, as they significantly affect the texture of your bars.
Experiment with Nuts and Seeds: If walnuts aren’t your favorite, feel free to substitute with almonds, pecans, or even seeds like pumpkin or sunflower.
Get Creative with Mix-Ins: Add dried fruits like cranberries, apricots, or raisins for a fruity twist. You can also include different types of nut butters or add a scoop of protein powder.
Don’t Skip Freezing Time: Allowing the bars to freeze is crucial for achieving the right texture. It helps them hold together when you cut them.
Cutting Technique: Use a warm knife to cut through the bars for cleaner edges. Simply run the knife under hot water and wipe it dry before cutting.
How to Store Homemade Granola Bars
Storing your homemade granola bars is easy. Place the cut bars in an airtight container. They can be kept in the refrigerator for up to one month, which makes them a perfect snack to prepare ahead of time. If you want to maintain their freshness, consider layering parchment paper between the bars.
If you find that you’ve made a large batch, you can also freeze individual bars. Wrap each one in plastic wrap and place them in a freezer-safe bag. When you’re ready to enjoy one, simply take it out and let it thaw at room temperature for a short while.
Variations of Homemade Granola Bars
One of the best aspects of making your homemade granola bars is that you can easily customize them to suit your tastes. Here are a few fun variations to try:
Chocolate Lovers: For a more decadent version, increase the amount of dark chocolate chips or add chocolate chunks to the mix before chilling.
Nut-Free Version: If you’re allergic to nuts, simply swap out peanut butter for sunflower seed butter and skip the walnuts.
Tropical Twist: Add shredded coconut and diced dried pineapple or mango for a taste of the tropics.
Protein Packed: Mix in a scoop of your favorite protein powder for an extra boost, especially helpful after workouts.
Spiced Versions: Experiment with spices, such as nutmeg or ginger, to give your bars unique flavor profiles.
FAQ About Homemade Granola Bars
What are homemade granola bars?
Homemade granola bars are nutritious snacks made primarily from wholesome ingredients, including oats, nuts, seeds, sweeteners, and toppings. They are healthy, customizable, and easy to make at home.
How long do homemade granola bars last?
When stored in an airtight container in the fridge, homemade granola bars can last for up to one month. For longer storage, you can freeze them for several months.
Can I use different sweeteners in my granola bars?
Absolutely! While this recipe uses honey, you can also try maple syrup, agave nectar, or brown rice syrup. Each will give your bars a slightly different flavor, so feel free to experiment.
Are homemade granola bars healthy?
Yes, they can be very healthy! By using whole ingredients and controlling the sugars and fats, you make a nutritious snack that can fit within a balanced diet.
Can I make these granola bars vegan?
Yes! To make your granola bars vegan, substitute honey with maple syrup or agave nectar. This way, you maintain the sweetness without using animal products.
Homemade Granola Bars
Equipment
- Food Processor
- Mixing Bowls:
- 8×8 baking dish
Ingredients
- 1 cup Medjool dates pitted
- 1/2 cup chunky peanut butter
- 1/4 cup walnuts chopped
- 1/2 teaspoon ground cinnamon
- 1/4 teaspoon sea salt
- 1 1/2 cups quick rolled oats
- 1/4 cup honey
- 2 tablespoons dark chocolate chips
Instructions
- Gather all ingredients on your countertop for easy access.
- In a food processor, blend the pitted Medjool dates until they form a thick paste.
- In a large mixing bowl, combine the date paste with chunky peanut butter, chopped walnuts, cinnamon, salt, quick rolled oats, honey, and dark chocolate chips. Mix until well combined.
- Line an 8×8 baking dish with parchment paper, leaving some overhang for easy removal.
- Transfer the granola mixture into the prepared dish and press it down firmly.
- Place the dish in the freezer for 1-2 hours until firm.
- Remove from the freezer and lift out using the parchment paper. Cut into bars.
- Enjoy immediately or store in an airtight container.
Send me this recipe!
Just enter your email below and get it sent straight to your inbox!