
You’re going to love how easy these baked Halloween donuts are. They’re soft, sweet, and made with basic ingredients you probably already have. No frying or fancy tools — just a donut pan, a quick batter, and a fun glaze. Decorate them with spooky white chocolate webs or colorful icing for a perfect Halloween treat.
Why We Love This Halloween Donuts
There’s so much to love about this recipe. First, it’s a fantastic way to celebrate Halloween with your family or guests without spending hours in the kitchen. The ingredients are simple, and the steps are straightforward, so even beginners can pull it off. You don’t need special equipment — just a donut pan and a few bowls.
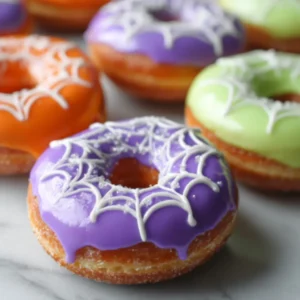
We also love how easy it is to customize. You can switch up the food coloring to match your Halloween theme — purple, green, orange — and go wild with the decorations. The white chocolate spiderwebs on top add just enough spooky flair without being complicated. Plus, baking instead of frying keeps your kitchen cleaner and the donuts a little lighter. Whether you’re baking with kids or preparing for a Halloween bash, this recipe adds joy to any spooky celebration.
Ingredients for Halloween Donuts
For the Donuts:
- 1 cup all-purpose flour
- 1/3 cup granulated sugar
- 1 teaspoon baking powder
- 1/2 teaspoon salt
- 2 tablespoons unsalted butter, melted
- 1 egg
- 1/3 cup + 1 1/2 tablespoons milk
- 1 teaspoon vanilla extract
For the Glaze and Decorations:
- 3 cups powdered sugar
- 1/4 cup milk (plus more if needed)
- 1 teaspoon vanilla extract
- Purple, orange, or green food coloring
- 6 oz white melting chocolate
- Piping bag
- Small round piping tip
- Optional: black food coloring gel pen
How to Make Halloween Donuts
You’ll begin by preheating your oven to 350°F. Grab a donut pan and lightly coat it with nonstick spray to ensure nothing sticks. Set it aside while you prepare your batter.
In a large mixing bowl, whisk together your dry ingredients — flour, granulated sugar, baking powder, and salt. Stir well so everything blends evenly.
In a smaller bowl, combine your wet ingredients: the melted butter, egg, milk, and vanilla extract. Whisk until smooth and consistent in texture.
Next, pour the wet mixture into the bowl with the dry ingredients. Stir everything together gently until just combined. Be careful not to overmix — you want the donuts light and soft, not dense or chewy.
Now it’s time to get that batter into the pan. You can either spoon it in or use a piping bag for more control. Fill each donut cavity about ¾ of the way full to allow room for rising.
Place the pan in the oven and bake the donuts for 8 to 10 minutes. They’re ready when a toothpick comes out clean or when the tops spring back lightly to the touch. Remove the pan and let the donuts sit for about 3 minutes, then carefully take them out and place them on a wire rack to cool.
While the donuts cool slightly, you can prepare the glaze. In a medium bowl, mix the powdered sugar, milk, and vanilla extract. If the glaze is too thick, add a little more milk, about ½ teaspoon at a time, until it reaches a smooth, pourable consistency.
Add your food coloring of choice and stir until the color is evenly blended. Set up a wire rack with parchment paper underneath to catch any drips.
Dip the top half of each donut into the glaze, then place them back on the rack to set.
While the glaze sets, melt the white chocolate in a microwave-safe bowl. Use 30-second increments and stir in between until fully melted. Fit your piping bag with a small round tip and fill it with the melted chocolate.
To create the spiderweb design, pipe 8 straight lines from the center of each donut outward like spokes on a wheel. Then, connect the lines by piping “U” shapes in between them, moving outward in a spiral pattern. You can also use a black gel pen to add web details if desired.
Let the decorations set before serving or storing. And just like that — spooky, delicious Halloween donuts!
How to Serve Halloween Donuts
These baked Halloween donuts are best served fresh, slightly warm, or at room temperature. Once the glaze and decorations are set, arrange them on a festive Halloween tray or dessert stand. You can even sprinkle some candy eyeballs or edible glitter for extra fun.
They pair wonderfully with hot drinks like cocoa, coffee, or a warm chai latte. If you’re hosting a party, they make a great addition to a dessert table alongside cookies and cupcakes. You could even use them as edible decorations by stacking them on a spooky Halloween tower. However you serve them, expect them to disappear fast!
Expert Tips: Halloween Donuts
To make sure your Halloween donuts turn out just right, keep these tips in mind:
- Don’t overmix the batter. Over-stirring makes baked goods tough. Mix until just combined for the softest texture.
- Don’t overfill the donut pan. Remember, they rise! Stick to filling them about ¾ full.
- Use a piping bag for easy filling. It’s faster and neater than using a spoon.
- Cool before glazing. Let the donuts cool before dipping them in glaze. If they’re too hot, the glaze will melt and slide off.
- Get creative with colors. You can use any Halloween shades — purple, orange, green — even black.
- Use good quality chocolate. It melts more smoothly and gives a cleaner web design.
How to Store Halloween Donuts (Baked)
If you have leftovers, store your baked Halloween donuts in an airtight container at room temperature for up to 2 days. Make sure the glaze has fully set before stacking to avoid smudging.
For longer storage, place them in the fridge, but be aware the texture may change slightly. To revive them, microwave for 10–15 seconds before serving. Avoid freezing glazed donuts, as the glaze can crack when thawed.
You can also prepare the batter ahead of time and store it in the fridge overnight. Just bake and decorate the next day for fresh results.
Variation of Halloween Donuts
This baked donut recipe is super flexible, so you can mix things up to match your personal style or holiday theme. For example, if you want a fall-inspired version, add a teaspoon of pumpkin spice or cinnamon to the batter. You could also mix in a little nutmeg for warmth.
Want to skip the spiderweb design? Try sprinkles, edible glitter, or candy eyes instead. You can even make a “monster face” by using food-safe markers and candies.
If Halloween isn’t the only holiday you’re baking for, change the food coloring to red and green for Christmas or pink and purple for Valentine’s Day. The base donut and glaze recipes are universal and easily adjusted for any occasion.
FAQ about Halloween Donuts
Can I make these Halloween donuts without a donut pan?
Yes, you can use a muffin tin and shape foil in the center of each cup to mimic the hole, but a donut pan gives the best shape and texture.
Are these Halloween donuts kid-friendly?
Absolutely! Kids love decorating them, and you can let them add sprinkles, candy eyes, or edible paint to make it extra fun.
Can I make these donuts ahead of time?
Yes. You can make the batter the night before or bake the donuts and decorate them the next day.
What’s the best food coloring to use?
Gel food coloring gives vibrant color without watering down the glaze. It’s ideal for strong Halloween shades.
Are baked donuts healthier than fried?
Baked donuts are typically lighter in fat and calories because they skip the oil. They’re a great alternative if you want a sweet treat without deep frying.
Can I add chocolate chips or other mix-ins to the batter?
Yes, but keep it minimal — about ¼ cup — so the donuts don’t get too dense.
Halloween Donuts
Ingredients
- 1 cup all-purpose flour
- 1/3 cup granulated sugar
- 1 teaspoon baking powder
- 1/2 teaspoon salt
- 2 tablespoons unsalted butter (melted)
- 1 large egg
- 1/3 cup milk (plus 1 1/2 tablespoons)
- 1 teaspoon vanilla extract
- 3 cups powdered sugar
- 1/4 cup milk (for glaze)
- 1 teaspoon vanilla extract (for glaze)
- to taste food coloring (purple, orange, or green)
- 6 oz white melting chocolate
- 1 piping bag
- 1 small round piping tip
- 1 black food coloring gel pen (optional)


Instructions
- Preheat your oven to 350°F (180°C) and lightly coat a donut pan with nonstick spray.
- In a large bowl, whisk together the flour, sugar, baking powder, and salt.
- In a separate bowl, combine the melted butter, egg, milk, and vanilla extract. Whisk until smooth.
- Pour the wet ingredients into the dry ingredients and stir gently until just combined.
- Fill each donut cavity about ¾ full with batter, then bake for 8 to 10 minutes until a toothpick comes out clean.
- Let the donuts cool for about 3 minutes in the pan before transferring them to a wire rack to cool completely.
- While cooling, prepare the glaze by mixing powdered sugar, milk, and vanilla extract. Adjust the consistency with more milk if needed.
- Add food coloring to the glaze and mix until well combined. Set up a wire rack with parchment paper underneath.
- Dip the top half of each donut into the glaze and place them back on the rack to set.
- Melt the white chocolate and pipe spiderweb designs on top of the glazed donuts.
Send me this recipe!
Just enter your email below and get it sent straight to your inbox!