When the holiday season approaches, the spirit of celebration fills the air, making it the perfect time to indulge in festive treats. One such delightful creation that captures the essence of the season is the Christmas Tree White Chocolate Bark. This treat is not only visually stunning but also incredibly simple to make. With its vibrant colors and rich flavors, it’s sure to be a hit at any holiday gathering or as a special gift for friends and family.
Why We Love This Christmas Tree White Chocolate Bark Recipe
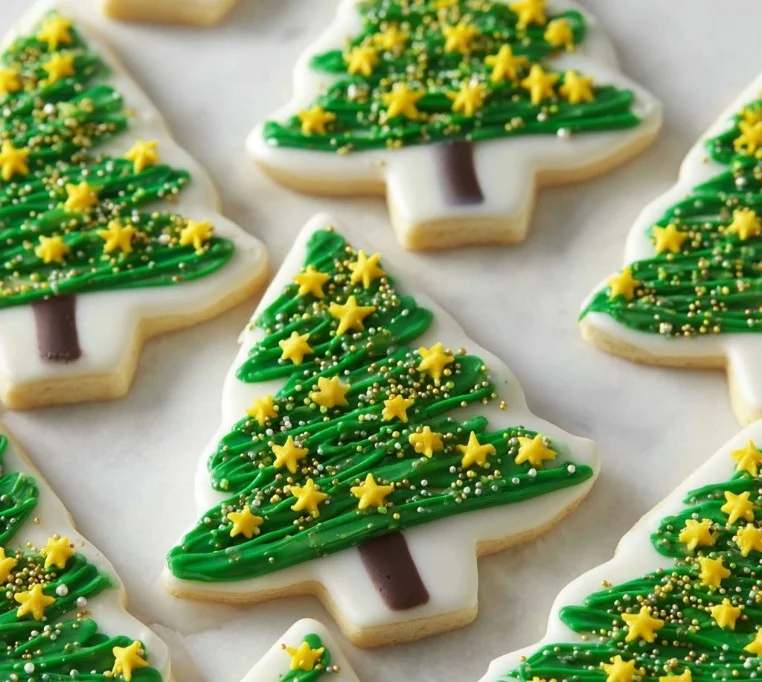
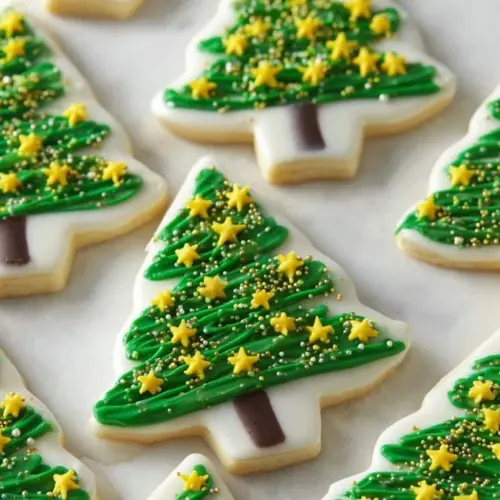
The Christmas Tree White Chocolate Bark is a favorite for many reasons. Firstly, its festive appearance brightens up any holiday event, making it a perfect centerpiece for your dessert table. The combination of white chocolate, green candy melts, and dark chocolate creates a delightful contrast that is as pleasing to the eyes as it is to the palate.
Moreover, this recipe encourages creativity. You can personalize the decorations, making each piece unique. Whether you go for a more elegant look with less decoration or a fun, bright approach with myriad colors, the options are endless!
Additionally, it’s a fun activity to include children in the kitchen. They’ll love helping you spread the melted chocolate, pipe the trees, and sprinkle the decorations. It’s a wonderful way to bond while creating something tasty, making memories that you’ll cherish long after the last piece is gone.
Lastly, the quality is exceptional, using high-quality chocolate melts and sprinkles gives you a finished product that tastes great and looks beautiful. With minimal effort, you have a delightful treat that captures the joy of the season!
Ingredients for Christmas Tree White Chocolate Bark
To make your own Christmas Tree White Chocolate Bark, you’ll need the following ingredients:
- 1 Bag white chocolate wafers
- 1 cup green candy melts
- 1/2 cup dark chocolate candy melts
- Small star sprinkles
- Pearlized nonpareil sprinkles
These ingredients come together to create a visually appealing and tasty treat. The white chocolate sets the base, while the vibrant green and dark chocolate add character, enhancing the recipe’s festive flair.
How to Make Christmas Tree White Chocolate Bark Directions
Creating your own Christmas Tree White Chocolate Bark is a straightforward process that combines a bit of melting, decorating, and some chilling time. Let’s dive into the steps so you can get started!
- Melt the white chocolate wafers: Begin by placing your white chocolate wafers in a microwave-safe bowl. Heat them in the microwave for about 4 to 5 minutes on 50% power, stirring every 30 seconds. This ensures that the chocolate melts evenly without burning.
- Prepare your baking sheet: While the white chocolate is melting, line a baking sheet with parchment paper. This will prevent the chocolate from sticking and make it easier to remove once it sets.
- Spread the melted chocolate: Once the white chocolate is fully melted, pour it into the center of your prepared baking sheet. Use a spatula to spread the chocolate evenly, creating a smooth surface of about 1/4 inch thickness.
- Add sprinkles: Before the chocolate begins to firm up, lightly sprinkle pearlized nonpareil sprinkles over the melted layer of white chocolate. This adds a beautiful sparkle to your bark, making it more festive.
- Chill the base layer: Place the baking sheet in the freezer for approximately 15 minutes to allow the chocolate to set completely.
- Melt the green and dark chocolate: While the white chocolate base is hardening, take your green and dark chocolate wafers and place them in separate microwave-safe bowls. Microwave each bowl for 2 to 3 minutes on 50% power, stirring every 30 seconds until both chocolates are melted and smooth.
- Prepare piping bags: Once melted, pour the green and dark chocolates into decorating bags. Trim a small tip off the end of each bag, ensuring you have control over the flow of chocolate.
- Pipe the Christmas trees: With the green chocolate, start piping small Christmas tree shapes on top of the set white chocolate bark. Then, take the dark chocolate and pipe on the trunks of each tree at the base.
- Add the finishing touches: To make your trees shine, sprinkle small star-shaped sprinkles on top of the green chocolate trees. This step adds a perfect finishing touch, bringing your festive design to life.
- Chill again: Return the finished bark to the freezer for an additional 15 minutes, allowing all melted chocolate to set firmly.
- Break the bark: Once completely chilled and set, carefully break apart the bark into pieces. Ensure that each piece features a colorful tree. It’s okay if they aren’t uniformly shaped; that adds to the handmade charm!
With these simple steps, you’ll have a gorgeous batch of Christmas Tree White Chocolate Bark ready to enjoy or share with loved ones.
How to Serve Christmas Tree White Chocolate Bark
Serving your Christmas Tree White Chocolate Bark is as easy as breaking it apart! Platter it up on a festive serving dish or arrange it in a decorative box for gifting. Here are a few ideas on how to serve it:
- As a dessert: Pair the bark with other holiday desserts like cookies, fudge, or peppermint treats on a dessert table. Its bright colors will catch the eye and add to the festive atmosphere.
- In gift bags: Create delightful gift bags by wrapping individual pieces of bark in cellophane tied with a festive ribbon. These make wonderful gifts for neighbors or as party favors.
- With a warm drink: Serve the bark alongside a warm cup of delicious spiced hot chocolate or your favorite dairy-free alternatives. This combination creates a cozy and inviting experience.
- On a cheese board: Consider incorporating the bark onto a charcuterie or cheese board. The sweet notes of the bark will perfectly complement savory cheeses, nuts, and fruits.
Remember, the presentation can elevate the charm of your bark. Add some holiday decorations around the serving dish for a complete festive display!
Expert Tips: Christmas Tree White Chocolate Bark
For the best results when making your Christmas Tree White Chocolate Bark, consider the following expert tips:
- Quality chocolate: Use good-quality white and dark chocolate melts for the best taste and texture. This will ensure that your final product is delicious and has that desired snap when broken apart.
- Stir often: When melting your chocolate, stirring every 30 seconds prevents burning and helps achieve a consistently smooth texture.
- Impress with detail: Feel free to experiment with the design of your trees. Use different piping techniques or even glitter edible dust to add more sparkle!
- Don’t rush the chilling: Allow the chocolate to set completely in the fridge or freezer before breaking it apart. This will prevent it from being mushy and ensure you get clean, beautiful pieces.
- Play with toppings: While star and nonpareil sprinkles are delightful, don’t hesitate to incorporate other festive toppings. Crushed candies or edible glitter can add unique touches!
By following these tips, your Christmas Tree White Chocolate Bark will be a stunning and delectable addition to your holiday festivities.
How to Store Christmas Tree White Chocolate Bark
To keep your Christmas Tree White Chocolate Bark fresh for longer, it’s important to store it correctly. Here’s how you can achieve that:
- Cool completely: Before storing, ensure that the bark has completely cooled and set. This prevents moisture from forming, which could affect its texture.
- Use an airtight container: Place the bark into an airtight container or a resealable plastic bag. This will protect your delicious creation from other scents in your kitchen or pantry.
- Store at room temperature: The bark can be stored at room temperature for up to two weeks, away from heat and sunlight. If you live in a particularly warm climate, you might want to consider refrigerating it.
- Avoid freezing: While you can freeze it, freezing can affect the texture of the chocolate and may result in a less desirable eating experience.
Following these storage tips will help maintain the freshness and quality of your Christmas Tree White Chocolate Bark, allowing you to enjoy it well into the holiday season.
Variations of Christmas Tree White Chocolate Bark
The beauty of the Christmas Tree White Chocolate Bark recipe is its versatility. Here are some variations you can try to mix things up:
- Different base chocolates: Instead of white chocolate, consider using milk chocolate or dark chocolate as a base. These alternatives will give your bark a completely different flavor profile.
- Add nuts: For a crunchy texture, sprinkle some chopped nuts such as almonds or walnuts on top of the melt chocolate before it sets. This adds a delicious twist and enhances the bark.
- Mint-infused bark: Add a few drops of peppermint extract to the white chocolate before pouring it onto the baking sheet for a delightful minty flavor.
- Royally colored trees: Use colored candy melts other than green, such as red or blue, to create a vibrant display of trees. These colors can be great for different holiday themes.
- Dried fruits: Consider adding dried fruits such as cranberries or apricots for a touch of natural sweetness and texture.
- Holiday-themed toppings: Change out the toppings for your bark seasonally. Instead of star sprinkles, you could use mini candy canes or holiday-themed chocolate decorations.
By trying these variations, you can create unique versions of Christmas Tree White Chocolate Bark that suit your taste and festivities best!
FAQs About Christmas Tree White Chocolate Bark
What is Christmas Tree White Chocolate Bark?
Christmas Tree White Chocolate Bark is a festive treat made by melting white chocolate and decorating it with green and dark chocolate to resemble Christmas trees. It’s a fun and delicious holiday confection.
Can I use regular chocolate instead of wafers?
Yes! You can use regular chocolate, but ensure you temper it properly to avoid any issues with texture when it sets.
How long does the Christmas Tree White Chocolate Bark last?
When stored properly in an airtight container at room temperature, the bark can last for up to two weeks.
Can I freeze Christmas Tree White Chocolate Bark?
While it is possible to freeze the bark, doing so may affect its texture. It’s best enjoyed fresh or within a couple of weeks of making it.
What are some creative ways to decorate the bark?
You can use various toppings, including nuts, colored candy melts, or dried fruits. Play with different decorations to make your bark unique!
Christmas Tree White Chocolate Bark
Equipment
- Baking Sheet
- Parchment Paper
- Microwave-Safe Bowls
- Piping Bags
Ingredients
- 1 bag White Chocolate Wafers
- 1 cup Green Candy Melts
- 1/2 cup Dark Chocolate Candy Melts
- Small Star Sprinkles For decoration
- Pearlized Nonpareil Sprinkles For decoration


Instructions
- Melt the white chocolate wafers in a microwave-safe bowl, heating at 50% power and stirring every 30 seconds until smooth.
- Line a baking sheet with parchment paper and spread the melted white chocolate evenly to about 1/4 inch thickness.
- Sprinkle pearlized nonpareil sprinkles over the melted white chocolate before it sets.
- Chill the baking sheet in the freezer for about 15 minutes to allow the chocolate to harden.
- Melt the green and dark chocolate candy melts in separate bowls, stirring every 30 seconds until smooth.
- Pour the melted green chocolate into a piping bag and pipe Christmas tree shapes on top of the set white chocolate.
- Pipe dark chocolate trunks at the base of each tree.
- Add small star sprinkles on top of the trees for decoration.
- Return the bark to the freezer for another 15 minutes to set completely before breaking into pieces.
Send me this recipe!
Just enter your email below and get it sent straight to your inbox!