
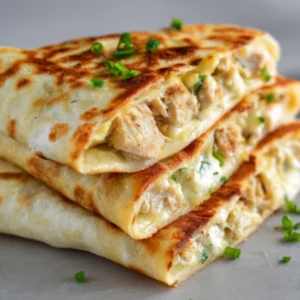
If you’ve been craving something that’s equal parts crispy, gooey, and satisfying, these cheesy garlic chicken wraps are about to become your go-to meal. They’re the kind of quick comfort food you can make without fuss, yet they deliver on flavor in a way that feels indulgent.
Why We Love This Cheesy Garlic Chicken Wraps Recipe
There’s a reason these wraps keep showing up on my lunch and dinner table—they just make sense. First, they’re incredibly fast to make, which means you can satisfy your hunger without spending hours in the kitchen. You don’t need fancy tools or hard-to-find ingredients—just a few pantry staples and some leftover chicken.
Second, they’re versatile. You can prepare them exactly as written, or you can adjust the filling to fit whatever you have in your fridge. Want them spicier? Add more hot sauce. Need a milder version for kids? Skip the heat and add extra cheese.
Finally, they’re satisfying in a way that makes you look forward to the next bite. The golden, crispy exterior paired with the rich, garlicky filling creates a texture and flavor combination that’s hard to beat. It’s comfort food without being heavy, and it’s a great way to use up leftovers in a creative way.
Ingredients About Cheesy Garlic Chicken Wraps
- 2 large tortillas (regular or low-carb/high-protein)
- 7 oz cooked chicken (about 200 grams), chopped – rotisserie works great
- 2 garlic cloves, minced or grated (adjust to taste)
- 2 tablespoons light mayonnaise
- 1 tablespoon light Greek yogurt or plain yogurt
- 2 teaspoons hot sauce (like Frank’s)
- ¼ teaspoon salt
- 3 oz grated cheese (about 90 grams, cheddar blend recommended)
- 1 green onion, chopped
- Olive oil spray
How to Make Cheesy Garlic Chicken Wraps
Making these wraps is straightforward, but the key is in how you layer and cook them. By following these steps, you’ll get a perfectly crispy outside with a soft, melty, flavorful inside every time.
Step 1: Prepare the filling
Start by chopping your cooked chicken into small, bite-sized pieces. If you’re using rotisserie chicken, this step will be even faster. Place the chicken into a medium mixing bowl, then add the minced garlic, mayonnaise, yogurt, hot sauce, and salt. Mix everything together until the chicken is evenly coated. The creamy mayo and yogurt help the garlic flavor spread evenly, while the hot sauce adds a subtle kick.
Step 2: Assemble the wraps
Lay a tortilla flat on your work surface. On the lower third of the tortilla, sprinkle about two tablespoons of cheese. This bottom layer of cheese will melt and act as a barrier, keeping the wrap from getting soggy. Spoon about two-thirds of a cup of the chicken mixture over the cheese. Add another tablespoon of cheese on top, then sprinkle with chopped green onion for a fresh bite.
Step 3: Fold and roll
Fold in the sides of the tortilla toward the center, then roll it up tightly from the bottom. This keeps all that cheesy goodness inside and ensures the wrap holds its shape when cooking.
Step 4: Cook the wraps
Heat a non-stick skillet over medium-high heat and spray it lightly with olive oil. Place the wraps seam-side down in the pan and cook for 3–4 minutes on each side until golden and crispy. Press them gently with a spatula for even browning. Covering the pan with a lid while cooking will help the cheese melt faster and warm the filling all the way through.
Step 5: Serve
Once the wraps are golden and crispy on all sides, remove them from the pan. Let them rest for a minute before slicing in half—this helps keep the filling from spilling out.
Optional air fryer method
If you prefer, cook the wraps in an air fryer at 375°F (190°C) for 6–8 minutes, flipping halfway through. You’ll get an equally crispy result without needing to stand over the stove.
Optional oven method
You can also bake the wraps at 400°F (200°C) for 10–12 minutes, flipping once. While this method is convenient, the wraps tend to be crispier when pan-fried or air-fried.
How to Serve Cheesy Garlic Chicken Wraps
These wraps are a complete meal on their own, but pairing them with the right sides can make your lunch or dinner even more satisfying. Serve them with a crisp garden salad, roasted vegetables, or a fresh cucumber and tomato mix for something light. If you want to keep it casual, they also go great with chips, pickles, or even a side of salsa for dipping.
For a more filling option, add a small bowl of soup alongside your wrap. Tomato soup pairs especially well with the cheesy, garlicky flavor. You could also cut the wraps into smaller pieces and serve them as appetizers for a gathering—they’ll disappear fast.
Expert Tips: Cheesy Garlic Chicken Wraps
- Use leftover chicken – Rotisserie chicken works beautifully for this recipe, but grilled or baked chicken also adds great flavor.
- Adjust the garlic – Fresh garlic gives a bold punch, but if you want something milder, try roasted garlic for a sweeter, softer taste.
- Double the recipe – These wraps reheat well, so making a few extra is a smart move for quick meals during the week.
- Seal the edges – Adding a little extra cheese at the seam will help glue the wrap together while cooking.
- Play with the cheese blend – Try mozzarella for a stretchier texture or pepper jack for extra heat.
How to Store Cheesy Garlic Chicken Wraps
If you have leftovers, store cooked wraps in an airtight container in the fridge for up to two days. To reheat, place them in a skillet over medium heat or in an air fryer for a few minutes until the outside is crispy again. Avoid microwaving if you can, as it tends to make the tortilla soft rather than crunchy.
If you want to plan ahead, make the chicken filling in advance and store it in the fridge for up to three days. You can also freeze just the filling for up to one month, then thaw it in the fridge overnight before using.
Variation of Cheesy Garlic Chicken Wraps
- Spicy Kick – Add jalapeños or use a spicier hot sauce for more heat.
- BBQ Twist – Swap hot sauce for BBQ sauce and use smoked cheddar for a smoky flavor.
- Mediterranean Style – Replace hot sauce with hummus, use feta cheese, and add chopped cucumber.
- Veggie-Packed – Add sautéed bell peppers, spinach, or mushrooms to the filling.
- Breakfast Wrap – Add scrambled eggs and a sprinkle of breakfast seasoning for a morning-friendly version.
FAQ About Cheesy Garlic Chicken Wraps
Can I make cheesy garlic chicken wraps ahead of time?
Yes. You can prepare the filling up to three days in advance, then assemble and cook the wraps when ready to eat.
What’s the best cheese for this recipe?
Cheddar blends work great, but mozzarella, provolone, or Monterey Jack are also delicious choices.
Can I freeze the wraps?
It’s best not to freeze the assembled wraps, as the tortilla may become soggy. However, you can freeze the filling for up to one month.
Are cheesy garlic chicken wraps healthy?
They can be part of a balanced meal, especially if you choose a whole-wheat or high-protein tortilla and control the cheese amount.
Can I use raw chicken instead of cooked chicken?
No, the chicken should be fully cooked before adding to the wrap to ensure safety and even cooking.
Cheesy Garlic Chicken Wraps
Equipment
- Skillet
- Baking Dish
- Air Fryer
Ingredients
- 2 large tortillas (regular or low-carb/high-protein)
- 7 oz. cooked chicken (about 200 grams), chopped; rotisserie works great
- 2 cloves garlic minced or grated (adjust to taste)
- 2 Tbsp. light mayonnaise
- 1 Tbsp. light Greek yogurt or plain yogurt
- 1 Tbsp. hot sauce (like Frank’s)
- 1/4 tsp. salt
- 3 oz. grated cheese (about 90 grams, cheddar blend recommended)
- 1 green onion chopped
- Olive oil spray


Instructions
- Chop cooked chicken into small, bite-sized pieces and place in a mixing bowl.
- Add minced garlic, mayonnaise, yogurt, hot sauce, and salt to the chicken. Mix until evenly coated.
- Lay a tortilla flat and sprinkle about 2 tablespoons of cheese on the lower third.
- Spoon about 2/3 cup of the chicken mixture over the cheese, add another tablespoon of cheese, and sprinkle with green onion.
- Fold the sides of the tortilla toward the center and roll tightly from the bottom.
- Heat a non-stick skillet over medium-high and spray with olive oil. Place the wraps seam-side down and cook for 3-4 minutes on each side until golden and crispy.
- Alternatively, cook in an air fryer at 375°F (190°C) for 6-8 minutes, flipping halfway through.
- Remove from heat, let rest for a minute, then slice in half and serve.
Send me this recipe!
Just enter your email below and get it sent straight to your inbox!