
Angel Cake is a timeless dessert that captivates your taste buds and brightens up any celebration. This light, fluffy cake is not only visually stunning but also perfectly balances sweetness and texture.
Why We Love This Angel Cake Recipe
There’s a special charm that comes with baking your own desserts, and this Angel Cake recipe makes the process accessible and enjoyable. The simplicity of the ingredients combined with the ease of preparation ensures that even novice bakers can create a fabulous cake. The bright colors of the batter not only make this dessert visually appealing but also add an element of fun to the baking experience.
Moreover, this cake is incredibly versatile. You can swap out the food coloring for different occasions or add fruit, chocolate, or nuts for additional flavor. The airy texture and sweetness perfectly complement a cup of tea or coffee, making it an excellent choice for gatherings or afternoon snacking. Ultimately, what makes this Angel Cake so beloved is its ability to bring people together, celebrate milestones, and create sweet memories.
Ingredients for Angel Cake
To create your very own Angel Cake, gather the following ingredients:
- 145 g Margarine or Butter (at room temperature)
- 145 g Caster Sugar
- 3 Free-range Eggs
- 1/2 tsp Vanilla Extract
- 230 g Self-raising Flour
- 1 tsp Baking Powder
- 2 tbsp Milk
- Pink & Yellow Food Colouring Gel
- 55 g Margarine or Butter (at room temperature, for icing)
- 110 g Icing Sugar
- Splash of Milk (for icing)
These simple ingredients come together to create a wonderful cake that’s light, flavorful, and visually stunning.
How to Make Angel Cake
Creating your Angel Cake is a straightforward process that begins with a few essential steps. To start, preheat your oven to 180°C (or 160°C for fan-assisted ovens, equivalent to Gas Mark 4). You’ll also want to line your tray bake tin with greaseproof paper to ensure an easy release after baking.
In a large mixing bowl, cream together the margarine or butter and caster sugar. Use a hand mixer or stand mixer to beat the mixture until it becomes light and fluffy. This step is crucial as it incorporates air, which contributes to the cake’s airy texture. Once fluffy, add the eggs one at a time, mixing well after each addition. This ensures that the eggs are properly incorporated into the mixture.
Next, stir in the vanilla extract to add a wonderful flavor to your cake. After that, sift the self-raising flour and baking powder over the wet ingredients. Gently fold the dry ingredients into the mixture until you achieve a smooth batter. Be careful not to over-mix, as this can result in a denser cake.
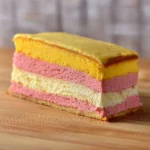
Once the batter is smooth, add the milk to help achieve a luscious consistency. Time to add some color! Divide the batter evenly into three bowls. Leave one bowl as is for a plain layer, while mixing small amounts of pink and yellow food coloring into the other two bowls. The goal is to create vibrant pastel layers for your cake.
Now that your batter is aptly colored, spread each colored batter into the prepared cake tin. You’ll want to layer them with the plain batter at the bottom and the colored batters on top. Bake in the preheated oven for about 20 to 25 minutes, or until the cake is risen and golden. A toothpick inserted in the center should come out clean, indicating that your cake is ready.
After baking, allow the cake to cool in the tin for a few moments before transferring it to a wire rack. It’s essential to let the cake cool completely before icing.
Now, to prepare the icing, in a separate bowl, cream together the butter/margarine, icing sugar, and a splash of milk until you achieve a light and fluffy consistency. Don’t rush this step; the fluffiness of your icing makes a big difference in texture and flavor.
Once the cake is cool, trim the edges to create a neat finish. Proceed to spread half of the buttercream icing on top of the yellow layer, carefully sandwiching the pink layer on top of it. Repeat this process with the pink layer and finish with the plain layer on top.
To finish your cake, you might want to pipe some additional icing on top or sprinkle some colorful decorations for that extra flair. Serve it with a smile, and enjoy the delightful masterpiece you’ve created.
How to Serve Angel Cake
Serving your Angel Cake is as delightful as making it. This cake shines brightest when presented with an aesthetic touch. You can opt for simple slices that showcase the beautiful layers, or go all out by adding fresh fruit, edible flowers, or a dusting of icing sugar on top for that extra pizzazz.
Angel Cake is incredibly versatile when it comes to pairings. It can be enjoyed with a cup of coffee or tea, making it an ideal treat for afternoon gatherings. You can also serve it with a dollop of whipped cream, a scoop of ice cream, or alongside a vibrant fruit coulis for a refreshing touch.
For special occasions, consider serving slices on colorful dessert plates, adding a sprig of mint for a pop of freshness. You might even present it on a beautiful cake stand to elevate your dessert table. The bright and cheerful colors of the cake will surely impress your guests and add a festive touch to any gathering.
Expert Tips for Making Angel Cake
- Room Temperature Ingredients: Ensure your butter or margarine and eggs are at room temperature for optimal mixing. This helps to create a smooth batter and an airy texture.
- Sifting Dry Ingredients: Always sift your flour and baking powder to eliminate lumps and ensure even distribution in your batter. This is key for achieving a light and fluffy cake.
- Gentle Mixing: When combining ingredients, use a folding motion to keep the air in the batter. Over-mixing can lead to a dense cake, which goes against the light, airy essence of an Angel Cake.
- Coloring the Batter: When adding food coloring, start with a small amount; you can always add more if needed. Aim for pastel shades to keep the cake light and visually appealing.
- Accurate Baking Time: Keep a close eye on your cake while baking. Ovens can vary, so start checking a few minutes before the recommended baking time to prevent overbaking.
How to Store Angel Cake
If you happen to have leftover Angel Cake, storing it correctly is essential to maintain its freshness. Allow the cake to cool completely, then wrap it tightly in cling film or store it in an airtight container. This will help retain moisture and prevent it from drying out.
You can keep the cake at room temperature if you plan to consume it within a few days. For longer storage, consider placing it in the refrigerator. Note that cold storage may alter the cake’s texture slightly, but it will still taste delicious.
If you want to extend its longevity even further, angel cakes freeze quite well. Slice the cake into individual portions and wrap each slice in cling film before placing them in a freezer bag. When you’re ready to indulge, simply thaw the cake at room temperature, and it’ll taste as fresh as the day you made it.
Variations of Angel Cake
While the classic Angel Cake is a delight on its own, one of the joys of baking is experimenting with flavors and styles. Here are a few fun variations you can try:
- Lemon Angel Cake: Add zest from a fresh lemon to the batter for a bright citrus flavor. You can also drizzle a lemon glaze over the finished cake for an extra zing.
- Chocolate Angel Cake: Substitute a small portion of the flour with unsweetened cocoa powder to create a chocolate-flavored cake. Top with chocolate ganache for an indulgent treat.
- Fruit-Infused Angel Cake: Consider folding small pieces of fresh berries into the batter for a burst of flavor. Strawberries, raspberries, or blueberries are great choices.
- Nutty Variation: Incorporate finely chopped nuts, such as almonds or walnuts, into the batter for added texture and a rich flavor profile.
- Spiced Version: Add a pinch of cinnamon or nutmeg for a warm, cozy flavor, perfect for fall celebrations.
Frequently Asked Questions about Angel Cake
What is Angel Cake?
Angel Cake is a light and fluffy dessert traditionally made with egg whites, flour, sugar, and butter or margarine. It has a delicate texture, making it a perfect cake for celebrations or tea time.
How do I get my Angel Cake to rise properly?
To achieve a good rise, ensure you cream the butter and sugar until airy, fold in dry ingredients gently, and avoid overmixing. Accurate baking times and temperatures also contribute significantly to how well your cake rises.
Can I substitute ingredients in an Angel Cake?
Yes! While certain key ingredients are essential, you can experiment with flavors and add-ins. For instance, using different extracts or incorporating fruits can give you a unique variation.
How should I store leftover Angel Cake?
Store leftover cake in an airtight container or wrapped in cling film at room temperature for a few days. For longer storage, slices can be frozen for future enjoyment.
Can I decorate my Angel Cake?
Absolutely! Angel Cake is a great canvas for creativity. You can decorate it with icing, fruit, nuts, or edible flowers to make it visually stunning.
Angel Cake
Ingredients
For the cake
- 145 g Margarine or Butter (at room temperature)
- 145 g Caster Sugar
- 3 pieces Free-range Eggs Room temperature
- 1/2 tsp Vanilla Extract
- 230 g Self-raising Flour Sifted
- 1 tsp Baking Powder Sifted
- 2 tbsp Milk To achieve desired batter consistency
- Pink & Yellow Food Colouring Gel For coloring the batter
For the icing
- 55 g Margarine or Butter (at room temperature, for icing)
- 110 g Icing Sugar
- splash Milk (for icing)


Instructions
Preparation
- Preheat your oven to 180°C (or 160°C for fan-assisted ovens, Gas Mark 4) and line your tray bake tin with greaseproof paper.
- In a large mixing bowl, cream together the margarine or butter and caster sugar until light and fluffy.
- Add the eggs one at a time, mixing well after each addition.
- Stir in the vanilla extract.
- Sift the self-raising flour and baking powder over the wet ingredients and gently fold until smooth.
- Add the milk to achieve a luscious consistency.
- Divide the batter into three bowls. Leave one plain and mix small amounts of pink and yellow food coloring into the others.
Baking
- Layer the batters in the prepared tin with the plain batter at the bottom and colored batters on top.
- Bake for 20 to 25 minutes or until risen and golden. A toothpick should come out clean when inserted.
- Allow the cake to cool in the tin briefly before transferring it to a wire rack to cool completely.
Icing and Serving
- Prepare the icing by creaming together the butter/margarine, icing sugar, and a splash of milk until fluffy.
- Trim the cooled cake to create a neat finish, and spread half of the buttercream icing on the yellow layer.
- Sandwich the pink layer on top and repeat with the remaining layers.
- Pipe additional icing on top or sprinkle decorations as desired.
- Serve with a smile, enjoying the delightful masterpiece you've created.
Send me this recipe!
Just enter your email below and get it sent straight to your inbox!