
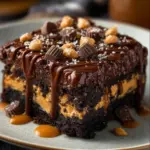
If you’re a fan of rich chocolate cake combined with the irresistible flavors of peanut butter and cream cheese, then Reese’s Chocolate Peanut Butter Earthquake Cake is bound to become your new dessert obsession. This cake captures the essence of indulgence, showcasing layers of moist chocolate cake that beautifully meld with creamy peanut butter filling and a rich mix of chocolate chips. Perfect for occasions from casual gatherings to festive celebrations, this dessert shines on any table, promising a delightful experience with every slice.
Why We Love This Reese’s Chocolate Peanut Butter Earthquake Cake Recipe
There’s something about Reese’s Chocolate Peanut Butter Earthquake Cake that makes it truly special. The combination of chocolate and peanut butter evokes nostalgia, reminding many of their favorite childhood candies. This cake not only looks appealing with its alluring layers and toppings but also brings an explosion of flavors that balances sweetness with a nutty depth. Whether you’re cooking for family, friends, or simply indulging in a treat for yourself, this cake offers comfort and satisfaction. Plus, with simple ingredients and straightforward instructions, you can whip it up easily, making it a beloved choice for bakers of all skill levels.
Ingredients about Reese’s Chocolate Peanut Butter Earthquake Cake
To create this delicious dessert, gather the following ingredients:
List of ingredients with measurements
- 1 box chocolate cake mix
- 1 cup water
- 1/2 cup vegetable oil
- 3 large eggs
- 1 cup creamy peanut butter
- 8 oz cream cheese, softened
- 1 cup powdered sugar
- 1 cup chocolate chips
- 1/2 cup chopped peanuts (optional)
How to Make Reese’s Chocolate Peanut Butter Earthquake Cake Directions
Creating your Reese’s Chocolate Peanut Butter Earthquake Cake is a straightforward and enjoyable process. Begin by preheating your oven to 350°F (175°C) and greasing a cake pan. This preparation ensures your cake comes out easily once baked.
In a large mixing bowl, gather the chocolate cake mix, water, vegetable oil, and eggs. Combine these ingredients thoroughly by mixing with a whisk or an electric mixer until you achieve a smooth batter. This rich chocolate base forms the backbone of your cake, providing depth and moisture.
Next, pour half of the cake batter into your prepared cake pan. This is where the magic begins. In another bowl, beat together the creamy peanut butter, softened cream cheese, and powdered sugar. Mix these until they’re well-blended and smooth. This peanut butter mixture will create a luscious layer that contrasts beautifully with the chocolate.
Spoon this creamy filling over the chocolate cake batter evenly, taking care to spread it gently so it covers the cake base. Now, pour the remaining chocolate batter over the peanut butter layer. This layered approach is what gives the cake its “earthquake” appearance once baked.
Before placing your cake in the oven, sprinkle a generous amount of chocolate chips and, if you choose, chopped peanuts on top. The chocolate chips will melt and blend into the cake, while the peanuts add a delightful crunch and extra flavor.
Bake in the preheated oven for about 40-45 minutes, or until a toothpick inserted into the center comes out clean. Keep an eye on it during the last few minutes to avoid overbaking. Once done, allow the cake to cool in the pan before transferring it to a wire rack. This cooling period is crucial as it allows the flavors to settle, making every bite simply irresistible.
How to Serve Reese’s Chocolate Peanut Butter Earthquake Cake
Serving your Reese’s Chocolate Peanut Butter Earthquake Cake is a joyous occasion in itself. Once cooled, cut the cake into generous slices, revealing the delightful layers of chocolate and peanut butter. You can enjoy it plain, or elevate your dessert experience by adding a scoop of vanilla ice cream or a dollop of whipped cream on top. The coolness of ice cream complements the warmth of the cake brilliantly, creating a contrast that pleases the palate.
For an even richer experience, consider drizzling some chocolate sauce or melted peanut butter over the slices before serving. If you’re wishing to impress your guests, serve the cake with a cup of hot coffee or a glass of milk. The combination of warm cake with cold beverages creates a harmony that completes your dessert presentation.
If there are leftovers (which is often unlikely), this cake can be enjoyed the next day, retaining its incredible flavors even after being stored. Whether for a birthday party, holiday gathering, or simply a weekend treat, this cake will surely delight everyone.
Expert Tips: Reese’s Chocolate Peanut Butter Earthquake Cake
To enhance your baking of the Reese’s Chocolate Peanut Butter Earthquake Cake, consider the following expert tips:
- Quality Ingredients Matter: Using high-quality cocoa powder and chocolate chips can significantly influence the taste of your cake, making it even more decadent.
- Room Temperature Ingredients: When baking, ensure that your eggs and cream cheese are at room temperature. This helps everything mix together more uniformly, leading to a better cake texture.
- Don’t Overmix: While it’s essential to combine your ingredients well, avoid overmixing the batter as this can lead to a dense cake.
- Cool Completely: Allow the cake to cool completely before slicing. This prevents the layers from sticking together and enhances the overall appearance when served.
- Experiment with Toppings: Feel free to get creative with your cake toppings. Adding crushed Reese’s pieces or a sprinkle of sea salt can give an extra flavor punch.
By following these simple tips, you can elevate your cake-baking skills and create a dessert that everyone will rave about.
How to Store Reese’s Chocolate Peanut Butter Earthquake Cake
Proper storage of your Reese’s Chocolate Peanut Butter Earthquake Cake is essential to maintain its fresh flavors and moist texture. If you find yourself with leftovers, allow the cake to cool completely before storing it. Cover the cake with plastic wrap or aluminum foil, or you can place it in an airtight container to safeguard against drying out.
If you plan to enjoy it over several days, refrigerate the cake, as it contains cream cheese. Properly stored, the cake can last about 5-7 days in the fridge. If you want to preserve it for longer, consider freezing it. Wrap individual slices tightly in plastic wrap and then place them in a freezer-safe bag. This method allows for easy thawing later. When you’re ready to enjoy, simply remove a slice from the freezer and let it thaw at room temperature for a bit before indulging.
Variation of Reese’s Chocolate Peanut Butter Earthquake Cake
While the original recipe for Reese’s Chocolate Peanut Butter Earthquake Cake is already exceptional, there are fun ways to put a spin on it. Here are some variations to consider:
- Nut-Free Version: If you need a nut-free alternative, replace the creamy peanut butter with sunflower seed butter. It mimics the flavor while avoiding peanuts entirely.
- Chocolate Peanut Butter Swirl: Instead of layering, you can create a swirl effect by dropping spoonfuls of the peanut butter mixture into the chocolate batter and using a knife to swirl it gently.
- Add Extra Crunch: For enthusiasts of texture, include crushed Oreos or graham crackers in the base or as a topping to add an exciting crunch.
- Flavored Cream Cheese: Try using flavored cream cheese, such as vanilla or cinnamon, to add a new layer of flavor to your cake.
- Different Chips: Experiment with white chocolate chips or even butterscotch chips in addition to the chocolate chips for a fun twist on the classic.
These variations can transform this dessert into something uniquely yours while still holding onto its core deliciousness.
FAQ
What makes Reese’s Chocolate Peanut Butter Earthquake Cake unique?
Reese’s Chocolate Peanut Butter Earthquake Cake stands out because of its layered design that fuses rich chocolate with creamy peanut butter and cream cheese. This combination provides both a delightful taste and texture, making it a show-stopping dessert.
How do I make sure my cake rises properly?
To ensure your cake rises perfectly, make sure your baking powder is fresh, and don’t skip the step of properly mixing the ingredients. Also, avoid overmixing, as it can produce a dense cake.
Can I make this cake ahead of time?
Yes! You can bake this cake a day in advance. Just make sure to store it properly to maintain freshness. You can also freeze it for longer storage.
Can I use a homemade cake mix instead of a store-bought one?
Absolutely! If you prefer to use a homemade chocolate cake recipe, feel free to substitute the box mix with your favorite homemade chocolate cake recipe, keeping the other directions the same.
What’s the best way to serve this cake?
You can serve this cake with a scoop of vanilla ice cream, whipped cream, or even a drizzle of chocolate sauce. It’s also delicious on its own, making it versatile for any occasion.
Reese’s Chocolate Peanut Butter Earthquake Cake
Ingredients
For the cake base
- 1 box chocolate cake mix
- 1 cup water
- 1/2 cup vegetable oil
- 3 large eggs Should be at room temperature
For the peanut butter filling
- 1 cup creamy peanut butter
- 8 oz cream cheese, softened Should be at room temperature
- 1 cup powdered sugar
Toppings
- 1 cup chocolate chips For sprinkling on top
- 1/2 cup chopped peanuts Optional


Instructions
Preparation
- Preheat your oven to 350°F (175°C) and grease a cake pan.
- In a large mixing bowl, combine chocolate cake mix, water, vegetable oil, and eggs. Mix until smooth using a whisk or electric mixer.
Layering
- Pour half of the cake batter into the prepared cake pan.
- In another bowl, beat together creamy peanut butter, softened cream cheese, and powdered sugar until smooth.
- Spoon the peanut butter mixture evenly over the chocolate batter.
- Pour the remaining chocolate batter over the peanut butter layer.
- Sprinkle chocolate chips and optional chopped peanuts on top.
Baking
- Bake in the preheated oven for 40-45 minutes, or until a toothpick inserted comes out clean.
- Allow the cake to cool in the pan before transferring it to a wire rack.
Serving
- Cut the cooled cake into generous slices and serve plain, with ice cream, or drizzled with chocolate sauce.
Send me this recipe!
Just enter your email below and get it sent straight to your inbox!