The holiday season is synonymous with festivities, gatherings, and, of course, delightful treats! Among the many delightful options to celebrate the joy of Christmas, Layered Christmas Jello Cups stand out aas a colorful and exciting dessert perfect for holiday parties, family gatherings, or just to enjoy at home. This delightful treat captures the essence of the season with its vibrant colors and refreshing flavors while being simple enough for anyone to prepare.
Why We Love This Layered Christmas Jello Cups Recipe
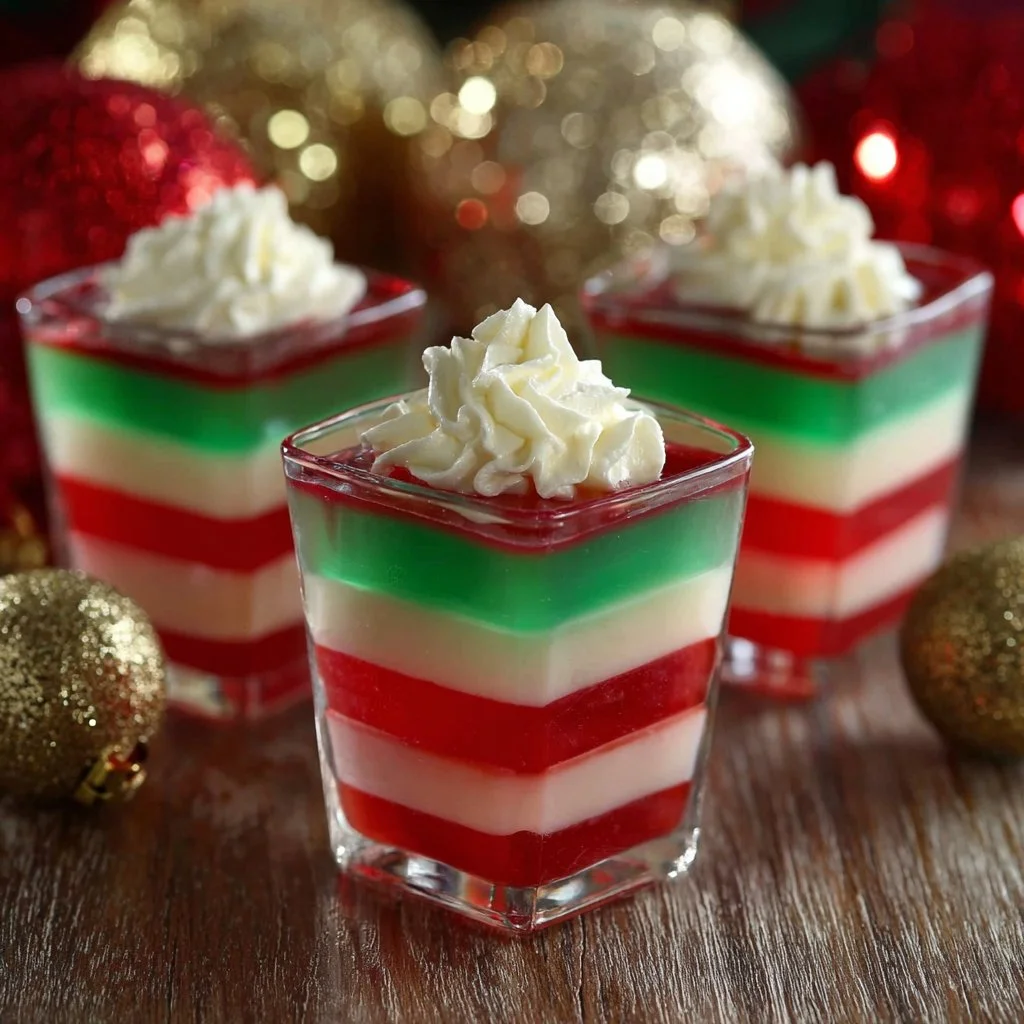
The first thing you will notice about Layered Christmas Jello Cups is their captivating appearance. The bright red and green layers bring a festive vibe to any holiday table. But they are not just a pretty face; this dessert is incredibly easy to make, making it ideal for both novice and seasoned cooks. All you need are a few simple ingredients and a bit of time for chilling, and you can create a delightful treat that will have everyone coming back for seconds.
Moreover, the playful nature of jello cups allows you to get creative with your presentations. Whether you serve them in small cups, glasses, or even festive-themed containers, you can make this dessert uniquely yours. Layering jello and yogurt not only enhances the flavor but adds a delightful texture contrast that everyone will enjoy. The simplicity of the recipe means you can also involve your kids in the kitchen, making it a wonderful family bonding experience over the holidays.
Now, let’s check out the ingredients you’ll need to get started on your Layered Christmas Jello Cups.
Ingredients for Layered Christmas Jello Cups
To prepare these festively flavored jello cups, gather the following ingredients:
- 4 small boxes (3 oz each) jello: 2 boxes of cherry flavor and 2 boxes of lime flavor or any green and red jello flavors you prefer.
- 2 cups vanilla yogurt: This will add a creamy layer to your jello.
- Whipped cream for topping (optional): For an extra layer of deliciousness.
With these simple ingredients, you can impress everyone during the festive season. Let’s move on to the directions so you can make these delightful dessert cups!
How to Make Layered Christmas Jello Cups Directions
Creating your layered jello cups is a fun process that involves a few straightforward steps. Follow these directions carefully, and you will have a beautifully layered dessert ready to enjoy!
- Prepare the first layer: Begin by bringing 1 cup of water to a boil. Once boiling, add the contents of one box of cherry jello and stir until it is completely dissolved. This is where the fun begins; you can enjoy the bright red color of the mixture as it comes together.
- Divide the mixture: Once the jello is fully dissolved, divide it into two equal halves. Take one half and mix in ½ cup of vanilla yogurt, stirring gently until everything is well combined. This mixture will create a lovely creamy layer.
- Set the yogurt layer: Pour the yogurt-jello mixture into your serving cups or dishes, filling them up to a suitable height. Once filled, place them in the refrigerator for about 20-30 minutes or until the layer is set. Checking the consistency is vital to ensure the layers don’t mix.
- Prepare for the next layer: For the second half of the reserved cherry jello mixture, add 3 tablespoons of water to help dilute it slightly. Set this mixture aside while you wait for the yogurt layer to firm up.
- Add the next layer: After the yogurt layer has set correctly, carefully pour the reserved cherry jello layer on top. Again, place the cups back in the refrigerator and let them chill until set.
- Repeat with lime jello: Next, repeat the previous steps for the lime jello. Boil another cup of water, dissolve the lime jello, divide, and mix half with yogurt. Pour that mixture into the cups once the previous layer is set.
- Build more layers if desired: If your cups allow, you can repeat the layering process—just ensure that each layer is entirely set before adding the next.
- Finish with whipped cream: Before serving, you can top your layered jello cups with a dollop of whipped cream for a delightful finishing touch if desired.
With these easy steps, your Layered Christmas Jello Cups will be ready to impress. Now, let’s explore some ideas on how to serve them!
How to Serve Layered Christmas Jello Cups
Serving Layered Christmas Jello Cups is as much about presentation as it is about enjoyment. Here are some fun and festive ways to showcase your creation:
- Individual servings: Since these jello cups are often made in small individual dishes or cups, they are perfect for serving. Arrange them on a large platter or a festive serving tray, and watch everyone gravitate towards these colorful delights.
- Garnish creatively: You can add festive touches like crushed peppermint candy, sprinkles, or small Christmas-themed decorations on top of the whipped cream to enhance their visual appeal.
- Perfect for gatherings: These cups can easily become a highlight at your holiday parties. Set up a dessert table with other treats alongside your jello cups, giving guests various options to choose from.
- Cute containers: Consider using clear plastic cups, mason jars, or themed holiday glasses to add a unique flair to your dessert presentation. Clear containers allow the layers to shine, making them visually enticing.
Layered Christmas Jello Cups are a delightful dessert that everyone will love to dive into. Now, let’s go over some expert tips to make your jello cups even better!
Expert Tips for Layered Christmas Jello Cups
- Allow enough setting time: Be patient and ensure each layer is fully set before adding the next. This step is crucial; it prevents the layers from mixing and helps achieve that beautiful layering effect.
- Chill your yogurt: If you take your yogurt out of the fridge right before mixing, it will be cooler, helping the jello set faster when combined.
- Mix gently: When you’re combining the yogurt with the jello, mix gently to maintain the layers. Stirring too vigorously could cause the yogurt to break down and lose its creaminess.
- Experiment with flavors: Don’t be afraid to try different flavors or colors of jello! You could use blue raspberry and lemon for a unique combination or go with other festive colors for added vibrancy.
- Add layer thickness wisely: If you prefer thicker or thinner layers, you can adjust the amounts used in each layer. Just ensure that everything remains proportionate so that the cups maintain structure.
Armed with these tips, you’re ready to tackle your Layered Christmas Jello Cups like a pro. Now, let’s learn how to store any leftovers.
How to Store Layered Christmas Jello Cups
If you find yourself with extra Layered Christmas Jello Cups after your holiday festivities, here’s how to store them properly:
- Refrigerate: Keep your jello cups in the refrigerator to maintain their freshness. Cover them with plastic wrap or lids to prevent any odor absorption or drying out.
- Consume within a week: It’s best to enjoy your Layered Christmas Jello Cups within 5-7 days for optimal flavor and texture.
- Avoid freezing: It’s best not to freeze jello cups, as this can change their consistency and ruin the layers.
Storing your layered jello cups correctly, you can enjoy the sweetness of the holidays long after the celebrations end. Now, let’s discuss some fun variations you can try.
Variations of Layered Christmas Jello Cups
One of the best parts of making Layered Christmas Jello Cups is that you can customize them to suit your taste or make them appealing to a broader audience. Here are some variations to consider:
- Different flavors: Instead of using only cherry and lime, experiment with other flavor combinations like strawberry and kiwi or orange and grape for a vibrant mix that’s sure to please everyone.
- Add fruit layers: Incorporate pieces of fruit in your layers. Chopped strawberries, blueberries, or sliced bananas can add flavor, texture, and visual appeal to your cups.
- Use flavored yogurt: For added zest, switch out regular vanilla yogurt for flavored yogurt, such as berry or citrus varieties, to enhance the taste even more.
- Create a spooky Halloween version: If you want to adapt this recipe for other occasions, you can make it spooky by using black and orange jellos for Halloween, layering in ghost-shaped candies, or topping with gummy worms.
- Make it a treat for adults: Consider adding a splash of flavored syrups to suit adult palettes, lagging with festive shots or creating a themed punch in cups for a holiday gathering.
You can explore these variations to keep things exciting and ensure that your Layered Christmas Jello Cups are always a crowd-pleaser, no matter the occasion.
FAQs About Layered Christmas Jello Cups
What are Layered Christmas Jello Cups?
Layered Christmas Jello Cups are festive desserts made by layering different flavors of jello and creamy yogurt. The vibrant colors and flavors make them a popular treat during the holiday season.
How can I ensure my jello layers do not mix?
Allow each layer to set completely before adding the next. This way, you can create beautiful, distinct layers without any mixing.
Can I use other jello flavors?
Absolutely! Feel free to experiment with any combinations of jello flavors you enjoy. The key is to choose colors that will complement each other visually.
How long does it take to make Layered Christmas Jello Cups?
The active preparation time is relatively short, but consider the chilling time for each layer, which can take a few hours in total. Plan for at least a couple of hours for the dessert to set correctly.
Can kids help make these jello cups?
Yes! Layered Christmas Jello Cups are an easy and fun project for children to assist with. They will enjoy pouring the jello and yogurt layers and coming up with creative ideas for layering.

Layered Christmas Jello Cups
Equipment
- Mixing Bowls:
- Small Cups or Glasses
- Whisk
- Refrigerator
Ingredients
- 4 small boxes (3 oz each) Jello 2 boxes cherry flavor and 2 boxes lime flavor (or any green and red flavors)
- 2 cups Vanilla Yogurt For creamy layer
- Whipped cream For topping Optional


Instructions
- Boil 1 cup of water, dissolve one box of cherry jello, and stir until fully dissolved.
- Divide the mixture in half. Mix one half with ½ cup vanilla yogurt until well combined.
- Pour the yogurt-jello mixture into serving cups and refrigerate for 20-30 minutes until set.
- Add 3 tablespoons of water to the remaining cherry jello, then pour this layer over the set yogurt layer.
- Refrigerate until set, then repeat the process for the lime jello.
- Finish with whipped cream on top before serving, if desired.
Send me this recipe!
Just enter your email below and get it sent straight to your inbox!