
Creating your own DIY Peppermint Candy Spoons is a delightful and crafty way to add a festive touch to any holiday event. These sweet, peppermint-infused spoons are not just visually appealing; they also bring a unique flavor to your favorite hot beverages. Whether you plan to enjoy them lazily on a cozy evening or share them with friends as holiday gifts, you’ll find that these easy-to-make spoons are a treat to both make and eat. Perfect for stirring cocoa, coffee, or even eggnog, these spoons capture the flavor of the season in every bite.
Why We Love DIY Peppermint Candy Spoons
There are many reasons why DIY Peppermint Candy Spoons are a favorite among many. They are not only delicious but also bring an element of fun to your holiday drinks. The burst of peppermint flavor enhances beverages, turning the simplest cup of hot chocolate into something truly special.
Additionally, the aesthetic appeal of these candy spoons makes them a wonderful decoration for your holiday table. They add a splash of color and creativity, making your festivities even more memorable. Creating these spoons can be a delightful family activity, bringing loved ones together in the kitchen as you crush, mold, and decorate.
Ingredients for DIY Peppermint Candy Spoons
To create your own set of charming peppermint spoons, you will need the following ingredients:
- 1 bag of Starlight Peppermint Candy
- 1 bag of Wilton Candy Melts
- Holiday Sprinkles
This list makes it straightforward and manageable. Gather your ingredients, and you’re ready to embark on your candy-making adventure.
How to Make DIY Peppermint Candy Spoons Directions
Making DIY Peppermint Candy Spoons is a fun and rewarding process. Here’s how to do it step by step:
- Preheat your oven: Start by preheating your oven to 300 degrees Fahrenheit. This temperature is ideal for melting the peppermint candies without burning them.
- Prepare the peppermint: Take your bag of Starlight Peppermint Candy and place it in a ziplock bag. Use a rolling pin or a heavy object to crush the candies into fine pieces. Be sure to get the peppermint finely crushed, as larger pieces will not melt properly.
- Fill the spoon mold: Using a teaspoon, begin to fill your spoon-shaped mold with the crushed peppermint. As you do this, make sure to pack the peppermint tightly and heap a little extra at the top and neck of the spoon. This extra will help prevent breakage once the spoons cool.
- Melt the peppermint: Place the filled spoon mold into your preheated oven. Allow the mixture to melt completely for about 10 minutes, keeping a close eye on it to avoid any burning. If you notice the melted mixture looks thin or if the shape seems to be collapsing, feel free to add more crushed peppermint to the mold.
- Cool down: Once the peppermint has fully melted, remove the mold from the oven. Allow it to cool down completely before attempting to take the spoons out. This cooling process is essential to ensure that the spoons hold their shape.
- Unmold the spoons: After the mixture has cooled and hardened, gently remove the spoons from the mold. Take your time to prevent any breakage.
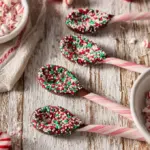
- Optional decoration: If you wish to add a special touch, melt the Wilton Candy Melts according to the package instructions. Dip the spoon ends of your peppermint spoons into the melted chocolate and then into a bowl filled with holiday sprinkles. This adds a delightful crunch and a pop of color to your spoons. Place them on a piece of wax paper to dry.
And there you have it! Your DIY Peppermint Candy Spoons are ready to be admired and enjoyed.
How to Serve DIY Peppermint Candy Spoons
Serving your DIY Peppermint Candy Spoons can be as creative as making them. Here are some delightful ways to present your candy spoons:
- Hot Beverages: The most common use for these spoons is to serve them alongside hot cocoa, coffee, or tea. Simply place a candy spoon in the cup, allowing the peppermint to melt and stir into the drink, creating a sweet and refreshing flavor.
- Gift Giving: These spoons make lovely homemade gifts. Bundle a few together in clear bags, tie them with festive ribbons, and add a tag. They’re perfect for teachers, neighbors, or anyone you wish to spread holiday cheer to.
- Table Decorations: Add a few peppermint candy spoons to your holiday table setting. They can be placed upright in mugs or nestled into dessert plates, creating eye-catching displays.
- Party Favors: If you’re hosting a holiday party, consider giving your guests a candy spoon as a parting gift. Place them in a decorative bowl or have individual spoons set out for guests to take home.
These spoons are versatile and can elevate the experience of any gathering.
Expert Tips: DIY Peppermint Candy Spoons
To ensure your DIY Peppermint Candy Spoons come out perfectly, here are some expert tips:
- Choose the right candies: Starlight Peppermint Candies are ideal because they melt well and hold their shape when cooled. If you can find other colorful peppermint candies, don’t hesitate to experiment.
- Keep an eye on the oven: When melting the candies, watch them closely. It is easy for candy to go from perfectly melted to burnt quickly.
- Avoid humidity: Make sure the day you are making these spoons is dry. Humidity can affect how well the candies melt and set.
- Be gentle with unmolding: When taking the spoons out of the mold, apply gentle pressure. If a spoon is stubborn, you can place it briefly in the refrigerator to help firm it up before trying again.
- Experiment with flavors: If you want to mix it up, consider adding flavors beyond peppermint. For example, crushed candy canes or using different types of melting chocolates can produce delicious variations.
How to Store DIY Peppermint Candy Spoons
To keep your peppermint spoons fresh and prevent them from becoming sticky, store them securely. Here are the best methods:
- Airtight Container: Place your cooled and set spoons in an airtight container. Make sure the container is dry and clean to avoid any condensation.
- Cool, Dry Place: Store the container in a cool, dry place, away from direct sunlight. This will help preserve the shape and flavor of your candy spoons.
- Avoid Refrigeration: While it’s tempting to store sweets in the fridge during warm months, it can actually lead to condensation, causing the spoons to sweat and become sticky.
By following these storage methods, your DIY Peppermint Candy Spoons can last for a few weeks, allowing you to enjoy them or gift them.
Variations of DIY Peppermint Candy Spoons
This festive recipe can be customized to suit your taste preferences. Here are some variations to consider:
- Chocolate-Covered Variations: While dipping the spoons in melted candy melts adds a delicious dimension, consider using dark or white chocolate for a twist. You can also drizzle different colored chocolates on top of the dipped spoons for extra flair.
- Flavor Infusions: If you want to venture beyond peppermint, try using flavored hard candies. Cherry, cinnamon, or even orange-flavored candies can produce exciting new spoons.
- Add Nuts or Coconut: Mix in some finely chopped nuts, like almonds or pecans, or shredded coconut into the candy mold before it sets for an added crunch.
- Decorative Toppings: Think beyond sprinkles! Use crushed graham crackers or even edible glitter to decorate the chocolate-dipped ends. This can enhance the visual appeal and give a unique twist.
- Festive Shapes and Designs: Instead of using standard spoon molds, explore themed molds such as holiday stars, trees, or snowflakes to further celebrate the season.
Frequently Asked Questions about DIY Peppermint Candy Spoons
- Can I use other types of candy? Absolutely! While Starlight Peppermint Candies work wonderfully, you can experiment with other types of hard candies that can melt well. Just be cautious about their melting points.
- How long will my DIY Peppermint Candy Spoons last? When stored properly, your candy spoons can last for about 2-3 weeks. Ensure they are kept in an airtight container in a cool, dry place.
- Can children help with this recipe? Yes! This recipe is simple and fun, making it a great project for kids. Just supervise when handling the hot oven.
- What drinks pair best with peppermint spoons? Peppermint spoons are fantastic with hot chocolate, coffee, or chais. They can also complement desserts like ice cream or yogurt.
- Can I make these spoons ahead of time? Yes, these candy spoons can be made well in advance. Just make sure to store them in proper conditions to keep them fresh.
DIY Peppermint Candy Spoons
Ingredients
For the spoons
- 1 bag Starlight Peppermint Candy Ideal for melting and holding shape
- 1 bag Wilton Candy Melts For decoration
- as needed Holiday Sprinkles For decoration


Instructions
Preparation
- Preheat your oven to 300 degrees Fahrenheit.
- Place the Starlight Peppermint Candy in a ziplock bag and crush into fine pieces using a rolling pin.
- Fill the spoon-shaped mold with the crushed peppermint, packing it tightly.
Cooking
- Place the filled mold into the preheated oven and melt for about 10 minutes, keeping a close eye to avoid burning.
- Once melted, remove the mold and allow it to cool completely before unmolding.
- Gently remove the spoons from the mold. If needed, chill briefly in the refrigerator to help unmold.
Decoration
- Melt the Wilton Candy Melts according to package instructions, dip the spoon ends in melted chocolate, and then in holiday sprinkles. Let dry on wax paper.
Send me this recipe!
Just enter your email below and get it sent straight to your inbox!