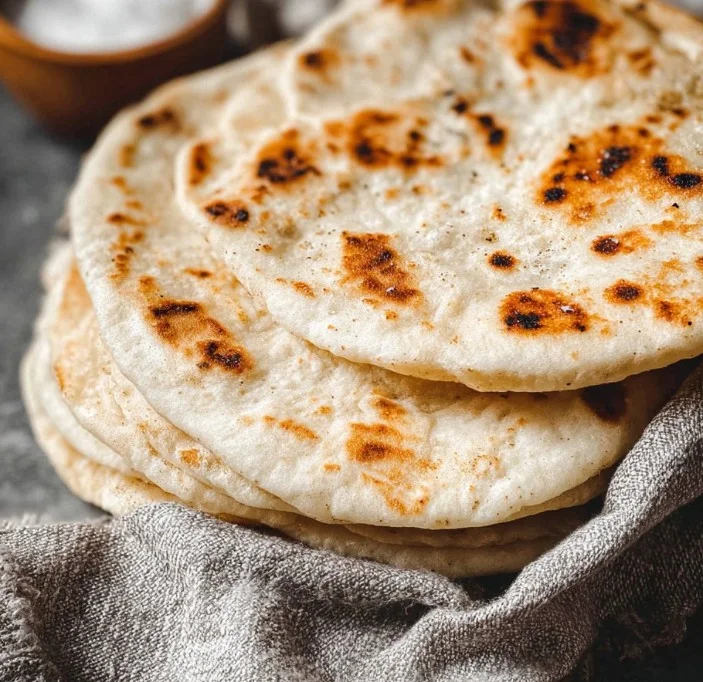
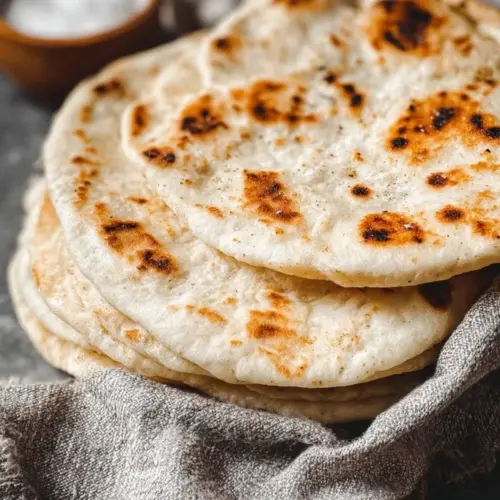
When you think of bread that can elevate any meal, pita bread undoubtedly tops the list. This Middle Eastern staple is not just versatile; it also brings a unique texture and flavor that can transform simple ingredients into an extraordinary dish. Making homemade pita bread is not only satisfying but also straightforward. With just a handful of ingredients, you can create fluffy pockets that are perfect for stuffing or dipping, making your culinary creations even more enjoyable. You will soon discover that there’s nothing quite like the taste of freshly baked pita, and the process itself is a delightful experience.
Why We Love This Homemade Pita Bread Recipe
There’s a certain charm that comes with making things from scratch, and pita bread is no exception. One of the reasons you’ll fall in love with this recipe is its simplicity. You might be surprised to find that you don’t need any fancy equipment or extensive culinary skills—just some flour, water, and a bit of patience. Plus, the reward of pulling that fluffy bread from the oven (or skillet) is beyond fulfilling.
Not only is homemade pita bread fresh and delicious, but it’s also incredibly versatile. You can use it to scoop up hummus, as a wrap for your favorite sandwich fillings, or even as the base for a mini pizza. The possibilities are endless, and each option lets the inherent flavors of the bread shine. Moreover, when you make your pita, you can control the ingredients, ensuring that you’re whipping up something wholesome and tasty.
Another fantastic aspect of homemade pita bread is the sheer joy of sharing it with loved ones. Whether you’re hosting a dinner party, arranging a picnic, or simply enjoying a meal with family, fresh pita adds a touch of warmth and care to the table. With each bite, you will not only savor your culinary creation but also cherish the time spent making it with those who matter most.
Ingredients about Homemade Pita Bread
Creating delicious homemade pita bread requires only a few essential ingredients. Here’s what you’ll need:
- 1 cup warm water (237g)
- 2 1/4 teaspoons instant yeast (1 packet)
- 1 teaspoon granulated sugar
- 1 teaspoon fine sea salt
- 1 tablespoon olive oil
- 2 1/4 cups all-purpose flour (281g)
How to Make Homemade Pita Bread Directions
Making homemade pita bread is an exciting journey that anyone can follow. Start by gathering your ingredients and preparing your workspace. Clearing a section of your kitchen will help to make the process smoother. Here’s how you can create your delicious pita:
- Make Dough: Begin by mixing the warm water, instant yeast, sugar, salt, olive oil, and 1 cup of flour in a bowl. Stir the mixture until fully combined. It should be slightly sticky but manageable. Gradually add more flour, one small scoop at a time. Continue mixing until the dough comes together in a soft but non-sticky ball.
- Kneading: Once the dough forms, flour your hands and knead it in the bowl for about a minute. The goal here is to achieve a smooth texture without overworking the dough. It’s okay if it remains a bit soft; this will aid in the fluffiness of your pitas.
- Rest: Transfer the kneaded dough into a well-greased bowl, cover it with a damp cloth, and let it rest for about 40 minutes. This rest period allows the gluten to relax, giving you the tender, puffy pitas you are aiming for. Alternatively, if time allows, refrigerate the dough until you are ready to use it later.
- Dividing and Rolling: After the resting period, turn the dough out onto a floured surface and divide it into 8 equal pieces. Roll each piece into a thin circle—you’re aiming for about 1/4 inch thick. A rolling pin will be helpful here, but your hands can work just as well if you prefer.
- Cooking: Heat a griddle or a large skillet over medium-high heat. Once the pan reaches the right temperature, lightly grease it with a bit of oil. Carefully place the rolled-out pita onto the pan. Cook for about 2 minutes, or until the bottom starts to turn golden brown. Flip the pita and continue cooking on the other side for another minute. Once done, remove it from the pan and place it inside a clean, dry kitchen towel to keep warm while you cook the remaining pieces.
- Enjoy: Your homemade pita bread is now ready to be enjoyed! Feel free to serve it immediately or store it for later.
How to Serve Homemade Pita Bread
The beauty of homemade pita bread lies in its versatility, making it an ideal accompaniment for various dishes. Here are some delightful ways to serve your fresh pita:
- With Dips: Serve your warm pita alongside flavorful dips such as hummus, tzatziki, or baba ganoush. The pockets of pita are perfect for scooping up these tasty spreads.
- As a Wrap: Use your pita as a wrap for savory fillings. Consider adding grilled chicken, fresh veggies, and a dollop of yogurt sauce for a delicious meal on the go.
- With Salad: Tear the pita into pieces and toss it with your favorite salad. The crunchy pieces provide texture and a unique twist to a classic green salad.
- Mini Pizzas: Spread some sauce and toppings on the pita and bake it for a quick and easy mini pizza. It’s an excellent option for a fun snack or a dish for kids.
- With Soups: Serve your pita bread alongside soups for a hearty meal. It can be used to dip into stews or broths, allowing you to enjoy every last drop.
The options are endless, so feel free to get creative with how you enjoy your homemade pita.
Expert Tips: Homemade Pita Bread
To ensure that you achieve the best results with your homemade pita, consider the following expert tips:
- Use Warm Water: Make sure the water you use is warm, not boiling. It should be around 110°F (43°C). Hot water might kill the yeast, while cold water will not activate it effectively.
- Use Instant Yeast: Instant yeast is easy to work with and does not require proofing. If you use active dry yeast instead, you should combine it with water and sugar first, letting it stand until frothy.
- Don’t Overwork the Dough: Knead the dough just until it is smooth. Over-kneading can create a tough pita instead of the light, airy pockets you’re aiming for.
- Preheat Properly: If you decide to bake your pita bread, preheat your oven to 475°F (250°C). A hot oven is crucial for the puffing action of the bread.
- Experiment with Thickness: Feel free to adjust how thick you roll your pita. Thinner pita will create a puffier pocket, while thicker pita will yield a denser bread.
- Keep It Covered: While cooking, keep the pitas covered with a towel to maintain their warmth and softness until you’re ready to serve.
How to Store Homemade Pita Bread
If you find yourself with leftover pita bread, don’t worry; it can be easily stored for later enjoyment. Here’s how to keep it fresh:
- At Room Temperature: Place cooked pita in an airtight container at room temperature. Enjoy them within 2-3 days for the best flavor and texture.
- In the Refrigerator: For longer storage, keep your pita in the refrigerator. It can last up to 5 days, but make sure to store it in an airtight container to prevent it from drying out.
- Freezing: If you want to extend the life of your pita, consider freezing them. Place your pitas in a resealable plastic bag, making sure to remove as much air as possible, and freeze them. When you’re ready to enjoy, simply thaw them at room temperature or warm them in the oven or skillet.
Variation of Homemade Pita Bread
While the classic pita recipe is delicious on its own, you might want to explore several variations to suit your taste or dietary preferences. Here are a few ideas:
- Whole Wheat Pita: Substitute half or all of the all-purpose flour with whole wheat flour for a healthier option. This variation adds a richer flavor and more nutrients to your pita.
- Herbed Pita: Infuse your dough with dried herbs such as oregano, thyme, or basil for an aromatic twist. Simply mix in the herbs while combining the flour.
- Spiced Pita: Add spices like cumin or paprika to the dough for a warm, fragrant flavor. This is particularly nice if you plan to use the pita for savory dishes.
- Mini Pitas: Instead of rolling out standard-sized circles, create smaller pitas, which can be great for appetizers or snacks.
- Flavored Oils: Brush the cooked pitas with flavored olive oil (like garlic or chili) before serving for an extra layer of flavor.
Explore those variations and find the one that resonates with you!
FAQ
What is Homemade Pita Bread Made Of?
Homemade pita bread is primarily made from all-purpose flour, warm water, instant yeast, sugar, salt, and olive oil. Combined, these ingredients create a soft, pliable dough that puffs up beautifully when cooked.
How Do I Get My Pita Bread to Puff Up?
To ensure your pita bread puffs up during cooking, make sure your cooking surface is adequately heated. Whether you use a skillet or an oven, a hot cooking environment is essential. Additionally, rolling the dough evenly and not overworking it will help achieve that sought-after pocket.
Can I Make Pita Bread Ahead of Time?
Absolutely! You can prepare the dough in advance and either refrigerate it for later use or freeze the cooked pitas for longer storage. Just make sure to store them correctly to maintain their freshness.
Can I Use Whole Wheat Flour for Pita Bread?
Yes, you can use whole wheat flour in place of all-purpose flour! Just keep in mind that it will yield a denser, nuttier pita. You might want to mix half whole wheat and half all-purpose flour for the best compromise of flavor and texture.
How Do I Store Leftover Pita Bread?
Store any leftover pita bread in an airtight container at room temperature for 2-3 days, in the refrigerator for up to 5 days, or freeze them for longer-lasting freshness. Just ensure they’re well-sealed to prevent drying out.
Homemade Pita Bread
Equipment
- Mixing Bowl
- Rolling Pin
- Griddle or Skillet
Ingredients
- 1 cup warm water (237g)
- 2 1/4 tsp instant yeast (1 packet)
- 1 tsp granulated sugar
- 1 tsp fine sea salt
- 1 Tbsp olive oil
- 2 1/4 cups all-purpose flour (281g)


Instructions
- In a mixing bowl, combine warm water, instant yeast, sugar, salt, olive oil, and 1 cup of flour. Stir until fully combined.
- Gradually add more flour, one scoop at a time, until a soft and non-sticky dough forms.
- Knead the dough in the bowl for about 1 minute until smooth. It should remain slightly soft.
- Transfer the dough to a greased bowl, cover with a damp cloth, and let it rest for about 40 minutes.
- After resting, turn the dough out onto a floured surface and divide it into 8 equal pieces.
- Roll each piece into a thin circle, about 1/4 inch thick.
- Heat a griddle or skillet over medium-high heat and lightly grease it. Cook each pita for about 2 minutes on one side, until golden brown, then flip and cook for another minute.
- Remove the cooked pita and place it in a clean kitchen towel to keep warm. Repeat with remaining pieces.
- Enjoy your homemade pita bread warm or store for later use!
Send me this recipe!
Just enter your email below and get it sent straight to your inbox!