When it comes to Halloween treats, few things are as fun and easy to make as Mummy Rice Krispie Treats. This delightful twist on the classic Rice Krispie treat is not only adorable but also fantastically festive. Imagine sweet, gooey marshmallows and crispy cereal, all dressed up in a spooky disguise! You’ll find that they are perfect for Halloween parties, school events, or any gathering where you want to bring a little extra joy and creativity to the table. Plus, the kids will love helping you make them!
Why We Love This Mummy Rice Krispie Treats Recipe
Mummy Rice Krispie Treats hold a special place in our hearts for several reasons. Firstly, they are incredibly simple to prepare, requiring just a few pantry staples and minimal cooking skills. This makes them an ideal project for kids and novice cooks alike.
Secondly, they are versatile—you can adapt them in a variety of ways to suit your taste or dietary needs. Whether you want to make them gluten-free or add in your favorite sprinkles, these treats can be customized in many ways!
Finally, they are a fantastic way to involve family and friends in the kitchen. Roll up your sleeves, gather your loved ones, and enjoy the process of creating these delicious little mummies together. The best part? They taste as good as they look!
Ingredients about Mummy Rice Krispie Treats
To get started on making your Mummy Rice Krispie Treats, you’ll need the following ingredients. They are simple, easy to find, and will help you create mouth-watering treats that you and your family will adore.
- 2 cups Rice Krispies cereal: The base of our treats, providing that necessary crunch.
- 2 cups Marshmallows: The star ingredient that gives these treats their gooey texture.
- 1 tbsp Butter: Helps to melt the marshmallows and adds a rich flavor.
- 1 cup White chocolate: This will be drizzled over the treats, giving them that mummy-like appearance.
- Candy eyes: Essential for bringing your mummies to life. Use as many as you like to create your desired effect.
How to Make Mummy Rice Krispie Treats Directions
Now that you have all your ingredients lined up, it’s time to dive into the fun part—creating your Mummy Rice Krispie Treats! Here’s a step-by-step guide to ensure your treats come out perfectly every time.
Prepare Your Pan: Start by taking a rectangular pan measuring 8 × 11 inches. Line it with parchment paper; this will make it easy to lift out the treats once they have set.
Melt the Marshmallows: In a bowl, combine the marshmallows and butter. You have two options here: You can melt them using a double boiler method by heating water in a saucepan and placing your bowl on top, allowing the steam to melt the mixture for about 15 minutes. Alternatively, if you’re short on time, you can melt the butter in a microwave-safe bowl. Once melted, add the marshmallows and heat them in 30-second increments, stirring in between, until they are completely melted and smooth.
Mix in the Cereal: Once the marshmallow mixture is smooth and creamy, it’s time to add the Rice Krispies cereal. Gently fold the crispy cereal into the marshmallow mixture until every piece is well coated.
Set Your Treats: Pour the mixture into the prepared pan and spread it out evenly. Using a greased spatula, press down firmly to ensure it holds together well. Cover with plastic wrap or a clean kitchen towel and refrigerate for at least 4 hours. This helps the treats set and makes them easier to cut later.
Slice Them Up: After your treats have chilled for several hours, remove them from the refrigerator. Using the parchment paper, carefully lift the treats out of the pan. With a warm knife, cut them into rectangles or squares for that classic Rice Krispie treat shape.
Melt the White Chocolate: Now for the fun part! Melt the white chocolate in a microwave-safe bowl. Heat it at 30-second intervals until smooth, being careful not to overheat it.
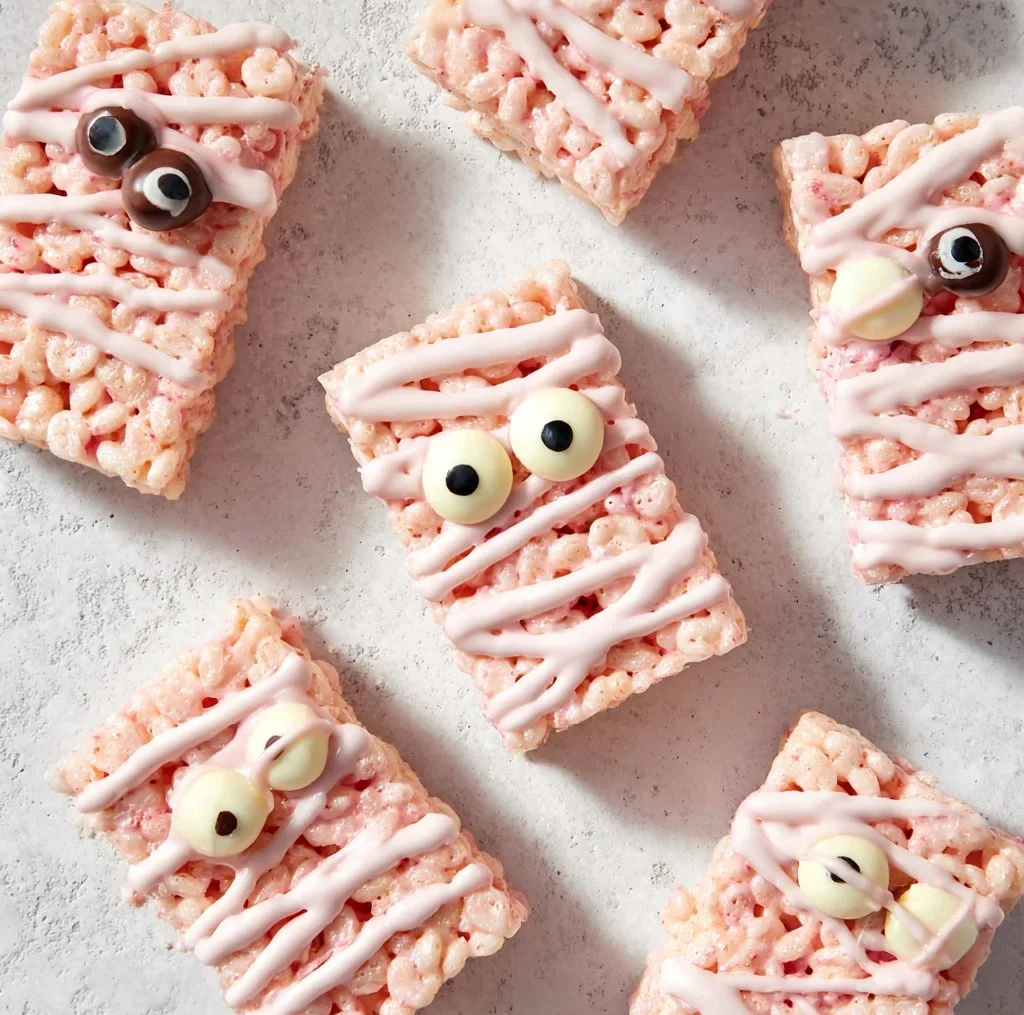
Decorate Your Mummies: Grab a piping bag (or a plastic bag with the corner cut off), and drizzle the melted white chocolate over each treat to create the mummy bandages.
Add the Eyes: Once the chocolate drizzle has been applied, place the candy eyes on top while the chocolate is still warm. This will help them stick better.
Final Chill: Place the decorated treats back in the refrigerator for another half hour to allow the chocolate to harden.
Serve and Enjoy!: Once the chocolate has set, your Mummy Rice Krispie Treats are ready to be served. Get ready for smiles and compliments from friends and family!
How to Serve Mummy Rice Krispie Treats
When it comes to serving your Mummy Rice Krispie Treats, there are countless ways to present them. You can place them on a festive platter surrounded by seasonal decorations like pumpkins or ghosts to enhance that Halloween atmosphere.
If you’re at a party, consider placing them in individual treat bags tied with orange or black ribbons for a personalized touch. This makes it easy for guests to grab one and enjoy while mingling. Alternatively, if you’re serving at home, you can stack them in a pyramid shape for a beautiful display on a table or counter.
No matter how you choose to serve them, these treats are sure to be a hit! Encourage your guests to share how cute they look before they devour them, truly capturing the spirit of Halloween fun!
Expert Tips: Mummy Rice Krispie Treats
Creating the perfect Mummy Rice Krispie Treats is all about knowing a few expert tips that can help elevate your finished product.
Measuring Ingredients: Be precise when measuring your ingredients. This will ensure that the marshmallow and butter mixture is perfect, resulting in a nice cohesive texture.
Greasing Tools: Don’t forget to grease your spatula and knife before pressing down the mixture or cutting the treats. This will prevent sticky messes and make your work much easier.
Tempering the Chocolate: When melting your white chocolate, do it slowly and stir frequently. Overheating can cause it to seize up. If that happens, adding a little vegetable oil can sometimes help smooth it out.
Drizzling Technique: If you find it challenging to drizzle the melted chocolate, practice makes perfect! The trick is to move your hand in a gentle, fluid motion.
Get Creative: Feel free to get creative with your Mummy Rice Krispie Treats. Add colorful sprinkles for some extra flair, or use different types of candy for the eyes!
How to Store Mummy Rice Krispie Treats
After you’ve made these delicious treats, you may want to store them for later enjoyment. Proper storage is essential to keep your Mummy Rice Krispie Treats fresh and tasty.
To store, place your treats in an airtight container. Layer them with parchment paper between the rows to prevent them from sticking together. They can typically be stored at room temperature for up to 3 days. If you’d like them to last longer, you can refrigerate them, but be aware that refrigeration can change their texture slightly.
If you have leftovers, make sure to keep them sealed to maintain freshness. However, you’ll likely find they disappear quickly—they are just that good!
Variation of Mummy Rice Krispie Treats
Experimenting with variations can be a delightful way to personalize your Mummy Rice Krispie Treats. Here are some ideas to get your creativity flowing.
Flavored Treats: Why not incorporate flavored marshmallows like strawberry or chocolate? This will change the taste profile and make each bite a new experience.
Add-ins: Consider folding in mini chocolate chips or various candies into the Rice Krispie mixture for an added flavor explosion.
Gluten-Free: If gluten is a concern, you can easily find gluten-free Rice Krispies to make this recipe accessible for those with dietary restrictions.
Chocolate Coating: Instead of using white chocolate for the mummy wraps, try using regular milk or dark chocolate for a twist on the classic.
With a little imagination, you can elevate this simple treat into an entirely new masterpiece!
FAQs about Mummy Rice Krispie Treats
What makes Mummy Rice Krispie Treats ideal for Halloween?
Mummy Rice Krispie Treats are perfect for Halloween due to their fun and spooky appearance, reminiscent of wrapped mummies. Their easy preparation makes them a favorite among families who want to embrace the holiday spirit with a sweet and festive treat.
Can I make Mummy Rice Krispie Treats in advance?
Absolutely! Mummy Rice Krispie Treats can be made a few days in advance. Store them in an airtight container, and they will be just as delicious when you’re ready to share them.
How do I make the chocolate drizzle perfect?
To make the chocolate drizzle perfect, melt it slowly and stir frequently. Using a piping bag helps control the drizzle and creates a more visually appealing mummy appearance.
Can I use regular marshmallows instead of mini marshmallows?
Yes, you can use regular marshmallows! Just remember to use the same volume, and cut them into smaller pieces if you find it easier to melt them uniformly.
What if I don’t have candy eyes?
If you can’t find candy eyes, you could use small chocolate chips or mini marshmallows for added detail. Alternatively, you can skip the decor and enjoy your treats as they are!

Mummy Rice Krispie Treats
Equipment
- 8×11 inch rectangular pan
- Parchment Paper
- Mixing Bowls:
- Spatula
- Microwave-safe bowl
Ingredients
- 2 cups Rice Krispies cereal provides crunch
- 2 cups marshmallows for gooey texture
- 1 tablespoon butter to melt marshmallows
- 1 cup white chocolate for drizzling
- as needed candy eyes for decoration


Instructions
- Line an 8×11 inch pan with parchment paper.
- Melt marshmallows and butter together using a double boiler or microwave until smooth.
- Fold Rice Krispies cereal into the melted marshmallow mixture until well coated.
- Press the mixture into the lined pan and refrigerate for at least 4 hours.
- Lift the treats out of the pan using the parchment paper and cut into rectangles or squares.
- Melt white chocolate in a microwave-safe bowl until smooth.
- Drizzle melted white chocolate over each treat to create mummy bandages.
- Place candy eyes on top while the chocolate is still warm to help them stick.
- Chill the decorated treats for another 30 minutes to set the chocolate.
- Serve and enjoy your Mummy Rice Krispie Treats!
Send me this recipe!
Just enter your email below and get it sent straight to your inbox!