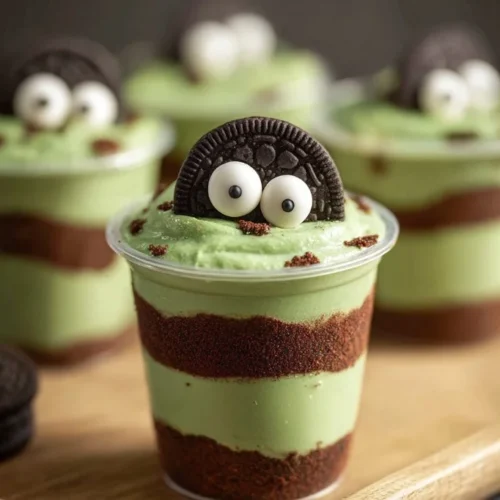
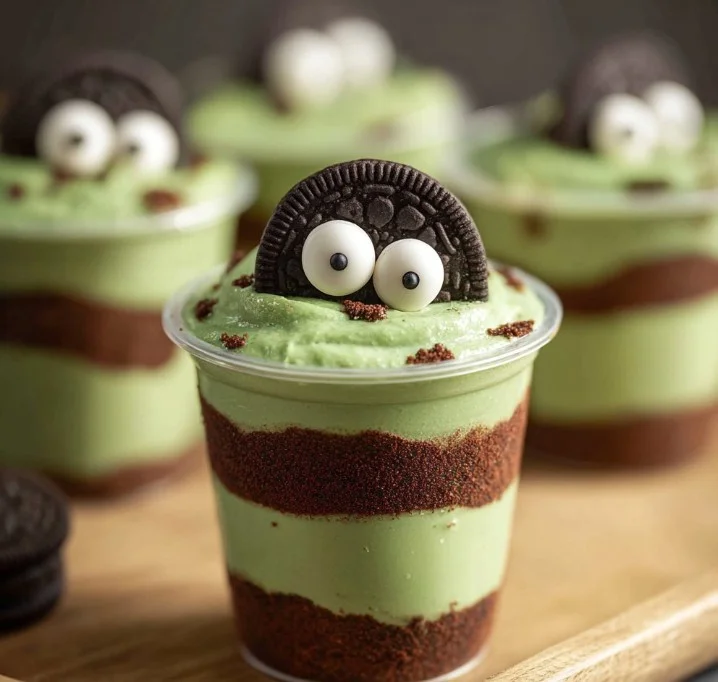
There’s a certain thrill to our culinary creations that entice the imagination, and here’s one that’s perfect for a spooky occasion or a fun Halloween party—Zombie Dirt Pudding Cups! This playful and delicious dessert captures the fun of Halloween in a creamy, crunchy concoction.
Why We Love This Zombie Dirt Pudding Cups Recipe
What’s not to love about Zombie Dirt Pudding Cups? Not only do they taste fabulous, but they also provide a fun way to get creative in the kitchen. These treats combine the nostalgic flavors of chocolate and vanilla in a visually stunning and playful presentation. The straightforward preparation makes them accessible for both novice and seasoned bakers. Plus, they can easily be customized to fit any spooky theme you’re going for—just add your twist! Whether it’s a haunted gathering or a school event, these pudding cups invite everyone to indulge their sweeter side and embrace their playful spirit.
Ingredients for Zombie Dirt Pudding Cups
To whip up these delightful Zombie Dirt Pudding Cups, gather the following ingredients:
- Mint Oreos: 18.7-ounce package (approximately 39 cookies)
- Instant white chocolate pudding mix: 3.3-ounce box
- Whole milk: 2 cups, chilled
- Green food color: 6-8 drops
- Cool Whip: 8-ounce tub, thawed
- Large candy eyeballs: 8-12 pieces
- Small candy eyeballs: 8-12 pieces
- Bone or skeleton sprinkles: for decoration
These ingredients create a delightful mix of textures and flavors that will have everyone coming back for seconds.
How to Make Zombie Dirt Pudding Cups
Making these adorable Zombie Dirt Pudding Cups is a fun and straightforward process that keeps everyone engaged. Here’s how you can create your spooky treats:
Start by gently twisting one side off 12 of the Oreo cookies, ensuring that the filling remains intact on one half. Set the cookie halves with exposed filling aside. This will become the base for your zombie decorations.
Take the remaining Oreos and crush them into a fine, dirt-like texture using a food processor. A little pulse will do the trick—just be careful not to turn them into powder. Set aside the crushed cookies.
In a large mixing bowl, whisk together the chilled milk, instant white chocolate pudding mix, and 6-8 drops of green food coloring. Mix for about 1-2 minutes, or until the pudding thickens up nicely. The green tint will give your pudding an eerie vibe that fits perfectly with the zombie theme.
Once the pudding has thickened, gently fold in the thawed Cool Whip. This will add airy creaminess, balancing the richness of the pudding.
Take your serving glasses or cups and sprinkle 1-2 tablespoons of the Oreo crumbs into the bottom. This layer mimics the look of dirt—setting the stage for your spooky treat.
Layer on the green pudding you just made, allowing the creamy goodness to cover the crushed Oreo layer completely.
Alternate layering the crushed cookies and pudding until your glass is filled, finishing off with a final layer of crushed Oreos at the top. This final touch will resemble dirt covering a grave!
Once all layers are created, place the pudding cups in the refrigerator and let them chill for about an hour. This chilling time allows the pudding to set properly and enhances the flavors.
When ready to serve, gently press a large and a small candy eyeball onto the exposed filling of the separated Oreo halves to create the appearance of zombies.
Carefully press the decorated cookies upright into the pudding cups to make it look like your zombies are rising from the dirt.
For an extra touch of fright, scatter bone or skeleton sprinkles on top of the pudding cups. They’ll add a festive flair, completing the Halloween vibe!
How to Serve Zombie Dirt Pudding Cups
When it’s time to serve your Zombie Dirt Pudding Cups, consider presenting them in clear cups to highlight those fun layers. Place the cups on a themed tray or individual plates with spooky decorations like fake spider webs or plastic spiders for extra flair. You can even label the cups with fun names such as “Zombie Dessert” or “Ghoulish Treats” for added effect. If you’re hosting a Halloween party or get-together, these cups can double as a fun conversation starter along with dessert. Pair them with themed drinks for a complete Halloween experience that your guests will undoubtedly rave about!
Expert Tips: Zombie Dirt Pudding Cups
Make Ahead: If you want to save time on the day of your event, consider making the pudding cups a day in advance. They store well in the fridge, and the flavors can deepen overnight. Just add the decorations before serving for freshness.
Customization: Feel free to get creative with the candy decorations! You could use gummy worms, chocolate skeletons, or even crushed candies to add texture and additional flavor.
Adjusting Color: Not keen on green? You can use different food colors to create unique pudding colors—maybe a spooky purple or a vibrant orange for a fun twist varying with your Halloween theme.
Gluten-Free Options: If you need a gluten-free version, simply find gluten-free Oreos, and follow the same recipe!
Layered Glasses: Depending on the cups you choose, feel free to adjust the number of layers. Smaller cups can create a more elegant dessert while larger cups give room for more daring layers.
How to Store Zombie Dirt Pudding Cups
If you find yourself with leftover Zombie Dirt Pudding Cups—though that’s unlikely—they can be stored in the refrigerator. Ensure that you cover them with plastic wrap or an airtight container to preserve freshness. It’s best to consume them within 2-3 days, as the texture may change with longer storage due to the whipped cream. If you’ve adorned the cups with candy decorations, it’s a good idea to add those right before serving to keep them looking fresh and appealing.
Variation of Zombie Dirt Pudding Cups
While the traditional Zombie Dirt Pudding Cups recipe is immensely popular, there are plenty of variations you can explore to make them even more delightful. Here are a few ideas:
Chocolate Lovers Version: Swap out half the white chocolate pudding with chocolate pudding for a more intense and rich flavor.
Vegan Alternative: You can use dairy-free pudding mixes and coco-whip to make these cups vegan-friendly while still keeping the spooky theme.
Seasonal Flavors: Consider incorporating fall flavors like pumpkin spice pudding or adding cinnamon to the crushed Oreos for a delightful twist on the classic recipe.
Layer of Fruit: For a refreshing contrast, add a layer of crushed fruit—like raspberries or strawberries—between the pudding and cookies. This adds flavor and color to your creation.
Crunchy Elements: Mix in crunchy elements like granola or crushed nuts between the layers for added texture.
FAQ About Zombie Dirt Pudding Cups
What’s the best way to ensure my Zombie Dirt Pudding Cups look great?
To maintain the visual appeal, serve them in clear containers to highlight the layers and be sure to add the candy decorations just before serving to keep everything fresh.
Can I make Zombie Dirt Pudding Cups in advance?
Absolutely! You can prepare the cups a day ahead. Just keep them covered in the refrigerator and add your toppings right before serving.
How long will these cups last in the fridge?
They can stay fresh for about 2-3 days in the refrigerator, provided they are stored properly.

Zombie Dirt Pudding Cups
Equipment
- Food Processor
- Large mixing bowl
- Clear cups or glasses
Ingredients
- 18.7 ounces Mint Oreos approximately 39 cookies
- 3.3 ounces instant white chocolate pudding mix
- 2 cups whole milk chilled
- green food color 6-8 drops
- 8 ounces Cool Whip thawed
- 8-12 large candy eyeballs
- 8-12 small candy eyeballs
- bone or skeleton sprinkles for decoration
Instructions
- Twist off one side of 12 Oreo cookies, keeping the filling intact. Set the halves aside.
- Crush the remaining Oreos into a fine texture using a food processor. Set aside.
- In a large bowl, whisk together chilled milk, pudding mix, and green food coloring for 1-2 minutes until thickened.
- Gently fold in the thawed Cool Whip until combined.
- In serving cups, layer 1-2 tablespoons of crushed Oreos as the base, followed by a layer of green pudding.
- Alternate layers of crushed Oreos and pudding until the cups are filled, finishing with a layer of crushed Oreos on top.
- Chill in the refrigerator for about an hour to set.
- Press large and small candy eyeballs onto the Oreo halves and insert them upright into the pudding cups.
- Sprinkle bone or skeleton sprinkles on top before serving for extra decoration.
Send me this recipe!
Just enter your email below and get it sent straight to your inbox!


