These Pumpkin Patch Dirt Cups are a fun and easy no-bake treat made with chocolate pudding, crushed cookies, and whipped topping. You decorate the top with green coconut and candy pumpkins to make it look like a little pumpkin patch. It’s a simple dessert that’s great for fall parties, school events, or a sweet family snack.
Why We Love This Pumpkin Patch Dirt Cups Recipe
There are so many reasons why this recipe is a fall favorite. First, it’s incredibly simple. You don’t have to preheat an oven or clean up a pile of mixing bowls. It uses pantry staples and takes less than 15 minutes to assemble. If you need a dessert that’s both quick and eye-catching, this one checks every box.
Another reason this dessert is a hit is because it’s fun to make. You can get your kids involved in every step—from crushing the cookies to decorating the top with coconut grass and little pumpkins. It turns into a mini craft project that ends with something sweet and delicious.
Pumpkin Patch Dirt Cups also work for just about any fall event. Whether it’s a potluck, classroom party, or weekend family treat, these little cups fit in anywhere. And they’re portioned individually, which makes them easy to transport, serve, and eat. You won’t have to worry about slicing or serving, and you can easily double or triple the batch for larger groups.
Lastly, the combination of flavors and textures is simply satisfying. Creamy pudding meets fluffy whipped topping and crunchy cookie bits, all finished with a decorative layer that’s as fun to look at as it is to eat. It’s comfort food with a playful seasonal twist—and once you try them, you’ll want to make them every autumn.
Ingredients about Pumpkin Patch Dirt Cups
To make these festive cups, you only need a few simple ingredients—most of which are already in your kitchen or easy to find at any grocery store. Here’s what you’ll need:
- 1 package (3.9 oz) Chocolate Instant Pudding
- 2 cups Milk
- 8 oz Cool Whip (or any whipped topping)
- 1 standard package of Oreo Cookies
- Candy Pumpkins (for decoration)
- Shredded Coconut
- Green Food Coloring
How to Make Pumpkin Patch Dirt Cups Directions
You’ll be surprised at how easy it is to bring this adorable dessert to life. There’s no cooking or baking involved—just a few steps of mixing, layering, and decorating. Here’s how to make it:
Start by preparing the chocolate cookie “dirt.” If you’re using a food processor, toss the Oreo cookies in and pulse until they become fine crumbs. Don’t have a processor? No problem. Put the cookies in a gallon-size zip bag and crush them with a rolling pin. You want a texture that’s crumbly but not dusty.
Next, move on to the pudding base. In a medium mixing bowl, combine the chocolate pudding mix and cold milk. Whisk it for about 2 minutes, or follow the instructions on your pudding package. Set the mixture aside for about 5 minutes to allow it to thicken.
Once the pudding is set, gently fold in the Cool Whip. This makes the texture light and creamy without overpowering the chocolate flavor. Don’t overmix—just stir enough to blend everything smoothly.
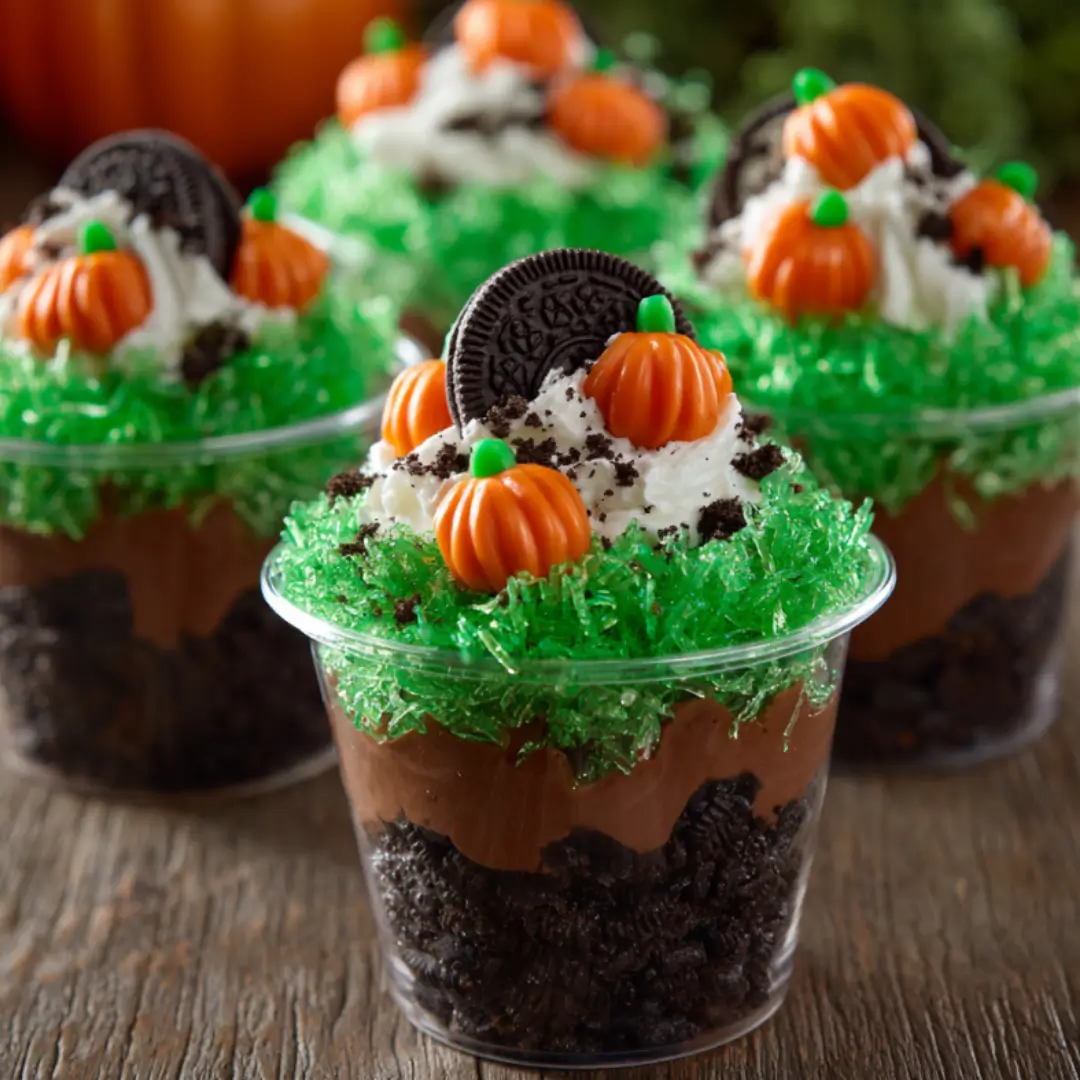
Now it’s time to assemble the cups. Start with clean, clear plastic cups—around 9 oz size works best. Begin by adding about one tablespoon of the crushed cookies to the bottom of each cup. This creates the first layer of “dirt.”
Spoon a layer of the pudding mixture over the cookies, spreading it evenly. Repeat the process: another spoonful of crushed cookies, then another layer of pudding. Keep layering until the cups are nearly full, but save a bit of the cookie crumbs for the top layer.
After assembling all your cups, place them in the fridge for at least one hour. This allows the layers to set and the flavors to meld. While the cups are chilling, prepare your coconut grass.
Place a handful of shredded coconut into a container with a secure lid. Add a few drops of green food coloring and a tiny splash of water. Close the lid and shake the container until the coconut turns evenly green. If it’s too light, add another drop or two and shake again until you get the vibrant green shade you want.
When you’re ready to serve, sprinkle the green coconut on top of each cup to resemble grass. Then press a candy pumpkin gently into the top. If you’re feeling creative, you can add multiple pumpkins to create the look of a full pumpkin patch.
And just like that, your Pumpkin Patch Dirt Cups are ready to delight!
How to Serve Pumpkin Patch Dirt Cups
Presentation matters, especially with a dessert that’s meant to be fun and festive. These cups are already cute on their own, but here are a few ways to elevate how you serve them.
Use clear cups to show off the beautiful layers. The contrast between the dark cookie crumbs and the creamy pudding makes the whole treat pop visually. You can even tie a ribbon around each cup in a fall color like orange or brown for an extra touch of charm.
If you’re serving these at a party, consider placing them on a tray decorated with faux leaves, mini hay bales, or small pumpkins. This turns your table into a seasonal display and makes your treats the centerpiece.
For younger kids, use smaller cups or even little jars. You can also hand them a plastic spoon and let them decorate their own with candy corn, candy eyes, or other small edible decorations. It’s a great activity and treat all in one.
These cups are best served chilled, straight from the fridge. That’s when the pudding has the perfect texture and the flavors are at their best. Just take them out a few minutes before serving to let them soften slightly.
Expert Tips: Pumpkin Patch Dirt Cups
- Crush with Care: When crushing the Oreos, you want a fine, sandy texture, but not powder. A few small chunks give a nice crunch and keep it from turning into dust.
- Don’t Skip Chilling: Even if you’re in a rush, the hour in the fridge really matters. It helps the layers hold together and enhances the flavor.
- Prep Ahead: You can make the pudding and crush the cookies a day ahead. Keep each in a separate container until you’re ready to assemble.
- Go Homemade if You Like: You can swap out the store-bought pudding or whipped topping with homemade versions. It adds a touch of richness but does take more time.
- Add Variety: Feel free to use different candies on top. Gummy worms, candy corn, or mini chocolate chips all work well for added fun.
How to Store Pumpkin Patch Dirt Cups
Pumpkin Patch Dirt Cups are easy to store and make ahead, which is part of their charm. After assembling and decorating, cover each cup loosely with plastic wrap or place them in a sealed container. Store them in the fridge and keep them chilled until you’re ready to serve.
They will stay fresh for up to 3 days, but they’re best within the first 24 hours. After that, the cookie crumbs may begin to soften, and the coconut topping can lose some of its crunch.
If you’re making these in bulk for an event, you can prepare the pudding and cookies the night before and assemble everything a few hours ahead of time. Add the toppings right before serving for the best presentation.
Variation of Pumpkin Patch Dirt Cups
There are plenty of ways to change up this recipe depending on your tastes or dietary needs.
- Gluten-Free Version: Use gluten-free chocolate sandwich cookies and check your pudding mix for gluten ingredients.
- Vegan Option: Swap in non-dairy pudding and whipped topping. Many brands offer plant-based versions that work just as well.
- Different Flavors: Try butterscotch or vanilla pudding for a new twist. You can also use chocolate mint cookies for a slightly different flavor profile.
- Add Mix-Ins: Stir in crushed chocolate chips, chopped nuts, or mini marshmallows into the pudding layer for more texture.
- Use Themed Decorations: Make them spooky for Halloween by adding candy eyes, gummy worms, or black cat toppers. For Thanksgiving, add edible leaves or mini cornucopias.
Let your imagination guide you—this dessert is endlessly flexible.
FAQ about Pumpkin Patch Dirt Cups
What kind of pudding works best for dirt cups?
Chocolate instant pudding is ideal because it sets quickly and mimics the “dirt” look perfectly. Avoid cook-and-serve puddings unless you’re planning to let them cool completely.
Can I make Pumpkin Patch Dirt Cups ahead of time?
Yes, you can make them a day ahead and store them in the fridge. Just add the green coconut and candy pumpkins right before serving for the best texture.
What’s the best way to crush the Oreos?
A food processor gives you the most even crumbs, but a zip bag and rolling pin works just fine. Just make sure to seal the bag well and crush them until you get fine bits.
Do I have to use Cool Whip?
No, you can use any whipped topping you like, including homemade whipped cream. Just make sure it’s thick enough to fold into the pudding without getting runny.
Can I use different toppings?
Absolutely. You can switch out the candy pumpkins for anything festive, like fall-themed sprinkles, candy corn, or even mini chocolate bars.

Pumpkin Patch Dirt Cups
Ingredients
- 1 package Chocolate Instant Pudding (3.9 oz)
- 2 cups milk
- 8 oz Cool Whip (or any whipped topping)
- 1 standard package Oreo Cookies
- to taste candy pumpkins (for decoration)
- to taste shredded coconut
- to taste green food coloring


Instructions
- Crush Oreo cookies in a food processor or place in a zip bag and crush with a rolling pin until you have fine crumbs.
- In a medium mixing bowl, combine chocolate pudding mix and cold milk. Whisk for about 2 minutes until well combined and thickened.
- Gently fold in Cool Whip until just combined. Avoid overmixing.
- In clear plastic cups, add a tablespoon of crushed cookies to create a layer of ‘dirt’.
- Spoon a layer of pudding mixture over the cookie layer, then repeat the layers until the cups are nearly full, saving some cookie crumbs for the top.
- Refrigerate the cups for at least 1 hour to set.
- Prepare your coconut grass by adding shredded coconut to a container with a few drops of green food coloring and shaking until evenly colored.
- When ready to serve, sprinkle green coconut on top of each cup and gently press a candy pumpkin into the center.
Send me this recipe!
Just enter your email below and get it sent straight to your inbox!