The holidays are a magical time of the year, filled with joy, laughter, and delicious treats. One dessert that truly captures the essence of the season is the Snowy Christmas Tree Cake. This delightful creation not only looks wonderful on your holiday table but also tastes incredible. With its vibrant green hue and snowy white frosting, this cake brings the festive spirit alive, making it a perfect centerpiece for your celebrations.
Why We Love This Snowy Christmas Tree Cake Recipe
There are countless reasons to love the Snowy Christmas Tree Cake. First off, it is remarkably simple to make, making it accessible for bakers of all skill levels. You don’t need to be a pro in the kitchen to whip up this festive treat. Everything you need can be found at your local grocery store, and the use of boxed cake mix helps keep things easy.
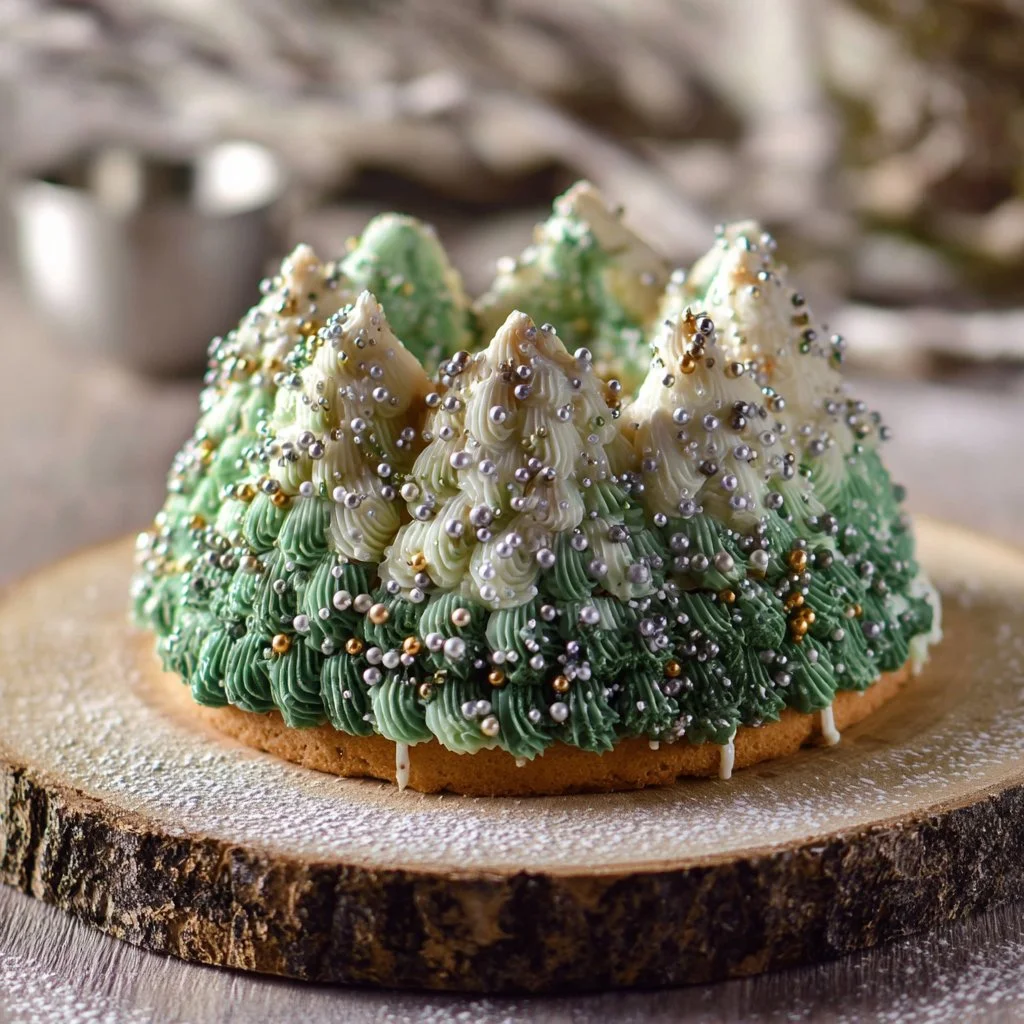
Moreover, this cake is an eye-catching delight that will impress your guests. The vibrant green cake, topped with a glistening white glaze and sprinkled with edible pearls, looks like an artist’s masterpiece. It perfectly captures the spirit of winter wonderlands and holiday festivities. The combination of flavors—light almond from the glaze paired with the vanilla cake—provides a sweet taste without being overpowering.
Lastly, it’s a customizable cake. You can adjust decorations or even the flavors to suit your preferences. Whether you want to add more sprinkles or create a different glaze flavor, the possibilities are endless. This makes the Snowy Christmas Tree Cake not just a dessert, but a fun project to engage with your loved ones in the kitchen during the holidays.
Ingredients for Snowy Christmas Tree Cake
Creating the Snowy Christmas Tree Cake is easy with the right ingredients. Here’s what you’ll need:
- 1 box white cake mix
- 1 teaspoon green gel food coloring
- 1 cup powdered sugar
- 2 tablespoons melted butter
- ¾ teaspoon almond extract
- 1 tablespoon milk (or as needed)
- Gold and silver sugar pearls for decorating
- Additional powdered sugar for dusting
The ingredients are straightforward and simple, allowing you to focus on the fun part—baking and decorating!
How to Make Snowy Christmas Tree Cake Directions
Baking the Snowy Christmas Tree Cake is an enjoyable process, and you’ll find that it’s surprisingly easy!
- Preheat your Oven: Start by preheating your oven to the temperature specified on the cake mix box, typically around 325°F (163°C).
- Prepare the Cake Batter: Follow the instructions on the box to prepare the cake batter. Once combined, reserve about ½ cup of this batter in a separate bowl.
- Color the Batter: Add green gel food coloring to the remaining batter. Stir it gently until the color is evenly distributed throughout the mixture, resulting in a beautiful green hue.
- Prepare the Baking Pan: Use a pan release spray or brush your baking pan with pan release to prevent sticking. Make sure to coat all sides evenly.
- Bake the Green Batter: Pour the vibrant green batter into the prepared pan. Tap the pan gently on the counter a few times to release any air bubbles that are trapped within the batter.
- Add the Reserved Batter: Now, carefully pour the reserved white batter on top of the green batter. Use an offset spatula to spread the white batter evenly to the edges of the pan, ensuring a smooth finish.
- Bake the Cake: Pop the cake into the preheated oven and bake according to the package directions. This usually takes about 25-30 minutes, but it’s always good to check for doneness with a toothpick. When it comes out clean, your cake is done!
- Cool the Cake: Allow the cake to cool in the pan for about 10 minutes. After that, turn it out carefully onto a wire rack to cool completely.
- Prepare the Glaze: While the cake cools, blend the powdered sugar, melted butter, almond extract, and milk in a bowl until you have a thin, slightly runny glaze.
- Glaze the Cake: Once your cake is completely cool, pour a small amount of the glaze over the top of your cake. With a pastry brush, spread it carefully over the sides to create an even coating.
- Decorate: Before the glaze sets, sprinkle gold and silver sugar pearls as decorations. Finally, dust the top lightly with powdered sugar to create a snowy effect.
Your enchanting Snowy Christmas Tree Cake is now ready to delight your taste buds!
How to Serve Snowy Christmas Tree Cake
Serving your Snowy Christmas Tree Cake is just as fun as making it. Here are a few ideas to elevate your presentation:
- Slice and Plate: Use a sharp knife to cut the cake into slices. Plate each slice individually, making sure to showcase the beautiful green and white layers.
- Add a Festive Touch: Serve the slices on festive holiday plates. Consider adding a small sprig of fresh mint or even a candy cane on the side for added flair.
- Pair with Beverages: This cake pairs wonderfully with warm beverages like hot chocolate or a creamy holiday punch. Set up a drink station for your guests to enjoy with their cake.
- Make it Personal: Consider writing holiday greetings on decorative cake boards or plates to personalize the cake presentation. Your guests will appreciate the extra effort!
- Display the Whole Cake: Alternatively, you can display the entire cake as a centerpiece. Place it on a decorative cake stand and surround it with pinecones, ornaments, or other festive decorations to enhance the holiday spirit.
Expert Tips for Snowy Christmas Tree Cake
To ensure your Snowy Christmas Tree Cake turns out beautifully every time, keep these expert tips in mind:
- Baking Pan: Use a sturdy, high-quality bakeware that distributes heat evenly to ensure your cake bakes perfectly without sticking.
- Stick to Instructions: While it’s helpful to experiment with the recipe, sticking to the instructions on the cake mix box can yield the best results, especially if you are a novice baker.
- Cool Thoroughly: Make sure your cake has cooled completely before glazing; this helps the glaze adhere better and prevents it from melting off the sides.
- Use Gel Food Coloring: When coloring your batter, gel food coloring provides more vibrant colors than liquid dye and won’t alter the texture of your batter.
- Decorate Just Before Serving: Sprinkles and decorative elements may sometimes lose their appeal over time. To keep them looking fresh, decorate right before serving.
- Variability in Bake Time: Always keep an eye on the cake towards the end of the bake time, as different ovens can have different temperatures.
How to Store Snowy Christmas Tree Cake
Once your charming Snowy Christmas Tree Cake is made, you may want to store any leftovers properly to maintain its freshness and flavor. Here’s how to do it effectively:
- Cool Completely: Ensure the cake is completely cooled before storage to prevent moisture buildup.
- Wrap it Up: Use plastic wrap or aluminum foil to wrap the cake tightly. If you have sliced pieces, consider using an airtight container for the best results.
- Refrigeration: Depending on your preferred texture, store the cake in the refrigerator for up to five days. Just remember that refrigeration may dry it out slightly, so consume sooner rather than later.
- Freezing Option: If you want to keep the cake longer, it freezes well! Wrap it in plastic wrap and then place it in a freezer-safe bag. It can last up to three months in the freezer. Thaw in the refrigerator before serving.
Variations of Snowy Christmas Tree Cake
As versatile as it is delightful, the Snowy Christmas Tree Cake can be made with various twists to fit your preferences. Here are a few ideas to consider:
- Flavored Cake Mix: Try using lemon or vanilla cake mix instead. This will add an alternative flavor profile while keeping the cake equally festive.
- Different Colors: Instead of green, experiment with other colors such as red or blue for a different seasonal theme. Use similar food coloring techniques to achieve bright results.
- Flavorful Glazes: If you’re looking to enhance the flavor further, you can replace almond extract in the glaze with vanilla, or even try adding zest from citrus fruits for an extra punch.
- Filling Options: Enhance the cake’s interior by adding a layer of frosting or filling—such as raspberry or chocolate—between the layers. This adds an exciting surprise when guests dig in!
- Holiday Spice Variations: Consider adding spices such as cinnamon or nutmeg to your batter for a seasonal twist, complementing the holidays’ warmth.
FAQ about Snowy Christmas Tree Cake
When making the Snowy Christmas Tree Cake, you may have a few questions. Here are some common queries answered:
Can I use a homemade cake recipe instead of a boxed cake mix? Absolutely! If you have a favorite white cake recipe, you can use it instead of the boxed mix. Just ensure you achieve the same texture and consistency for best results.
How can I make the cake more festive? To increase the holiday vibes, you can add edible glitter, fresh berries, or even mini candy canes as decorations to the cake. Get creative with the toppings!
Is the cake suitable for special dietary needs? You can certainly explore gluten-free cake mixes or alternatives to cater to dietary restrictions. Just adjust the remaining ingredients accordingly to maintain the flavor.
How far in advance can I bake this cake? You can make the Snowy Christmas Tree Cake up to three days ahead, but it’s best enjoyed fresh. If storing for an extended period, consider freezing as previously suggested.
Can I decorate the cake the day before serving? Yes, though it’s best to add decorations like sprinkles on the day of serving to keep them vibrant and crispy.

Snowy Christmas Tree Cake
Equipment
- Baking Pan
- Mixing Bowls:
- Electric Mixer
- Piping Bag
Ingredients
- 1 box White Cake Mix
- 1 teaspoon Green Gel Food Coloring
- 1 cup Powdered Sugar
- 2 tablespoons Melted Butter
- 3/4 teaspoon Almond Extract
- 1 tablespoon Milk Or as needed
- Gold and Silver Sugar Pearls For decorating
- Additional powdered sugar For dusting


Instructions
- Preheat your oven to the temperature specified on the cake mix box, typically around 325°F (163°C).
- Prepare the cake batter according to the package instructions. Reserve about ½ cup of the batter in a separate bowl.
- Add green gel food coloring to the remaining batter and mix until the color is evenly distributed.
- Prepare your baking pan with pan release spray or butter. Pour the green batter into the pan and then pour the reserved white batter on top, spreading it evenly.
- Bake according to package directions, usually 25-30 minutes, or until a toothpick comes out clean. Allow to cool in the pan for 10 minutes, then transfer to a wire rack to cool completely.
- In a bowl, whisk together powdered sugar, melted butter, almond extract, and milk until you have a thin glaze.
- Once the cake is cool, pour the glaze over the top and spread it evenly down the sides.
- Sprinkle gold and silver sugar pearls on top and dust with additional powdered sugar for a snowy effect.
Send me this recipe!
Just enter your email below and get it sent straight to your inbox!