As the leaves start to turn and the air gets crisper, there’s something magical about the arrival of fall. With this season comes a delightful array of flavors that warm the soul. One treat that stands out above the rest is Pumpkin Pie Bars. These delectable desserts capture the essence of autumn with their warm spices, creamy pumpkin filling, and a buttery crust that will have you reaching for a second piece before you even realize it. If you’re looking for a simple yet impressive dessert to share with family and friends, this recipe will quickly become your go-to choice during the cozy months ahead.
Why We Love This Pumpkin Pie Bars Recipe
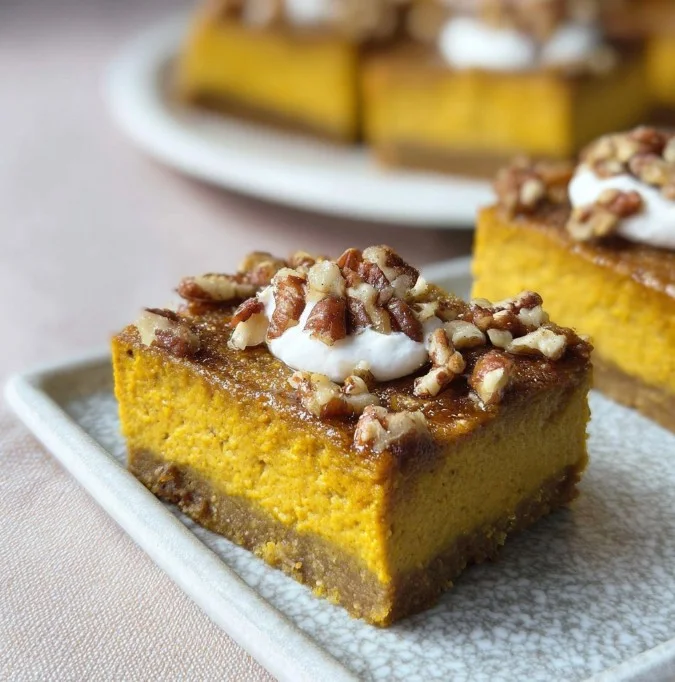
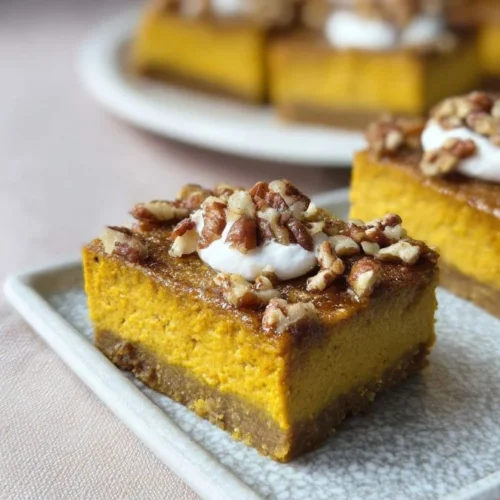
Pumpkin Pie Bars are a beautiful blend of deliciousness and nostalgia. They carry the classic flavors of the traditional pumpkin pie but are made into a more portable and easy-to-serve bar form. This recipe is not only scrumptious; it’s incredibly versatile too! Whether you’re hosting a Thanksgiving dinner, a casual fall get-together, or simply want a special treat to enjoy at home, these bars are perfect for any occasion. They are easy to make and have that creamy pumpkin filling topped with a lovely mix of spices and nuts that takes each bite to the next level.
Creating these bars allows you to benefit from the nutrition of pumpkin, which is packed with vitamins and fiber. Plus, the use of oats in the crust provides a wholesome touch, making these treats feel a bit more guilt-free, even though it’s hard to stop at just one!
Ingredients for Pumpkin Pie Bars
To create your own Pumpkin Pie Bars, gather the following ingredients:
- 1 cup all-purpose flour
- 1/2 cup old-fashioned oats
- 1/2 cup brown sugar
- 1/2 cup unsalted butter, softened
- 1/2 teaspoon salt
- 2 cans (15 ounces each) pumpkin puree
- 2 cans (12 ounces each) evaporated milk
- 4 eggs, beaten
- 1 1/2 cups sugar
- 1 1/2 tablespoons cornstarch
- 2 teaspoons cinnamon
- 1 teaspoon vanilla extract
- 1/2 teaspoon nutmeg
- 1/2 teaspoon ground cloves
- 1/2 teaspoon ground ginger
- 1 teaspoon salt
- 1/2 cup chopped pecans
- 1/2 cup brown sugar
- 2 tablespoons unsalted butter, melted
- 1/4 teaspoon cinnamon
How to Make Pumpkin Pie Bars Directions
Making Pumpkin Pie Bars is a straightforward process that leads you to a delightful result. Start by preheating your oven to 350 degrees Fahrenheit. As your oven warms, grease a 9 x 13-inch cake pan with baking spray. This step is important to ensure your bars come out easily once they are ready.
In a large bowl, you’ll want to combine the all-purpose flour, old-fashioned oats, brown sugar, softened butter, and salt. Mix these ingredients until they form a crumbly mixture. Once well combined, press this crumbly mixture evenly into the bottom of your prepared cake pan. The crust will add a delicious base to your bars, so make sure it’s evenly distributed. Now, bake this crust in the oven for about 18 minutes until it is slightly golden.
While the crust is baking, it’s time to prepare the filling. In another large bowl, combine the pumpkin puree, evaporated milk, beaten eggs, sugar, cornstarch, cinnamon, vanilla extract, nutmeg, cloves, ginger, and salt. Whisk these ingredients together until you have a smooth and creamy mixture. This filling is what makes Pumpkin Pie Bars rich and flavorful.
Once the crust is finished baking, carefully pour the pumpkin filling over the prepared crust and return the pan to the oven. Bake for about 45 minutes, or until the filling is set. You can tell it’s ready when the center is firm but still has a slight jiggle.
While the filling bakes, it’s the perfect time to prepare your topping. In a small bowl, combine the chopped pecans, brown sugar, melted butter, and cinnamon. Mix these ingredients together until they are well coated. After the initial 45 minutes of baking, sprinkle this pecan topping evenly over the pumpkin filling.
Return the pan to the oven for an additional 15 minutes. This will allow the topping to become beautifully toasted and fragrant. Once baked, take the Pumpkin Pie Bars out of the oven and let them cool for a bit before slicing. When fully cooled, cut them into 24 squares or bars. These delicious treats can be stored for later—or enjoyed all at once!
How to Serve Pumpkin Pie Bars
Serving Pumpkin Pie Bars is a delightful experience that can be customized to your liking. Once your bars are cooled and cut into squares, place them on a serving tray or a beautiful platter. You can sprinkle a bit of powdered sugar on top for an elegant touch, which adds both beauty and flavor to the bars.
Oh, and why not add a dollop of whipped cream or a scoop of vanilla ice cream to each serving? This addition elevates the bars to a whole new level, perfect for indulging. You can also consider drizzling some caramel or chocolate sauce over the top for those who enjoy a sweeter treat.
These bars are perfect for all occasions—from family gatherings to festive celebrations. Their portability makes them an excellent option for picnics or potluck parties, where you need something easy to share. Just be prepared for your guests to come back for seconds!
Expert Tips for Making Pumpkin Pie Bars
Creating the perfect Pumpkin Pie Bars is easier when you have a few expert tips up your sleeve. Here are some insights to make your baking experience even better:
Use Fresh Pumpkin: While canned pumpkin puree is convenient, using fresh roasted pumpkin can enhance the flavor and texture. If using fresh, make sure to blend it well to achieve a smooth consistency.
Don’t Overmix the Filling: When whisking the filling ingredients, mix just until combined. This ensures your bars stay creamy and do not develop a dense texture.
Let Them Cool: After baking, allow the bars to cool completely before slicing. This helps them set properly and makes cutting easier without crumbling.
Storage Solution: If you want to store your bars, place them in an airtight container with parchment paper between layers. This keeps them fresh longer.
Spice It Up: Feel free to adjust the spice levels according to your taste. If you love it extra spiced, increase the cinnamon or add a dash of allspice for a unique take.
By keeping these tips in mind, you’re setting yourself up for success in creating these delightful treats.
How to Store Pumpkin Pie Bars
Storing your Pumpkin Pie Bars is quite simple and helps maintain their deliciousness. Once the bars have cooled, see if there are any leftovers—though it’s hard to imagine!
If you have some to store, place them in an airtight container. Stack the bars carefully, using parchment paper between layers to prevent sticking. You can keep your bars at room temperature for up to two days. However, they will keep longer if stored in the refrigerator, where they can last up to a week.
For longer storage, consider freezing them. Wrap individual bars in plastic wrap, then place them in a freezer-safe bag. They can be stored in the freezer for up to three months. When you’re ready to enjoy them, simply thaw in the refrigerator overnight.
Variation of Pumpkin Pie Bars
One of the best aspects of Pumpkin Pie Bars is the flexibility in making them your own. Here are some variations to consider for a little twist on the classic recipe:
Gluten-Free Version: Substitute the all-purpose flour with a gluten-free blend. Almond flour or coconut flour can also be used for a different flavor profile.
Dairy-Free Option: Use coconut milk in place of evaporated milk and a dairy-free butter alternative for the crust.
Chocolate Swirl: For chocolate lovers, consider swirling in some melted chocolate into the pumpkin filling before baking for a deliciously rich flavor.
Nut Variations: If pecans aren’t your favorite, try walnuts or even hazelnuts sprinkled on top. You can also leave them out altogether for a nut-free version.
Additional Toppings: Experiment with toppings like chopped caramel bits, toffee bits, or even a sprinkle of sea salt for a delightful contrast to the sweetness.
Pumpkin Spice: Use a pumpkin spice blend instead of individual spices. This mixture often contains cinnamon, nutmeg, ginger, and cloves for a balanced taste.
Frequently Asked Questions About Pumpkin Pie Bars
What makes Pumpkin Pie Bars different from traditional pumpkin pie?
Pumpkin Pie Bars offer the classic pumpkin pie flavor in a more portable and easy-to-serve bar format. The crust is a bit heartier, incorporating oats for added texture and flavor.
Can I make these bars ahead of time?
Absolutely! Pumpkin Pie Bars can be made a few days in advance, stored in the refrigerator, and served chilled or at room temperature. They may also be frozen for longer storage.
Do I need to use evaporated milk?
While evaporated milk gives the filling its rich, creamy texture, you can substitute it with other options. Coconut milk or almond milk can work if you’re looking for dairy alternatives.
Can I cut down on sugar?
Yes, you can reduce the amount of sugar in the filling, though it may affect the overall sweetness. Consider adding natural sweeteners like honey or maple syrup for a different flavor profile.
Pumpkin Pie Bars
Equipment
- 9×13 Baking Pan
- Mixing Bowl
- Electric Mixer
Ingredients
- 1 cup all-purpose flour
- 1/2 cup old-fashioned oats
- 1/2 cup brown sugar
- 1/2 cup unsalted butter softened
- 1/2 tsp salt
- 2 cans pumpkin puree (15 ounces each)
- 2 cans evaporated milk (12 ounces each)
- 4 large eggs beaten
- 1 1/2 cups sugar
- 1 1/2 Tbsp cornstarch
- 2 tsp cinnamon
- 1 tsp vanilla extract
- 1/2 tsp nutmeg
- 1/2 tsp ground cloves
- 1/2 tsp ground ginger
- 1 tsp salt
- 1/2 cup chopped pecans
- 1/2 cup brown sugar
- 2 Tbsp unsalted butter melted
- 1/4 tsp cinnamon


Instructions
- Preheat the oven to 350°F (175°C) and grease a 9×13-inch baking pan.
- In a large bowl, combine flour, oats, brown sugar, softened butter, and salt until crumbly. Press into the bottom of the prepared pan.
- Bake the crust for 10 minutes until set.
- In another bowl, mix pumpkin puree, evaporated milk, eggs, sugar, cornstarch, cinnamon, vanilla, nutmeg, cloves, ginger, and salt until smooth.
- Pour the pumpkin filling over the baked crust and spread evenly.
- In a small bowl, combine chopped pecans, brown sugar, melted butter, and cinnamon. Sprinkle on top of the filling.
- Bake for an additional 45 minutes or until the filling is set. Let cool before slicing into bars.
Send me this recipe!
Just enter your email below and get it sent straight to your inbox!