
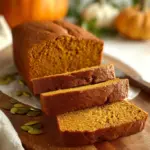
Autumn is a season that encapsulates warm colors, cozy nights, and the wonderful aroma of pumpkin-based treats wafting through the air. One of the delightful staples you can enjoy during this time is gluten-free pumpkin bread. It’s not just a seasonal favorite; this bread offers flavor and comfort any time of year. You might be wondering what makes gluten-free pumpkin bread so special. Let’s dive into this delicious recipe that everyone can enjoy, whether you follow a gluten-free diet or simply adore the rich taste of pumpkin.
Why We Love This Gluten-Free Pumpkin Bread Recipe
You may find a plethora of pumpkin bread recipes during fall, but gluten-free pumpkin bread stands out for various reasons. Firstly, it’s incredibly easy to make, making it an ideal option for both novice and experienced bakers. Secondly, it has a delightful balance of sweet and warm spices that encapsulates the essence of autumn. You can enjoy the moist texture and rich flavor without worrying about gluten. This recipe is so good; it might just become a staple in your home regardless of dietary restrictions.
One of the best parts about gluten-free pumpkin bread is its versatility. You can enjoy it for breakfast, as a snack, or even as a dessert. It pairs exceptionally well with a cup of coffee or tea, making it a perfect addition to your morning routine or afternoon treats. You’ll find that once you try this bread, it will capture your heart and taste buds alike.
Ingredients for Gluten-Free Pumpkin Bread
Creating this gluten-free pumpkin bread is straightforward, and you likely have many of these ingredients on hand. Here’s what you’ll need to gather:
- 1 cup canned pumpkin (make sure it’s not pumpkin pie filling)
- 1 teaspoon baking soda
- 1/2 teaspoon gluten-free baking powder
- 1/4 teaspoon salt
- 3/4 cup granulated sugar
- 1/2 cup brown sugar
- 2 teaspoons pure vanilla extract
- 3 large eggs
- 1/3 cup vegetable oil
- 1 1/2 cups gluten-free all-purpose flour
- 1/4 teaspoon xanthan gum
- 1 teaspoon cinnamon
- 1 tablespoon pumpkin pie spice
These ingredients come together beautifully to create a warm and flavorful pumpkin bread that everyone can enjoy.
How to Make Gluten-Free Pumpkin Bread
Now that you have your ingredients ready, you’re probably eager to get started on your gluten-free pumpkin bread. The process is simple and requires minimal effort, which is great when you’re in a baking mood but don’t want to spend hours in the kitchen.
First, preheat your oven to 350°F (175°C). This temperature is perfect for achieving a beautifully baked bread that’s moist on the inside and slightly crisp on the outside. Next, you’ll want to prepare a 9 x 5 loaf pan, so grab your gluten-free cooking spray and coat it thoroughly to prevent sticking.
In a large mixing bowl, combine the canned pumpkin, baking soda, gluten-free baking powder, and salt. Mix these ingredients until they are fully blended. The pumpkin serves as the base, bringing that lovely rich flavor and moisture to your bread.
Now it’s time to add the sugars and vanilla extract. Pour in the granulated sugar and brown sugar, then drizzle in the pure vanilla extract. Stir until this mixture is smooth and well combined. This step will not only add sweetness but also enrich the batter with a delightful aroma.
Next, add the eggs one at a time, followed by the vegetable oil. Continue mixing until everything is integrated into a smooth batter. The eggs contribute to the bread’s rise, while the oil keeps it moist.
Now you can add the gluten-free all-purpose flour, xanthan gum, pumpkin pie spice, and cinnamon. Mix until the ingredients are just combined. Make sure not to over-mix as it can affect the texture of your final bread.
Once your batter is ready, spoon it into the greased loaf pan. Make sure it’s evenly distributed to promote even baking. Slide the pan into your preheated oven and bake for about 50 to 60 minutes. Check for doneness using a toothpick; it should come out clean when inserted into the center.
Once baked, allow your gluten-free pumpkin bread to cool for about 5 to 10 minutes in the pan. When you can handle it, gently remove the loaf from the pan and cool it on a wire rack or cutting board. Now that your kitchen is filled with that mouthwatering aroma, it’s time to slice and enjoy!
How to Serve Gluten-Free Pumpkin Bread
Your gluten-free pumpkin bread is not only delicious but can also be served in various ways to enhance your experience. Here are some ideas that you might find enjoyable.
- Plain: The first slice you try should be plain. You’ll appreciate the moistness and texture of the bread, full of pumpkin flavor.
- With Butter: Spread a little butter on warm slices for an extra creamy indulgence.
- Cream Cheese Spread: For a sweeter variation, consider adding a layer of cream cheese spread. The tanginess contrasts beautifully with the sweetness of the bread.
- Toasted: If you enjoy toast, slice the loaf and give it a quick toast. This will add a delightful crispness to the outside while keeping the inside soft.
- As a Sandwich: Use slices to create a sandwich with your favorite spreads or as a base for a breakfast sandwich with eggs.
- With Coffee or Tea: Pair the bread with your morning coffee or afternoon tea for a perfect pick-me-up.
No matter how you serve it, your gluten-free pumpkin bread is sure to be a hit!
Expert Tips: Gluten-Free Pumpkin Bread
As you embark on your pumpkin bread journey, here are some expert tips to ensure you achieve the best flavor and texture every time:
- Use Fresh Ingredients: Ensure your baking soda, baking powder, and spices are fresh to elevate the flavors of your bread.
- Don’t Skimp on the Pumpkin: Use pure canned pumpkin and avoid pumpkin pie filling, which often contains added sugars and spices that can alter the flavor.
- Mix Gently: When combining the dry ingredients with the wet, mix just until combined. Overmixing could lead to a denser loaf.
- Test for Doneness: Always check for doneness a few minutes before the timer runs out. Ovens can vary, so avoid overbaking.
- Let Cool Completely: Let the bread cool fully before slicing to keep it from becoming gummy.
Following these tips will help you achieve a perfect gluten-free pumpkin bread, impressing everyone you share it with!
How to Store Gluten-Free Pumpkin Bread
Once you have your gluten-free pumpkin bread made, you may find it difficult to stop at just one slice! If you happen to have leftovers (which is rare), proper storage is key to maintaining freshness.
- Airtight Container: Store leftover pumpkin bread in an airtight container at room temperature. It will stay fresh for about 3 to 4 days.
- Refrigeration: If you want to prolong its life, you can keep it in the fridge. This will extend freshness for up to a week.
- Freezing: For longer storage, this bread freezes exceptionally well. Once fully cooled, wrap the loaf tightly in foil or plastic wrap and place it into a freezer bag. You can freeze it for up to 3 months. To defrost, leave it at room temperature for a few hours or let it thaw in the refrigerator overnight.
With these storage options, you can keep enjoying your tasty gluten-free pumpkin bread long after baking!
Variations of Gluten-Free Pumpkin Bread
While the classic gluten-free pumpkin bread is already delightful, there’s always room for creativity! Here are some fun variations you might want to try:
- Add Nuts: Consider folding in chopped nuts like walnuts or pecans for a glorious crunch.
- Chocolate Chips: For a sweeter twist, add dark or semi-sweet chocolate chips into the batter. The richness of chocolate pairs beautifully with the spices.
- Dried Fruits: Mix in some raisins or cranberries for an extra sweet surprise in each bite.
- Spiced Variations: Experiment with spices such as nutmeg or ginger as an alternative to or in addition to cinnamon and pumpkin spice.
- Leavening Agents: Grab some whipped egg whites to fold into your batter for an extra light and airy bread.
- Savory Twist: Try omitting the sweeteners and spices and include herbs like rosemary or thyme for a savory variation.
Adding these variations to your gluten-free pumpkin bread will help keep it exciting and offer something new for everyone to enjoy!
FAQs About Gluten-Free Pumpkin Bread
Can I use fresh pumpkin instead of canned pumpkin?
Absolutely! If you have fresh pumpkin, you can cook it, puree it, and use it instead of canned pumpkin. Just make sure to measure the amount accurately.
Is gluten-free pumpkin bread suitable for vegans?
While this recipe includes eggs, you can replace them with a vegan substitute, such as flaxseed meal or applesauce, to make it vegan-friendly.
Can I make this recipe without sugar?
Yes, you can experiment with sugar substitutes. Just be aware that it might affect the texture and moisture of your bread.
What gluten-free flour works best?
Using a gluten-free all-purpose flour blend that contains xanthan gum is recommended. Always check the packaging to ensure it’s designed for baking.
How can I enhance the flavor?
You might consider adding citrus zest, like orange or lemon, to provide an additional flavor layer that pairs well with pumpkin.
Gluten-Free Pumpkin Bread
Ingredients
Dry Ingredients
- 1 cup canned pumpkin Make sure it’s not pumpkin pie filling.
- 1 teaspoon baking soda
- 1/2 teaspoon gluten-free baking powder
- 1/4 teaspoon salt
- 1 1/2 cups gluten-free all-purpose flour Contains xanthan gum.
- 1/4 teaspoon xanthan gum
- 1 teaspoon cinnamon
- 1 tablespoon pumpkin pie spice
Wet Ingredients
- 3/4 cup granulated sugar
- 1/2 cup brown sugar
- 2 teaspoons pure vanilla extract
- 3 large eggs
- 1/3 cup vegetable oil


Instructions
Preparation
- Preheat your oven to 350°F (175°C). Prepare a 9 x 5 loaf pan by greasing it with gluten-free cooking spray.
- In a large mixing bowl, combine the canned pumpkin, baking soda, gluten-free baking powder, and salt. Mix until fully blended.
- Add the granulated sugar, brown sugar, and vanilla extract. Stir until smooth and well combined.
- Add the eggs one at a time, then drizzle in the vegetable oil. Mix until integrated into a smooth batter.
- Add the gluten-free all-purpose flour, xanthan gum, pumpkin pie spice, and cinnamon. Mix until just combined; avoid overmixing.
Baking
- Spoon the batter into the greased loaf pan, ensuring it's evenly distributed.
- Bake for about 50 to 60 minutes, checking for doneness with a toothpick; it should come out clean.
Cooling
- Allow the bread to cool for 5 to 10 minutes in the pan. Carefully remove the loaf and cool on a wire rack.
Send me this recipe!
Just enter your email below and get it sent straight to your inbox!