Welcome to the delightful world of Cream Cheese Bars! If you’re seeking a dessert that combines creamy goodness with a hint of sweetness, you’ve stumbled upon the perfect recipe. Whether you’re preparing for a family gathering, a potluck, or simply craving something sweet, these Cream Cheese Bars will surely impress. With their flaky crescent roll base, luscious cream cheese filling, and a sprinkle of cinnamon sugar on top, every bite captures pure bliss. Let’s explore why these treats are beloved and how you can create your own batch!
Why We Love This Cream Cheese Bars Recipe
There’s something uniquely satisfying about Cream Cheese Bars that make them a favorite among many dessert lovers. First, they’re incredibly easy to prepare, requiring minimal ingredients that you likely have on hand. The combination of creamy filling and crispy crust creates a lovely contrast that’s hard to resist. Plus, these bars are highly versatile—serving them warm, cold, or at room temperature accommodates any preference.
Not only do these bars tantalize your taste buds, but they also present beautifully. Cut them into neat squares, and you’ll have a centerpiece that elevates any table setting. Whether it’s a casual Sunday brunch or a formal gathering, these bars fit right in, making them a must-try for anyone who loves desserts!
Ingredients about Cream Cheese Bars
To create the perfect Cream Cheese Bars, you’ll need the following ingredients. Ensuring your ingredients are high quality will make a noticeable difference in the final output.
- Granulated sugar: 1 1/4 cups, divided
- Cinnamon: 1 1/2 teaspoons
- Refrigerated crescent roll dough sheets: 16 ounces
- Cream cheese: 16 ounces, room temperature
- Vanilla extract: 2 teaspoons
- Butter: 5 tablespoons
This simple lineup of ingredients packs a punch of flavor and texture that will have everyone asking for seconds.
How to Make Cream Cheese Bars Directions
The process of making Cream Cheese Bars is straightforward and enjoyable. Preheat your oven to 350°F, then prepare a 9×13-inch baking dish by greasing it with butter or cooking spray. This step is crucial to prevent sticking and ensure smooth removal of the bars once baked.
In a small bowl, combine 1/4 cup of granulated sugar with the cinnamon. Set this mixture aside as you move to the next step. Open one can of the crescent roll sheets and gently lay it into the bottom of the prepared baking dish, pressing it down slightly to fit snugly.
Now, turn your attention to the cream cheese filling. In a large mixing bowl, combine the room temperature cream cheese, 1 cup of granulated sugar, and the vanilla extract. Use a mixer on medium speed to blend the ingredients until the mixture is fluffy and well combined. This step is vital as it integrates the flavors and ensures a smooth consistency.
Spread this delightful cream cheese mixture over the crescent roll base evenly. Next, take the second can of crescent sheets and lay it over the cream cheese layer, much like you did with the first layer. This forms the perfect topping for your bars.
Melt the butter and, using a brush, apply it generously over the top layer of crescent rolls. This will add a rich flavor and help achieve that beautiful golden finish. Finally, sprinkle the prepared cinnamon sugar mixture on top, ensuring even coverage.
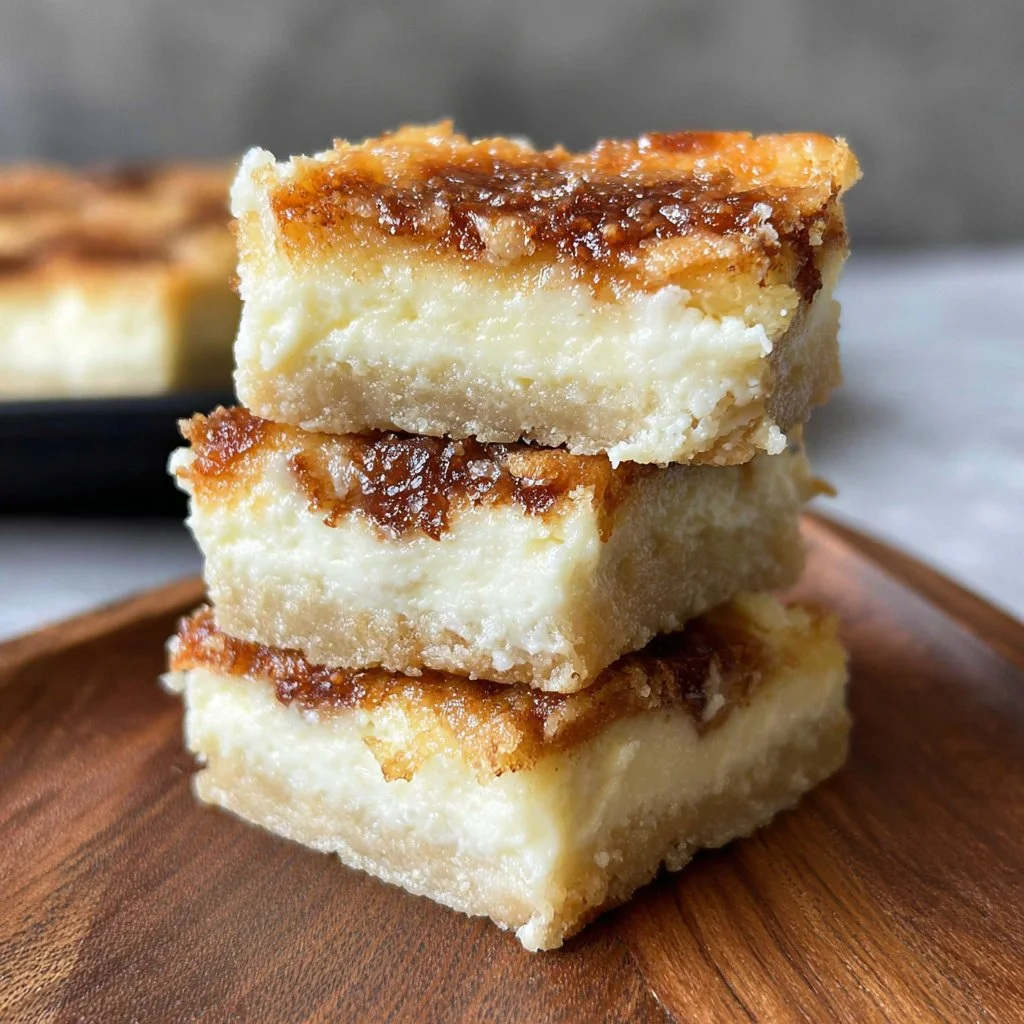
Now it’s time to bake! Place the dish in the preheated oven and allow it to bake for 25-30 minutes, or until the top layer turns golden brown. The aroma of buttery, cinnamon goodness will fill your kitchen during this time. Once done, remove it from the oven and let it cool completely before cutting it into 24 squares. Those squares are ready to dazzle and delight!
How to Serve Cream Cheese Bars
When it comes to serving your Cream Cheese Bars, consider presenting them on a festive platter for a more polished look. They pair well with coffee or tea, making them an excellent choice for brunch or afternoon gatherings. You can also serve them with fresh fruits like berries or slices of apple to add a refreshing contrast to their richness.
For a fun twist, consider drizzling a little chocolate or caramel sauce over the top before serving. Not only does this enhance the visual appeal, but it also brings an extra layer of flavor that will elevate your Cream Cheese Bars to gourmet status. If you’re feeling adventurous, a dollop of whipped cream can turn your squares into an indulgent dessert experience.
ensure you serve them at the right temperature. While they’re delicious when served cold or at room temperature, warming them slightly before serving can bring out the creamy filling even more.
Expert Tips: Cream Cheese Bars
To make sure your Cream Cheese Bars turn out perfectly, keeping these expert tips in mind can be very helpful. First, ensure your cream cheese is at room temperature before mixing. This small detail makes it easier to blend smoothly and achieves a fluffier texture.
If you want a stronger cinnamon flavor, feel free to adjust the amount of cinnamon in the sugar mixture. Some even recommend adding a pinch of nutmeg for depth. Experimenting with flavors can create a unique spin on the classic recipe.
Layer thickness is another critical factor. For best results, aim for even layers of crust and filling. This ensures balanced flavor in each bite and a nice structural integrity that makes cutting the bars cleaner.
Keep an eye on your bars while they bake. Ovens can vary, so starting the check at around the 25-minute mark will help you catch them at the perfect moment. You want them golden brown but not overly baked, as this can affect the texture.
How to Store Cream Cheese Bars
Storing your Cream Cheese Bars properly will help maintain their freshness and flavor. Once cut, place the squares in an airtight container. If you have leftovers, they can be stored in the refrigerator. They will stay fresh for up to a week, but be warned—they might not last that long!
If you decide to freeze them, which is another great option, wrap each bar individually in plastic wrap and then place them in a freezer-safe container. This way, you can thaw as many or as few as you desire in the future. They can last up to two months in the freezer, maintaining their delightful flavor.
Variation of Cream Cheese Bars
One of the beautiful things about desserts like Cream Cheese Bars is their adaptability. Feel free to experiment with different flavors in the filling. For instance, adding a bit of chocolate chips can create a creamy, decadent chocolate cream cheese bar. If you love fruit, consider mixing in some mashed strawberries or blueberries along with the cream cheese for a fruity twist.
For those who enjoy a nutty flavor, sprinkle chopped nuts such as pecans or walnuts on top before baking. This will not only add crunch but also deepen the flavor profile of your bars.
If you prefer a touch of citrus, a teaspoon of lemon or orange zest in the cream cheese mixture can provide a fresh twist that pairs beautifully with the sweetness. The possibilities are endless, so let your creativity run wild!
FAQ Section
What are Cream Cheese Bars? Cream Cheese Bars are delightful desserts made primarily of a cream cheese filling layered between flaky crescent roll dough, baked to golden perfection, and often topped with a cinnamon sugar mixture.
Can I make Cream Cheese Bars ahead of time? Absolutely! You can prepare these bars a day in advance and store them in the refrigerator. They will still taste delicious the next day.
How do I know when my Cream Cheese Bars are done? You’ll know your bars are done when they turn golden brown on top and the filling is set. A clean knife inserted into the center can also help you confirm their readiness.
Can I freeze Cream Cheese Bars? Yes, you can freeze Cream Cheese Bars. Just wrap the squares tightly in plastic wrap and store them in a freezer-safe container for up to two months.
What should I serve with Cream Cheese Bars? Cream Cheese Bars pair wonderfully with coffee, tea, or even a refreshing fruit cup. For a special touch, serve with a drizzle of chocolate or caramel sauce on top.

Cream Cheese Bars
Ingredients
For the crust and topping
- 16 ounces Refrigerated crescent roll dough sheets
- 5 tablespoons Butter, melted For brushing on top
- 1 1/4 cups Granulated sugar Divided, 1 cup for filling and 1/4 cup for cinnamon sugar
- 1 1/2 teaspoons Cinnamon For topping
For the filling
- 16 ounces Cream cheese, room temperature Ensure it's at room temperature for better mixing
- 2 teaspoons Vanilla extract


Instructions
Preparation
- Preheat your oven to 350°F (175°C). Grease a 9x13-inch baking dish with butter or cooking spray.
- In a small bowl, mix 1/4 cup of granulated sugar with the cinnamon and set aside.
- Open one can of crescent roll sheets and press it into the bottom of the prepared baking dish.
Making the filling
- In a large mixing bowl, beat the room temperature cream cheese, 1 cup of granulated sugar, and vanilla extract with a mixer on medium speed until fluffy and well combined.
- Spread the cream cheese mixture evenly over the crescent roll base.
- Lay the second can of crescent sheets over the cream cheese layer.
Topping and baking
- Brush the melted butter generously over the top layer of crescent rolls.
- Sprinkle the cinnamon sugar mixture evenly on top.
- Bake in the preheated oven for 25-30 minutes, or until the top layer is golden brown.
- Allow to cool completely before cutting into 24 squares.
Send me this recipe!
Just enter your email below and get it sent straight to your inbox!