
This Candy Corn Cheesecake is a great dessert for Halloween. It has creamy layers that look like candy corn with yellow, orange, and white colors. The cheesecake is rich and smooth, and it needs some time to bake and chill, but it tastes really good. It’s perfect to make ahead for a party.
Why We Love This Candy Corn Cheesecake Recipe
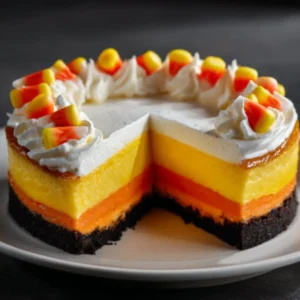
This cheesecake stands out because it captures the essence of Halloween in a dessert that tastes just as amazing as it looks. The three distinct layers, each tinted with yellow, orange, and white hues, mimic candy corn perfectly, bringing a visual delight before you even take a bite. Using a mix of cream cheese, mascarpone, and sour cream creates an ultra-smooth texture that melts in your mouth. The subtle sweetness from honey paired with the gentle tang of sour cream balances the flavor beautifully, making it a treat you can enjoy again and again. Plus, topping it off with whipped cream and real candy corn adds that classic festive finish that guests will remember.
Ingredients for Candy Corn Cheesecake
For the crust:
- 24 Oreos, finely crushed
- ¼ cup (½ stick) butter, melted
For the cheesecake:
- 3 packages (8 ounces each) cream cheese, softened
- 8 ounces mascarpone cheese, softened
- 8 ounces sour cream
- 1½ cups honey
- 1½ cups granulated sugar
- 6 large eggs
- ⅓ cup all-purpose flour
- ½ cup heavy whipping cream
- 1 teaspoon vanilla extract
- Yellow and orange food coloring paste or gel
For the topping:
- ½ cup heavy whipping cream
- 1 cup candy corns
How to Make Candy Corn Cheesecake Directions
Start by preheating your oven to 350°F and preparing a 10-inch springform pan with nonstick spray. The crust sets the base for your cheesecake, so begin by mixing finely crushed Oreo cookies with melted butter. Press this mixture firmly into the bottom of your pan and bake for about 10 minutes. Once done, let it cool while you prepare the cheesecake filling.
In a large bowl, blend together the cream cheese, mascarpone, and sour cream using an electric mixer at medium speed until you achieve a smooth, creamy consistency. Next, add the honey and granulated sugar, continuing to mix until everything is well combined. Incorporate the eggs one at a time, beating well after each addition to ensure a uniform texture. Use a spatula to scrape down the sides, keeping the mixture smooth.
Lower your mixer speed and add the flour, heavy cream, and vanilla extract, blending gently to avoid overmixing. Now comes the fun part—dividing the batter evenly into three bowls. Leave one bowl as is (this will be the white layer). To the other two, add yellow food coloring paste to one and orange to the other, adjusting the color intensity until you get the perfect candy corn shades.
Pour the yellow batter over the cooled crust and bake for 30 to 35 minutes until just set but not jiggly. Remove from the oven and allow it to cool for 20 minutes. Next, pour the orange batter on top of the yellow layer and repeat the baking and cooling process. Finally, add the white batter over the orange layer and bake one last time for 30 to 35 minutes. Let the entire cheesecake cool completely once baking is finished.
For best results, refrigerate the cheesecake for 24 hours to allow it to fully set and develop flavor. Before serving, run a sharp knife around the edge of the pan to loosen it and carefully remove the springform sides. If you’re confident, slide a knife beneath the crust to transfer the cheesecake onto a serving platter.
Prepare the topping by whipping the remaining ½ cup of heavy cream at high speed until stiff peaks form. Spread this whipped cream evenly on top of the cheesecake. Decorate with candy corn candies for a festive and colorful finish. Keep the cheesecake chilled until you’re ready to serve.
How to Serve Candy Corn Cheesecake
This cheesecake makes a stunning centerpiece for Halloween parties, and serving it correctly ensures every slice is a delight. Use a sharp, clean knife to cut neat slices—warming the knife slightly under hot water can help you achieve smooth edges without cracking. Place each slice on a dessert plate and consider adding a dollop of extra whipped cream on the side for an indulgent touch.
To elevate the presentation, sprinkle a few extra candy corns around the plate or garnish with a small fresh mint leaf for a pop of green that contrasts nicely with the vibrant colors. Because this cheesecake is rich, pairing it with a light, refreshing beverage like iced herbal tea or sparkling water with a slice of lemon helps balance the flavors.
Whether for a formal dinner or a casual gathering, serve the cheesecake chilled, as the cool texture adds to the creamy mouthfeel and overall enjoyment.
Expert Tips: Candy Corn Cheesecake
Making a multi-layered cheesecake like this one requires patience and careful attention, but a few tips can simplify the process. First, always bring your cream cheese, mascarpone, and sour cream to room temperature before mixing. This ensures a silky smooth batter without lumps.
When coloring your batter, add the paste gradually to avoid overly intense hues. It’s easier to darken the color than to lighten it once mixed. Also, try not to overbeat after adding the flour; overmixing can make the cheesecake dense instead of light and creamy.
Use a water bath if you want to avoid cracks on your cheesecake surface. Wrapping the springform pan in foil and placing it in a larger pan filled with hot water helps maintain even heat. Make sure the water doesn’t touch the top of the pan to prevent water seeping into the batter.
Chilling the cheesecake for a full day is essential. It helps the flavors meld and the texture to firm up for clean slicing. Lastly, decorate just before serving to keep the whipped cream fresh and the candy corn looking vibrant.
How to Store Candy Corn Cheesecake
Proper storage of your cheesecake is key to preserving its flavor and texture. After serving, cover any leftover slices tightly with plastic wrap or store in an airtight container to prevent drying out or absorbing odors from the fridge.
You can keep the cheesecake refrigerated for up to 5 days. If you want to store it longer, wrap it well in plastic and then aluminum foil, and freeze for up to 2 months. When ready to enjoy, thaw it overnight in the fridge for best results.
Avoid leaving the cheesecake out at room temperature for extended periods to prevent spoilage, especially since it contains dairy products.
Variations of Candy Corn Cheesecake
If you’re eager to put your own spin on this festive dessert, there are plenty of creative ways to customize it. For a nutty twist, add crushed toasted pecans or almonds into the Oreo crust or sprinkle some on top before chilling. This adds a crunchy texture that contrasts nicely with the smooth cheesecake.
To make it more fruity, swirl in some pureed pumpkin or mango into one of the colored layers for a seasonal flavor boost that pairs well with the creamy base. You can also swap out the candy corn topping for fresh berries or chocolate shavings for a different visual and taste experience.
If you want to keep the dessert lighter, substitute part of the cream cheese with Greek yogurt, which reduces fat but keeps a creamy texture. For a no-bake version, create a layered parfait in glasses using the same colored batters baked ahead and chilled.
FAQ about Candy Corn Cheesecake
What makes this cheesecake different from a regular cheesecake?
This cheesecake is unique because it features three distinct colored layers mimicking candy corn. It uses a combination of cream cheese, mascarpone, and sour cream for extra creaminess and a smooth texture.
Can I use a 9-inch pan instead of a 10-inch springform pan?
You can, but be aware that the batter amounts might be too much for the smaller pan. You may have some leftover batter or thinner layers if you use a 9-inch pan.
How long should I chill the cheesecake before serving?
For best texture and flavor, refrigerate the cheesecake for at least 24 hours. This resting time allows the layers to set firmly and the flavors to blend.
Can I make this cheesecake in advance for a party?
Absolutely! This cheesecake actually benefits from being made a day ahead, giving it ample chilling time and making your party prep easier.
Is there an alternative to food coloring paste?
Yes, you can use liquid food coloring, but paste or gel coloring tends to give more vibrant and consistent colors without thinning the batter.
How should I store leftover cheesecake?
Keep leftovers covered in an airtight container in the refrigerator for up to 5 days. For longer storage, freeze the cheesecake wrapped tightly and thaw in the fridge before serving.
Candy Corn Cheesecake
Ingredients
- 24 Oreos (finely crushed for crust)
- 1/4 cup unsalted butter (melted)
- 3 packages cream cheese (8 ounces each, softened)
- 8 ounces mascarpone cheese (softened)
- 8 ounces sour cream
- 1 1/2 cups honey
- 1 1/2 cups granulated sugar
- 6 large eggs
- 1/3 cup all-purpose flour
- 1/2 cup heavy whipping cream
- 1 teaspoon vanilla extract
- as needed yellow and orange food coloring paste or gel
- 1/2 cup heavy whipping cream (for topping)
- 1 cup candy corn (for garnish)


Instructions
- Preheat your oven to 350°F (175°C) and prepare a 10-inch springform pan with nonstick spray.
- Mix crushed Oreos with melted butter and press firmly into the bottom of the pan. Bake for about 10 minutes, then let cool.
- In a large bowl, blend cream cheese, mascarpone, and sour cream until smooth. Add honey and sugar, mixing well.
- Add eggs one at a time, beating well after each addition. Then add flour, heavy cream, and vanilla extract, mixing gently.
- Divide the batter into three bowls. Leave one white, add yellow coloring to another, and orange to the third.
- Pour the yellow batter over the cooled crust and bake for 30 to 35 minutes until just set. Let cool for 20 minutes.
- Repeat with the orange layer, then the white layer, baking each for 30 to 35 minutes. Cool completely after the final bake.
- Refrigerate for 24 hours to set fully. Before serving, whip the remaining heavy cream to stiff peaks and spread on top.
- Garnish with candy corn and serve chilled.
Send me this recipe!
Just enter your email below and get it sent straight to your inbox!