
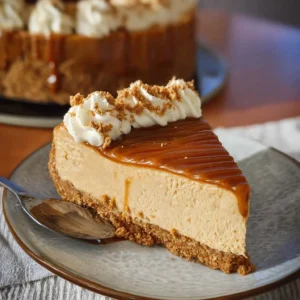
There’s something truly special about a well-crafted cheesecake, and when you infuse it with the irresistible flavor of Biscoff cookies, you elevate this classic dessert to new heights. Imagine a creamy, rich filling, nestled on a crunchy biscuit base, topped with a drizzle of Biscoff spread. The Biscoff cheesecake is not just a dessert; it’s a celebration of flavors and textures that will leave you and your guests in awe.
Why We Love This Biscoff Cheesecake Recipe
Biscoff cheesecake is a perfect marriage of textures and flavors. The buttery crunch of the Biscoff biscuit base beautifully complements the smooth, velvety filling that is rich yet light at the same time. Each bite offers a taste of caramelized brown sugar and hints of spice from the Biscoff spread, making it an indulgent treat for any occasion.
This cheesecake is incredibly easy to make, requiring minimal effort for maximum impact. It’s great for any gathering, from casual family dinners to more elaborate celebrations. Whether you are a seasoned baker or a novice in the kitchen, this recipe will guide you through the process in a straightforward and enjoyable way. Once you try it, you will definitely fall in love with this dessert!
Ingredients about Biscoff Cheesecake
To create a sensational Biscoff cheesecake, gather the following ingredients:
- 250g Biscoff biscuits
- 1/4 tsp salt
- 90g butter, melted
- 250ml cream
- 500g cream cheese
- 1/3 cup caster sugar
- 1 tsp vanilla essence
- 1 cup Biscoff spread
- Whipped cream (optional for decoration)
- Extra Biscoff biscuit crumbs (optional for decoration)
- Extra Biscoff spread (optional for decoration)
This selection of ingredients combines perfectly to yield a cheesecake that is both rich and satisfying, yet incredibly easy to prepare. Each element contributes to the overall flavor and texture, creating a delightful indulgence.
How to Make Biscoff Cheesecake Directions
Now let’s dive into the process of making your Biscoff cheesecake. Don’t worry; it’s not as daunting as it may seem. Follow these straightforward steps, and you will have a luscious cheesecake ready to impress!
Begin by crushing the Biscoff biscuits into fine crumbs using a food processor. If you don’t have one, you can place the biscuits in a zip-lock bag and crush them with a rolling pin. Once they are finely crumbled, add 1/4 tsp of salt and the melted butter. Pulse the mixture until everything is well combined.
Take your biscuit mixture and press it firmly into the bottom of a lined 22cm springform cake tin. Make sure to create an even layer, which will form the base of your cheesecake. The back of a metal spoon works well for smoothing it out. After you’ve pressed it down, place the tin in the fridge to chill while you prepare the filling.
In a mixer, whip the cream until it reaches stiff peaks. This may take a few minutes, but be patient—it’s worth it. Once whipped, set it aside for later use.
In the same mixer, beat together the cream cheese, caster sugar, and vanilla essence until the mixture becomes light and fluffy. Scrape down the sides periodically to ensure even mixing—this usually takes about 5 minutes.
Gradually add in the Biscoff spread, beating until it’s fully incorporated. You’ll notice the mixture becomes richer and more flavorful.
Now, it’s time to gently fold in the whipped cream. Start by incorporating half of it, mixing gently to avoid deflating the mixture. Once that’s combined, fold in the remaining whipped cream until it’s fully blended, resulting in a smooth, airy filling.
Pour the cheesecake mixture over the chilled biscuit base, smoothing the top with a spatula or the back of a spoon. Make sure it reaches the edges for a clean look.
It’s important to let your cheesecake set properly. Place it in the refrigerator for at least 6 hours, but for the best results, leave it overnight. This extra time allows the flavors to meld and the filling to firm up nicely.
When you’re ready to serve, carefully run a sharp knife around the edge of the tin. This will help release the cheesecake easily. Remove the springform tin and transfer the cheesecake to a serving plate.
Before serving, you can melt a bit of Biscoff spread in the microwave until it’s runny. Drizzle this over the top for an extra touch of decadence. Optionally, decorate with whipped cream and extra Biscoff biscuit crumbs.
By following these steps, you will have a sensational Biscoff cheesecake that will be the star of your dessert table.
How to Serve Biscoff Cheesecake
Serving your Biscoff cheesecake is just as important as making it, as presentation can elevate the experience. Here’s how to ensure it looks as delightful as it tastes:
Slice with Precision: Use a sharp knife to cut even slices, dipping the knife in hot water between cuts for cleaner edges.
Garnish Generously: Top each slice with a dollop of whipped cream, a drizzle of extra Biscoff spread, and a sprinkle of Biscoff crumbs. These decorations not only enhance the flavor but also add visual appeal.
Pair Wisely: This cheesecake pairs beautifully with coffee or a tall glass of milk. The coffee brings out the caramel notes in the Biscoff, making it a delightful combo.
Temperature Matters: Always serve the cheesecake chilled. Opt for around 10 to 15 minutes out of the refrigerator for the best texture and flavor.
Presentation is Key: Use a beautiful serving plate and consider adding some fresh fruit or edible flowers around the cheesecake for a pop of color.
This thoughtful approach to serving ensures your Biscoff cheesecake is truly an impressive dessert.
Expert Tips: Biscoff Cheesecake
Creating the perfect Biscoff cheesecake can be made easier with just a few expert tips. These insights will help you avoid common pitfalls and enhance your baking skills:
Room Temperature Ingredients: Ensure that your cream cheese and whipped cream start at room temperature. This helps to mix them more smoothly without lumps.
Don’t Rush the Chilling: Be patient when it comes to refrigerating the cheesecake. It truly benefits from at least 6 hours or overnight for the best texture and flavor.
Mind the Whipping: When whipping cream, keep an eye on it. Over-beating can turn it into butter, while under-beating leaves it too soft. Aim for stiff peaks that hold their shape.
Use Quality Ingredients: The quality of your Biscoff spread and cream cheese can make a significant difference in taste. Opt for reputable brands for the best flavor.
Experiment with Decor: Feel free to get creative with your garnishes. Consider adding chopped nuts, chocolate shavings, or even a sprinkle of sea salt to enhance flavor profiles.
By following these expert tips, you will elevate your cheesecake-making game and ensure your Biscoff cheesecake is nothing short of spectacular.
How to Store Biscoff Cheesecake
After the excitement of creating your Biscoff cheesecake, you might be wondering how to store any leftovers effectively. Proper storage is essential to maintain freshness and flavor.
Refrigeration is Key: Always store your cheesecake in the refrigerator. Cover it with plastic wrap or place it in an airtight container to prevent it from absorbing odors from other foods.
Maximum Freshness: Ideally, consume your Biscoff cheesecake within 3 to 5 days. However, it can last up to a week in the fridge.
Freezing Options: If you can’t finish it in time, you can freeze individual slices. Wrap each slice tightly in cling film and aluminum foil to prevent freezer burn. It can be frozen for up to 2 months.
Thawing Tips: When ready to enjoy your frozen cheesecake, thaw it in the refrigerator overnight. This ensures it retains its creamy texture.
By storing your cheesecake correctly, you can continue enjoying its delightful flavor for days to come.
Variation of Biscoff Cheesecake
While the classic Biscoff cheesecake is a sensational treat on its own, you may want to explore some exciting variations. Each brings a new twist that can personalize this beloved dessert:
Chocolate Biscoff Cheesecake: Add melted chocolate to the cream cheese mixture for a decadent chocolate layer. You can use dark, milk, or white chocolate for different flavor profiles.
Biscoff Swirl: Incorporate swirls of Biscoff spread throughout the cheesecake filling. This creates a visually appealing pattern and intensifies the Biscoff flavor.
Nutty Biscoff Cheesecake: Add chopped nuts, like pecans or hazelnuts, to the biscuit base or as a topping. The added crunch and flavor will complement the creaminess beautifully.
Fruit Topping: Top your cheesecake with fresh berries, like raspberries or strawberries. The tartness of the fruit contrasts wonderfully with the rich filling.
No-Bake Version: If you prefer a simpler approach, consider making a no-bake Biscoff cheesecake. Skip the whipping and simply fold in solidified whipped cream for a lighter, less time-consuming dessert.
Experimenting with variations allows you to enjoy Biscoff cheesecake in many different contexts, ensuring it never gets boring.
FAQ about Biscoff Cheesecake
Can I make Biscoff cheesecake ahead of time?
Absolutely! In fact, making the cheesecake a day in advance allows it to set properly and flavors to meld together. Just be sure to store it covered in the refrigerator.
How do I know when my cheesecake is set?
If the edges are firm and the center has a slight jiggle when gently shaken, it’s ready. After chilling, it will firm up further.
Can I substitute Biscoff biscuits with another type of cookie?
Yes, you can substitute with similar cookies like speculoos, digestive biscuits, or any other cookie with a complementary flavor. Just ensure the base remains firm and intact.
Is Biscoff spread the same as cookie butter?
Yes, Biscoff spread is a type of cookie butter made from the same cookies. It has a unique flavor that enhances the cheesecake beautifully.
Can I make this recipe gluten-free?
Yes, by using gluten-free Biscoff biscuits, you can easily adapt this recipe to accommodate gluten-free diets without sacrificing flavor.
Biscoff Cheesecake
Equipment
- 9-inch Springform Pan
- Mixing Bowls:
- Electric Mixer
- Cooling rack
Ingredients
- 250 grams Biscoff biscuits
- 1/4 teaspoon salt
- 90 grams butter melted
- 250 ml cream
- 500 grams cream cheese room temperature
- 1/3 cup caster sugar
- 1 teaspoon vanilla essence
- 1 cup Biscoff spread
- whipped cream optional for decoration
- extra Biscoff biscuit crumbs optional for decoration
- extra Biscoff spread optional for decoration


Instructions
- Preheat your oven to 350°F (175°C).
- Crush Biscoff biscuits into fine crumbs and mix with melted butter and salt. Press firmly into the bottom of a lined 9-inch springform pan.
- In a mixer, beat cream cheese until smooth, then gradually add sugar and vanilla essence until fluffy.
- Mix in Biscoff spread until fully incorporated.
- Pour the cream mixture into the prepared crust, smoothing the top.
- Bake for 55-65 minutes until the edges are set and the center is slightly wobbly.
- Turn off the oven and let the cheesecake cool inside for 1 hour. Then refrigerate for at least 6 hours or overnight.
- Before serving, drizzle melted Biscoff spread on top and garnish with whipped cream and extra crumbs if desired.
Send me this recipe!
Just enter your email below and get it sent straight to your inbox!