The holiday season is a time of joy, laughter, and delicious treats. Among the array of festive sweets, Christmas Tree Brownies stand out as a fun and delightful treat that brings a little magic to your holiday gatherings. These charming confections not only look fantastic but also taste absolutely divine. Imagine rich, fudgy brownies transformed into whimsical Christmas trees adorned with creamy frosting and colorful decorations. Whether you’re baking with family, surprising friends, or simply indulging in a festive dessert, these Christmas Tree Brownies are sure to become a beloved tradition.
Why We Love This Christmas Tree Brownies Recipe
There’s something truly enchanting about Christmas Tree Brownies that makes them a favorite among both kids and adults. First, the process of turning ordinary brownies into festive trees adds an element of creativity and fun to your baking experience. You get to unleash your inner artist as you pipe frosting and sprinkle decorations. Secondly, these brownies are incredibly easy to make. With a boxed brownie mix at the base, you’ll find the preparation process to be quick and straightforward, leaving you more time to enjoy the holiday season.
Moreover, they offer a perfect balance of rich chocolate flavor and sweet frosting that will tantalize your taste buds. The vibrant colors and festive designs make them not just a treat for the mouth, but for the eyes too. Once you present these delightful brownies at a holiday gathering, you’ll surely have everyone smiling and reaching for a second piece.
Ingredients about Christmas Tree Brownies
To whip up your very own batch of Christmas Tree Brownies, gather the following ingredients:
- 1 (18.3-ounce) box of brownie mix
- 1 (16-ounce) container of vanilla frosting
- Green food coloring (approximately 20-25 drops)
- Assorted sprinkles for decoration
- Red hots for embellishing the trees
- 6 candy canes (cut into about 2-inch pieces)
- 12 red hot candies
Each ingredient plays a crucial role in crafting these delightful treats. The brownie mix forms the base, providing a rich and chocolatey flavor. The vanilla frosting, colored with green food dye, creates the quintessential tree look. Sprinkles, red hots, and candy canes add fun and festive accents, bringing your Christmas scene to life and making your brownies perfect for sharing.
How to Make Christmas Tree Brownies Directions
Creating your Christmas Tree Brownies is an enjoyable and simple process. Here’s how you can bring these festive treats to life.
- Preparation: Start by lining a 9×9-inch baking pan with foil for easy removal. Once lined, give it a light spray with vegetable spray to prevent sticking.
- Bake the Brownies: In a large bowl, follow the instructions on the brownie mix box and prepare the batter accordingly. Pour the batter into the prepared pan and bake as directed, ensuring that your brownies come out moist and fudgy. Once baked, take them out of the oven and set aside to cool completely.
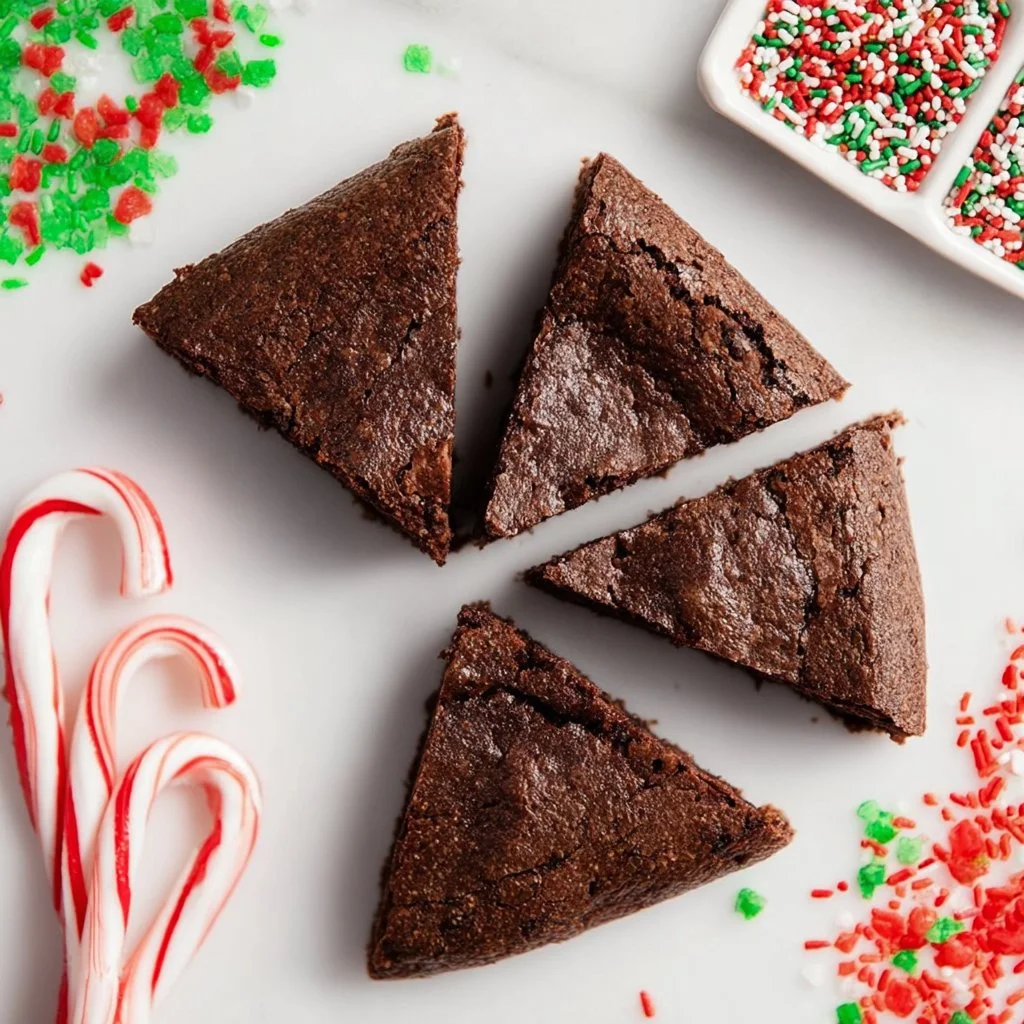
- Shape Your Brownies: Once cooled, lift the brownies out of the pan using the edges of the foil. Cut the brownies into three equal strips and then slice each strip into four triangles. This creates the tree shapes that will be decorated.
- Candy Cane “Trunks”: Take your candy canes and cut them into pieces about 2 inches long. Insert one piece into the end of each brownie triangle to serve as the “trunk” of your tree.
- Frosting with a Festive Touch: In a small bowl, mix half of the container of vanilla frosting with green food coloring. Add about 20-25 drops to achieve the desired shade of green. Once mixed, spoon the green frosting into a small plastic bag. Snip a tiny hole in one corner of the bag to create a piping bag.
- Pipe Your Garland: Start at the top of each brownie triangle, using the bag to pipe the green frosting in a garland pattern. Move side to side as you work your way down the triangle, covering the brownie with lovely green frosting.
- Sprinkle Decorations: After frosting, the fun part begins! Sprinkle your desired toppings—be it sprinkles or additional candies—on top of the frosting. To finish off your trees, place a red hot candy at the top of each triangle, making each brownie look like a decorated Christmas tree.
With these steps, your Christmas Tree Brownies are complete! The vibrant colors and creative shapes will surely bring a smile to everyone’s face.
How to Serve Christmas Tree Brownies
When it comes to serving your Christmas Tree Brownies, presentation can elevate the festive experience even further. You can arrange them on a large platter or cake stand, spacing them out to highlight each decorated tree. To make it even more festive, consider garnishing your serving platter with some fresh holiday greens or small ornaments to contribute to the Christmas vibe.
You may also want to show off your creative side by arranging the brownies in the shape of a Christmas tree. Stack them higher in the center and gradually decrease the size outward, replicating a pine tree shape, which will undoubtedly be a conversation starter.
Don’t forget to have festive napkins and plates ready for your guests. These brownies are perfect for holiday parties, classroom treats, or cozy gatherings at home with family. Pair them with a cup of hot cocoa or warm apple cider, and you have a delightful holiday dessert that everyone will love.
Expert Tips: Christmas Tree Brownies
To make sure your Christmas Tree Brownies turn out perfectly, consider these expert tips:
- Brownie Consistency: Ensure that you do not overbake the brownies. Keeping them fudgy will enhance the overall taste and texture of your finished treat.
- Coloring the Frosting: Adjust the amount of green food coloring based on your preference. You can mix in a little yellow or blue food dye to achieve the perfect shade of green for your trees.
- Decorating Variations: Use various sprinkles in different sizes and colors. Edible glitter can also add a magical touch to your trees, making them shine as if coated in fresh snow.
- Use a Stencil: If you’re not comfortable cutting freehand triangles, you can make a template out of cardstock. Place it over your brownies to guide your cuts for uniform shapes.
- Allow Cooling Time: Allow your brownies to cool completely before frosting. This prevents the frosting from melting and running off, keeping your decorations intact.
- Get Creative: Feel free to experiment with other candies for decoration. Mini marshmallows can make for snowy effects, while chocolate chips could resemble ornaments on your trees.
With these tips, you can ensure a successful bake and impress your family and friends with your beautiful creations.
How to Store Christmas Tree Brownies
To maintain the freshness of your Christmas Tree Brownies, proper storage is key. After your brownies have cooled and you’ve completed the decoration, place them in an airtight container. You can also use parchment paper between layers to prevent any sticky situations. Store them at room temperature for up to three days.
If you wish to keep them longer, consider refrigerating them. They can last up to a week in the fridge. When taking them out, let them sit for a little while to reach room temperature before serving, ensuring that the texture returns to its delightful fudgy state.
For even longer storage, you can freeze your brownies. Wrap each brownie triangle in plastic wrap and place them in a freezer-safe container. They can last for up to three months. Thaw them in the fridge overnight or let them sit at room temperature for a few hours before indulging.
Variation of Christmas Tree Brownies
While the traditional Christmas Tree Brownies are absolutely fantastic, you can always add a little twist to make them your own. Consider these fun variations:
- Flavor Change: Instead of using a classic brownie mix, try replacing it with blondie mix for a different flavor profile. The lighter base would complement the frosting beautifully.
- Different Frosting: Experiment with flavored frostings. Peppermint or even chocolate frosting can add a unique flair to your trees. Adding peppermint extract to the vanilla frosting can give it a refreshing twist.
- Add Nuts: If you prefer a crunch in your brownies, add chopped nuts (such as walnuts or pecans) to your brownie batter. This will enhance the texture and flavor, creating a delicious contrast.
- Alternative Decorations: Use chocolate-covered pretzels for a fun design element. You can create ornaments or even stars on top of your trees with different candies.
- Theme-Based Designs: If you’re feeling particularly creative, consider a snow tree theme by frosting the brownies with white icing and adding shredded coconut as “snow.”
These variations offer a chance to personalize your holiday treats and impress your guests with unique flavors and presentations.
Christmas Tree Brownies FAQ
What makes Christmas Tree Brownies a holiday favorite?
Christmas Tree Brownies are a holiday favorite due to their fun and festive appearance, paired with the rich taste of chocolate. They encourage creativity during the baking process and are perfect for gatherings, making them a popular choice for the season.
Can I use homemade brownies instead of a boxed mix?
Absolutely! If you have a favorite homemade brownie recipe, feel free to use it instead of a boxed mix. Just be sure to bake them in a 9×9-inch pan for the best results.
How can I make the frosting easier to pipe?
If your frosting is too stiff to pipe, you can warm it slightly in the microwave for about 10 seconds or mix in a bit of milk to achieve the desired consistency for easy handling.
Are Christmas Tree Brownies suitable for gluten-free diets?
Yes! You can easily make this recipe gluten-free by using a gluten-free brownie mix. Just follow the instructions on the box for best results.
How do I make my brownie trees stand up better?
To ensure your brownie trees stand up properly, make sure to chill them in the fridge after cutting and decorating. This will help them firm up and hold their shape, especially if you’ve used lots of frosting.
Christmas Tree Brownies
Ingredients
Brownie Base
- 1 box 1 (18.3-ounce) box of brownie mix Use your favorite brownie mix.
Frosting and Decorations
- 1 container 1 (16-ounce) container of vanilla frosting This will be colored for the trees.
- 20-25 drops Green food coloring Adjust for desired shade of green.
- to taste Assorted sprinkles for decoration Use fun shapes and colors.
- 12 pieces 12 red hot candies To decorate the tops of the trees.
- 6 Candy canes (cut into about 2-inch pieces) These will serve as the trunks.


Instructions
Preparation
- Line a 9×9-inch baking pan with foil and lightly spray with vegetable spray.
Baking the Brownies
- Prepare the brownie batter following the instructions on the brownie mix box.
- Pour the batter into the prepared pan and bake as directed until moist and fudgy.
- Allow the brownies to cool completely after baking.
Shaping and Decorating
- Lift the cooled brownies from the pan using the foil edges and cut into three strips, then slice each strip into four triangles.
- Insert a 2-inch candy cane piece into the end of each brownie triangle to serve as the tree trunk.
- Mix half of the vanilla frosting with the green food coloring, and transfer to a piping bag.
- Pipe the green frosting in a garland pattern on each brownie triangle.
- Sprinkle assorted toppings over the frosting and place a red hot candy at the top of each triangle.
Send me this recipe!
Just enter your email below and get it sent straight to your inbox!