Baking is not just a method; it’s an art form. Among the many delightful creations you can make in your kitchen, artisan bread holds a special place. This type of bread is characterized by its hand-crafted quality, rich flavors, and that sought-after crusty exterior. When you think of the word “artisan,” imagine the care, love, and expertise that go into making each loaf. You will discover that making artisan bread at home isn’t just an enriching experience; it’s a delightful journey.
Why We Love This Artisan Bread Recipe
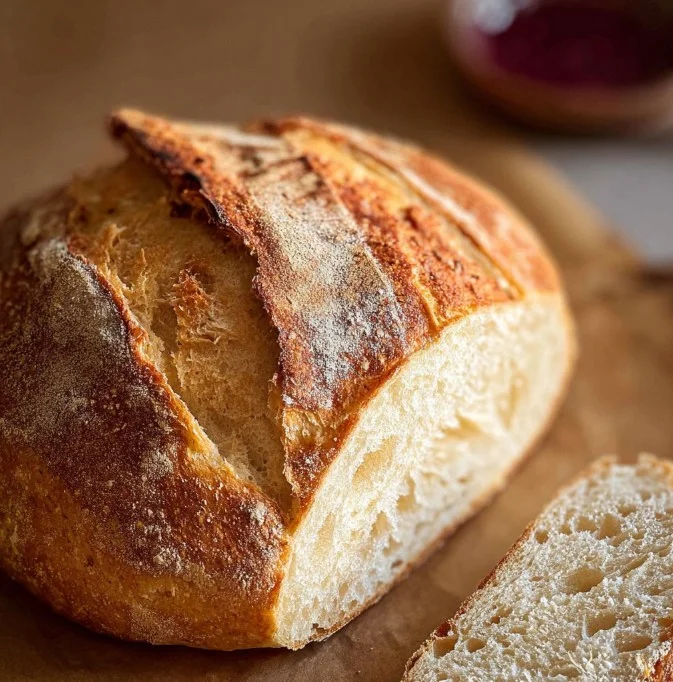
What’s not to love about artisan bread? The magic begins with four simple ingredients: bread flour, instant yeast, kosher salt, and warm water. This artisan bread recipe shines because it combines both simplicity and flavor. The weathered crust, combined with a fluffy interior, holds a certain allure that you often associate with artisanal bakeries.
Beyond flavor, this recipe allows you to customize your bread-making journey. Whether you’re a novice or an experienced baker, you’ll appreciate how easy it is to follow. The beauty of this recipe lies in its versatility. You have the flexibility to adjust rising times and experiment with flour types to create a loaf that is uniquely yours. The end result? A loaf that tastes as if it has been pulled straight from a traditional bakery.
Ingredients for Artisan Bread
To create your own artisan bread, you will need the following ingredients:
- 3 3/4 cups bread flour
- 2 1/4 teaspoons instant yeast
- 1 3/4 teaspoons kosher salt
- 1 1/2 cups warm water (between 120°F and 130°F)
These ingredients come together to create a rich and flavorful loaf that you can proudly serve to friends and family.
How to Make Artisan Bread
Creating artisan bread is a step-by-step process that rewards your patience and effort. Here’s how you can easily create your loaf:
- Mix the Dry Ingredients: Begin by placing the flour, instant yeast, and kosher salt in a large mixing bowl. Use a large wooden spoon to stir the ingredients together until they are well combined.
- Incorporate the Warm Water: Slowly add the warm water to the dry mixture. This is where the magic begins. Stir until you have a very sticky dough, ensuring no lumps of flour remain.
- First Rise: Cover the bowl with plastic wrap and place it in a warm, draft-free area. Allow the dough to rise until it has doubled in size, roughly 1 1/2 to 2 hours. If you’re opting for an overnight rise, cover the bowl and refrigerate it instead. This method takes about 8 hours but allows for a more developed flavor.
- Preheat Your Oven: Once the dough has risen, preheat your oven to 450°F. During this time, place a Dutch oven with its lid inside the oven for about 30 minutes, allowing it to heat up.
- Shape the Dough: Take the dough out of the refrigerator if you opted for overnight rising and let it sit at room temperature for 15 minutes. Dust your hands with flour and gently fold the edges of the dough toward the center, rotating the bowl as you go. Keep working the dough until it starts holding its shape.
- Prepare for Baking: Lightly flour a clean surface and turn the dough out onto it, seam side down. Shape it into a round loaf and place it on a piece of parchment paper. Sprinkle a bit more flour on top and cover it loosely with either plastic wrap or a clean dish towel for 10 minutes.
- Score the Dough: Using a sharp knife, make a shallow cut across the top of your dough, about 1/4-inch deep. This will help the bread expand while baking.
- Bake the Bread: Carefully lift the parchment paper with the dough and place it into the preheated Dutch oven. Cover it with the lid and bake for 30 minutes. After this, remove the lid and continue baking until the loaf is a deep golden brown, approximately 15 to 17 minutes more.
- Cooling: Take the bread out of the Dutch oven using the parchment paper to assist. Set it on a wire rack and let it cool for at least 20 minutes before slicing. This cooling process is crucial as it allows the bread to finish cooking and helps develop its flavor.
How to Serve Artisan Bread
With your artisan bread baked to perfection, the next step is how to serve it. This tantalizing loaf is incredibly versatile. You might simply slice the bread and enjoy it with a little butter, allowing the soft, airy inside to shine.
Consider creating delicious sandwiches that feature fresh veggies, cheeses, or spreads. The texture of the crust pairs beautifully with various toppings, elevating the simplest ingredients into gourmet bites.
If you’re feeling more adventurous, enjoy it alongside soups, salads, or stews, where the crust can be used to soak up rich and flavorful broths. Artisan bread is also fantastic for a charcuterie board, where you can serve it with cheeses, olives, and cured meats to impress your guests.
Expert Tips for Artisan Bread
- Measure Accurately: Baking is a science. Ensure you measure your flour correctly to avoid a dry loaf. Spoon the flour into a measuring cup and level it with a knife instead of packing it down.
- Temperature Matters: Water temperature is crucial. Too hot can kill yeast, while too cold can slow down the rising process. Aim for that sweet spot between 120°F and 130°F.
- Experiment with Flour: While bread flour is perfect for this recipe, you can experiment with all-purpose flour or even incorporate whole wheat flour for a different flavor profile and texture.
- Let It Rise: Don’t rush the rising process. Sufficient time allows for flavor development. If you can, opt for the overnight rise for enhanced taste.
- Use Baking Stones: If you want a crustier bread, consider using a baking stone in your oven. Preheat it well to create steam and an optimal crust.
How to Store Artisan Bread
Storing your artisan bread properly is essential to maintain its freshness. Here are a few methods:
- Bread Box: Place your loaf in a bread box or a paper bag to keep it crusty while preventing it from getting too hard.
- Plastic Wrap: If you plan to consume the bread over several days, wrap it tightly in plastic wrap and store at room temperature.
- Freezing: To extend its shelf life, freeze your loaf. Slice it before freezing so you can easily take out individual pieces as needed. Use an airtight freezer bag, wrapping the bread tightly to minimize air exposure.
Variation of Artisan Bread
The beauty of artisan bread is that it’s not just limited to one recipe. Here are a few variations you might find exciting:
- Herb-Infused Bread: Add fresh or dried herbs such as rosemary, thyme, or oregano into the dough during mixing for an aromatic twist.
- Olive & Cheese Bread: Incorporate olives and cheese like feta or cheddar into your dough for a savory flavor profile that’s great for a charcuterie spread.
- Seed Topped Bread: Before the final rise, sprinkle seeds such as sesame or poppy seeds on top of the dough for a nutty crunch.
- Sweet Bread: Add a touch of honey, sugar, or dried fruits like cranberries or raisins for a sweeter alternative that pairs well with breakfast items.
FAQ About Artisan Bread
What are the best types of flour to use for artisan bread?
Bread flour is ideal due to its high protein content, resulting in a chewier texture. However, you can also use all-purpose flour or even whole wheat for a different flavor and texture.
Can I make artisan bread without a Dutch oven?
While a Dutch oven is highly recommended for its ability to trap steam, you can still bake artisan bread on a baking sheet. Just place a pan of water in the bottom of the oven to create steam.
How long does artisan bread last?
When stored properly, artisan bread can last for about 2 to 3 days at room temperature. In the freezer, it can last for a few months.
Why is my artisan bread dense?
Dense bread can result from improper yeast activation, not kneading enough, or not allowing sufficient rising time. Always ensure you follow the steps carefully for the best results.
Can I add other ingredients to the dough?
Absolutely! You can add nuts, cheese, or dried fruits to create variations that suit your palate. Just remember to adjust the hydration of the dough accordingly.
Artisan Bread
Ingredients
Main Ingredients
- 3.75 cups bread flour
- 2.25 teaspoons instant yeast
- 1.75 teaspoons kosher salt
- 1.5 cups warm water (between 120°F and 130°F) Ensure temperature is correct to activate yeast.


Instructions
Preparation
- Mix the flour, instant yeast, and kosher salt in a large mixing bowl.
- Slowly add the warm water to the dry mixture and stir until you have a sticky dough.
- Cover the bowl with plastic wrap and put it in a warm place to rise until doubled in size (1.5 to 2 hours, or refrigerate overnight for 8 hours).
Baking
- Preheat your oven to 450°F, placing a Dutch oven with its lid inside for 30 minutes.
- Shape the dough and let it sit at room temperature for 15 minutes after refrigeration.
- Dust a clean surface with flour, turn the dough onto it, shape into a round loaf, and cover it for 10 minutes.
- Score the top of the dough with a sharp knife, about 1/4-inch deep.
- Lift the dough on parchment paper into the preheated Dutch oven, cover, and bake for 30 minutes.
- Remove the lid and bake for another 15 to 17 minutes until golden brown.
Cooling
- Use parchment paper to lift the bread out and let it cool on a wire rack for at least 20 minutes.
Send me this recipe!
Just enter your email below and get it sent straight to your inbox!