
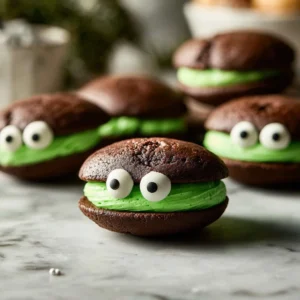
Indulge in the festive delight of Chocolate Whoopie Pie Monsters, a treat that’s equal parts playful and delectable. Imagine sinking your teeth into soft, chocolatey cakes that are sandwiched together with a sweet and creamy filling, all while boasting a whimsical monster-like appearance. This recipe transforms a classic whoopie pie into a Halloween sensation, perfect for parties, family gatherings, or just a fun baking day at home. The vibrant green colors and cute googly eyes make these pies not only a treat for your taste buds but also a feast for your eyes.
Why We Love This Chocolate Whoopie Pie Monsters Recipe
Chocolate Whoopie Pie Monsters are the ultimate blend of fun and flavor. Whether you’re celebrating Halloween or simply want to bring a little whimsy into your life, these treats deliver on all fronts. The rich taste of chocolate paired with the fluffy marshmallow filling creates an irresistible combination. Kids and adults alike can’t resist the temptation to take a bite out of these charming desserts.
What makes these whoopie pies especially appealing is their versatility. You can easily customize the colors and decorations to fit any occasion. Whether it’s adding sprinkles or changing the color to suit a holiday theme, you have the freedom to let your creativity run wild. Plus, making these pies is a fun activity to enjoy with family and friends, making moments that turn into cherished memories.
Ingredients for Chocolate Whoopie Pie Monsters
To create your own Chocolate Whoopie Pie Monsters, gather the following ingredients:
- 1 box Devil’s Food Cake Mix
- 1/2 cup vegetable oil
- 3 eggs
- 1 box chocolate instant pudding mix
- 3/4 cup warm water
- 3/4 cup unsalted butter, softened to room temperature
- 2 cups powdered sugar
- 1 tsp vanilla extract
- 1/8 tsp salt
- 10 oz marshmallow fluff (about 3 cups)
- 1 tsp green food coloring (or to the desired color)
- 1/2 cup green sprinkles
- 44 googly eye candies (optional)
How to Make Chocolate Whoopie Pie Monsters
The journey to creating your Chocolate Whoopie Pie Monsters is easy and fun. Let’s break down the process step by step:
Preheat the Oven: Start by setting your oven to 350°F. This ensures that the whoopie pies bake evenly and come out perfectly soft and chewy.
Mix the Cake Batter: In a large mixing bowl, combine the Devil’s Food Cake Mix, vegetable oil, eggs, chocolate instant pudding mix, and warm water. Using a hand mixer, blend the ingredients on low speed until well combined. Once the mixture is uniform, switch to high speed for an additional minute to incorporate air into the batter, which helps create a light texture.
Pipe the Batter: Transfer this deliciously rich batter into a piping bag. If you don’t have a piping bag, a plastic zip-top bag with a corner snipped off will work perfectly. On a parchment-lined baking sheet, pipe small circles of batter about 1 inch apart. This spacing allows them to spread without merging together during baking.
Bake the Whoopie Pies: Place the baking sheet in the preheated oven and let them bake for 10 to 12 minutes. You’ll know they’re ready when they’re set and spring back when touched lightly. Once done, remove them from the oven and allow them to cool for about 2 minutes on the baking sheet before transferring them to a wire rack to cool completely.
Prepare the Marshmallow Filling: In a separate mixing bowl, beat the softened butter until creamy. Gradually add the powdered sugar, mixing until smooth. Then, stir in the vanilla extract and salt.
Combine and Color: In another bowl, mix the marshmallow fluff with green food coloring until you achieve the desired shade. Gently fold this mixture into the butter mixture until well combined. The filling should be fluffy and vibrant, reflecting the fun nature of your monster pies.
Assemble the Pies: Once the chocolate cakes have cooled completely, pipe a generous amount of the filling onto the flat side of one whoopie pie. Top it with another pie, flat side down, creating a sandwich. For an extra fun touch, roll the edges in green sprinkles, providing a delightful crunch and vibrant color.
Add the Monster Touch: If you’re feeling extra playful, you can affix googly eyes on top of the whoopie pies using a little bit of the filling as glue. This is where the magic happens, as your chocolate pies transform into adorable monster treats!
Chill: To help the filling firm up a bit, chill your assembled whoopie pies in the refrigerator for about 30 minutes. This step is optional but recommended for easier handling.
How to Serve Chocolate Whoopie Pie Monsters
Serving your Chocolate Whoopie Pie Monsters can be just as fun as making them. Lay them out on a festive platter to showcase their vibrant colors and whimsical designs. You can also consider serving them in individual treat bags or boxes, particularly if you’re making them for a Halloween party or a special celebration.
For a spooky effect, you might want to present these delights alongside themed decorations like mini pumpkins or cobwebs. They can be a delightful centerpiece that entices both kids and adults alike. Pair these delicious treats with a glass of cold milk or a warm cup of cocoa for the perfect finishing touch. This combination not only enhances the experience but also makes every bite of the fluffy pie even more enjoyable.
Expert Tips: Chocolate Whoopie Pie Monsters
Getting the perfect Chocolate Whoopie Pie Monsters involves some handy tips that can elevate your baking game:
Use Room Temperature Ingredients: Whenever possible, allow your eggs, butter, and other ingredients to come to room temperature before mixing. This aids in achieving a better texture and consistency in your batter.
Don’t Overmix: When combining your ingredients, especially after adding the dry components, mix just until combined. Overmixing can lead to denser cakes, whereas light and fluffy whoopie pies are the goal.
Practice Piping Techniques: If you’re new to using a piping bag, practice your technique on parchment paper or a plate before piping onto the baking sheet. This will help you feel more confident when it comes time to assemble your treats.
Maintain Uniformity: To ensure even baking, try to pipe your circles as evenly as possible in size. This will help them bake uniformly and look more appealing when assembled.
Personalization: Feel free to experiment with different colors for the filling or additional decorations beyond sprinkles and googly eyes. You could use other edible decorations like candy or fun-shaped sprinkles.
How to Store Chocolate Whoopie Pie Monsters
To keep your Chocolate Whoopie Pie Monsters fresh and delicious, it’s essential to store them properly. Store the whoopie pies in an airtight container in the refrigerator. This will help maintain their freshness and keep the filling from becoming too soft. They should remain good for up to a week, though they are likely to be devoured long before then!
If you want to make them ahead of time, you could bake the chocolate cakes and freeze them separately, then assemble them with the filling just before serving. This makes for a convenient make-ahead dessert that you can whip up in no time when needed.
Variations of Chocolate Whoopie Pie Monsters
While the classic Chocolate Whoopie Pie Monsters are a hit on their own, you can easily customize and create variations to keep the fun alive:
Flavor Variations: Instead of a simple chocolate cake mix, try experimenting with other flavors like red velvet or vanilla cake mixes for a different taste and look.
Filling Options: Swap out the marshmallow fluff for other delicious fillings such as cream cheese frosting, peanut butter frosting, or even banana fluff for a fruity twist.
Themed Decorations: Get creative with holiday themes! For Christmas, you could change the food coloring to red or white and decorate your pies with holiday-themed sprinkles.
Gluten-Free Option: For a gluten-free version, use a gluten-free cake mix and ensure that your other ingredients are certified gluten-free.
Mini Versions: Create mini whoopie pies for bite-sized fun. Reduce the size of your batter circles for a delightful treat that’s perfect for entertaining or snacking.
FAQ about Chocolate Whoopie Pie Monsters
What are Chocolate Whoopie Pie Monsters?
Chocolate Whoopie Pie Monsters are soft, chocolatey cakes sandwiched with a creamy filling and decorated to look like whimsical monsters. They are a fun dessert perfect for parties and celebrations.
How can I customize my Chocolate Whoopie Pie Monsters?
You can customize them by changing the cake mix flavor, experimenting with different fillings, and using various colors or decorations to suit your occasion.
Chocolate Whoopie Pie Monsters
Equipment
- Oven
- Mixing Bowls:
- Piping Bag
- Baking Sheet
- Cooling rack
Ingredients
- 1 box Devil’s Food Cake Mix
- 1/2 cup vegetable oil
- 3 large eggs
- 1 box chocolate instant pudding mix
- 3/4 cup warm water
- 3/4 cup unsalted butter softened to room temperature
- 2 cups powdered sugar
- 1 teaspoon vanilla extract
- 1/8 teaspoon salt
- 10 oz. marshmallow fluff about 3 cups
- 1 teaspoon green food coloring or to desired color
- 1/2 cup green sprinkles
- 44 pieces googly eye candies optional


Instructions
- Preheat your oven to 350°F (175°C).
- In a large bowl, mix the cake mix, vegetable oil, eggs, pudding mix, and warm water until well combined. Beat on high speed for 1 minute.
- Transfer the batter to a piping bag and pipe small circles onto a parchment-lined baking sheet.
- Bake for 10-12 minutes or until set and springy to the touch. Let cool for 2 minutes before transferring to a wire rack.
- In a separate bowl, beat the softened butter until creamy. Gradually add powdered sugar, mixing until smooth. Stir in vanilla and salt.
- In another bowl, mix marshmallow fluff with green food coloring until desired shade is achieved, then fold into the butter mixture.
- Once the cakes have cooled, pipe the filling onto the flat side of one cake and top with another to create a sandwich.
- Roll the edges in green sprinkles and add googly eyes using a bit of filling as glue.
- Chill the assembled pies in the refrigerator for about 30 minutes before serving.
Send me this recipe!
Just enter your email below and get it sent straight to your inbox!