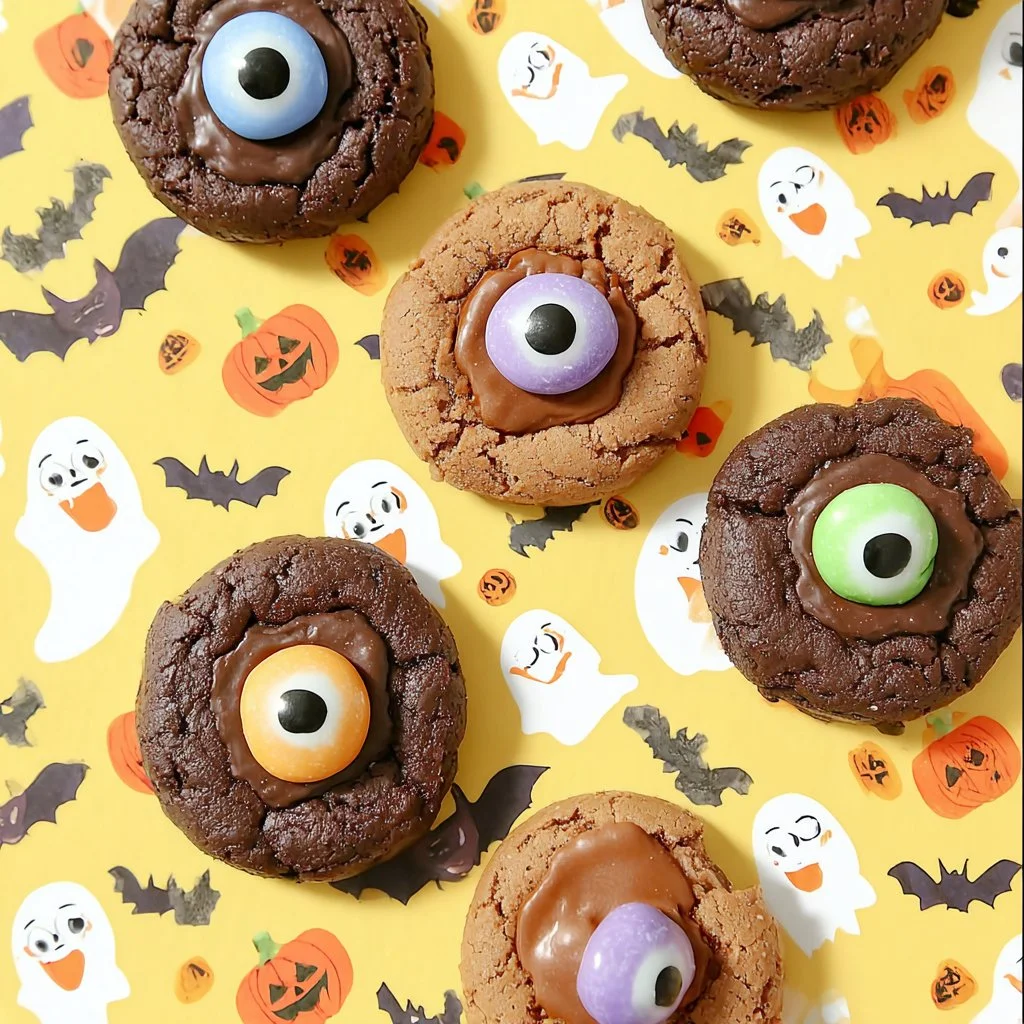
Halloween is the time of year when spooky decorations, fun costumes, and delicious treats fill the air with excitement. One of the high points of the season is undoubtedly the sweet treats you can create to celebrate the festive spirit. And what could be more delightful than making a batch of Halloween Thumbprint Cookies with Scary Googly Eyes? These cookies not only deliver on taste but also boast an appearance that’ll make your Halloween gatherings even more fun and festive. With their rich cocoa flavor and bright, vibrant decorations, these cookies are sure to impress both kids and adults alike.
Why We Love This Halloween Thumbprint Cookies with Scary Googly Eyes Recipe
The love for Halloween Thumbprint Cookies with Scary Googly Eyes starts with their fantastic flavor and appealing texture. The combination of butter, sugars, and eggs creates a cookie dough that is incredibly smooth and rich. Adding cocoa powder gives the cookies a deep chocolate flavor that perfectly contrasts the sweetness of the candy melts.
Another reason these cookies are a favorite is their whimsy. The googly eyes add a fun, playful touch that takes the humble cookie from ordinary to extraordinary. They’re great for sharing with friends, or even simply enjoying on your own while binge-watching your favorite Halloween movies! Plus, making these cookies is a wonderful way to spend quality time with your children, allowing them to help decorate and even have some fun with the googly eyes.
These cookies are perfect for school parties, Halloween-themed gatherings, or simply as a delightful treat throughout the holiday season. The blend of chocolate, the joy of customization, and those fun candy eyes make this cookie recipe a Halloween classic!
Ingredients about Halloween Thumbprint Cookies with Scary Googly Eyes
To create these eye-catching cookies, gather the following ingredients:
- 1/2 cup butter, softened
- 1/2 cup granulated sugar
- 1/2 cup brown sugar, packed
- 2 eggs
- 1 1/2 cups all-purpose flour
- 2/3 cup unsweetened cocoa powder
- 1/4 teaspoon salt
- 1/4 teaspoon baking powder
- 1/4 teaspoon baking soda
- Wilton bright white candy melts
- Wilton vibrant green candy melts
- Wilton orange candy melts
- Wilton purple candy melts
- Wilton large red vein candy eyes
Gathering all these ingredients beforehand makes it easier to keep everything organized while you bake. The combination of these elements will ensure that your spooky cookies not only taste great but also look delightfully festive!
How to Make Halloween Thumbprint Cookies with Scary Googly Eyes Directions
Making your Halloween Thumbprint Cookies with Scary Googly Eyes is simple and straightforward. Here’s how you can do it step by step:
1. Preheat the Oven: Start by preheating your oven to 350°F. This ensures that your cookies will bake evenly and come out chewy.
2. Line the Baking Sheet: Take a cookie sheet and line it with parchment paper. This step helps prevent the cookies from sticking and makes for easier cleanup later.
3. Cream the Butter and Sugars: In a medium-sized bowl, combine the softened butter with both granulated and brown sugars. Use a hand mixer or a sturdy spoon to beat the mixture together until it’s smooth and creamy.
4. Add Eggs: Beat in the eggs one at a time. Make sure each egg is well incorporated before adding the next. This helps in achieving that fluffy cookie texture.
5. Prepare the Dry Ingredients: In a separate bowl, whisk together the all-purpose flour, cocoa powder, salt, baking powder, and baking soda. Mixing the dry ingredients separately ensures that your leavening agents are evenly distributed.
6. Combine Mixtures: Gradually add the dry mixture to the creamed butter mixture. Mix until everything is just combined. Be careful not to overmix, as it can result in tough cookies.
7. Chill the Dough: After mixing, cover the bowl and place the dough in the refrigerator for about 15 minutes. Chilling helps the cookies hold their shape while baking.
8. Form the Cookies: Once chilled, use your hands to form the dough into 1-inch balls. Place each ball on the prepared cookie sheet, making sure to keep them about 2 inches apart to allow for spreading during baking.
9. Bake the Cookies: Place the cookie sheet in the preheated oven and bake for 10 to 12 minutes. Keep an eye on them; they should look set but still soft.
10. Create Thumbprints: As soon as they come out of the oven, allow the cookies to cool for 2 to 3 minutes. While they are still soft, gently press your thumb into the center of each cookie to create an indentation.
11. Add Candy Melts: Now, it’s time to place your candy melts into the thumbprints. Choose bright colors like white, green, orange, or purple for a festive look. The warmth from the cookies will melt the candy slightly, helping it adhere to the cookie.
12. Funny Eyes: Finally, place the large red vein candy eyes on top of the melted candy. This step adds the “scary” element to your cookies, giving them personality.
13. Cool Completely: Transfer the cookies to a wire rack to cool completely. This will ensure that they firm up nicely and are ready for enjoyment!
And just like that, your Halloween Thumbprint Cookies with Scary Googly Eyes are ready to be shared and devoured. Each bite is a combination of rich chocolate and fun decorations—who could resist?
How to Serve Halloween Thumbprint Cookies with Scary Googly Eyes
Serving your Halloween Thumbprint Cookies can be as fun as making them! Here are a few ideas that can enhance your Halloween celebrations:
Halloween Dessert Table: Create a colorful dessert table featuring your cookies alongside other spooky treats. You can include other snacks like pumpkin-shaped chocolates or even a pumpkin pie for the ultimate Halloween dessert spread!
Party Favors: Wrap individual cookies in clear cellophane bags tied with black or orange ribbons. Hand them out as party favors at your Halloween gatherings, giving your guests a sweet treat to take home.
Fun Platter: Arrange the cookies on a vibrant platter that fits the Halloween theme. You can add a few plastic spiders or skeletons around the cookies to keep that spooky vibe.
Tell a Story: As you serve the cookies, engage your guests by telling them a fun spooky story. This can add to the excitement and make your gathering even more enjoyable.
Ghoulish Pairings: Serve the cookies with a glass of milk or hot chocolate for dipping. A warm beverage complements the chocolate flavor of the cookies and adds a comforting element to your Halloween snacks.
These serving suggestions will make your Halloween Thumbprint Cookies with Scary Googly Eyes the star of the show!
Expert Tips: Halloween Thumbprint Cookies with Scary Googly Eyes
To ensure that your cookies turn out perfectly, here are some expert tips that can help you along the way:
Room Temperature Ingredients: Make sure your butter and eggs are at room temperature before mixing. This helps create a smoother dough and ensures even baking.
Cookie Dough Consistency: If the dough feels too sticky, you can add a small amount of extra flour, but be cautious not to add too much. The dough should be soft but manageable.
Chill for Best Results: Don’t skip the chilling step. It’s crucial for maintaining the cookie shape and ensuring they don’t spread too much while baking.
Perfect Thumbprint: When making the thumbprint, use a gentle touch. Don’t press too hard, as you want just enough indentation to hold the melted candy.
Variety in Colors: Experiment with different colors of candy melts for a more diverse look. This step can make your cookies even more festive and appealing.
Add Texture: Consider sprinkling some crushed nuts or candy sprinkles around the candy melts for added texture and color.
Timing is Key: If you find your cookies puffing up while baking, you can flatten them slightly with a spatula immediately after they come out of the oven.
These handy tips will guide you in creating cookies that not only taste delicious but also look impressive and unique!
How to Store Halloween Thumbprint Cookies with Scary Googly Eyes
Knowing how to store your cookies is essential for maintaining their freshness. Here’s how to keep your Halloween Thumbprint Cookies with Scary Googly Eyes at their best:
Cool Completely: Always ensure your cookies have cooled completely before storing them. This step prevents moisture from building up in the storage container.
Use an Airtight Container: Store your cookies in an airtight container. This will keep them fresh for a longer time and help prevent them from becoming stale.
Room Temperature Storage: Your cookies can be kept at room temperature for up to a week if stored properly. If you want to keep them longer, consider refrigerating them.
Freezing Option: For longer storage, you can freeze the cookies. Place them in a single layer on a baking sheet to freeze first, then transfer them to a freezer-safe bag or container. They can be frozen for up to three months. When ready to enjoy, simply let them thaw at room temperature.
Reapply Eyes After Freezing: If you freeze your cookies, hold off on adding the googly eyes until you’re ready to serve them. This way, the eyes remain fresh and colorful.
Variation of Halloween Thumbprint Cookies with Scary Googly Eyes
While the classic Halloween Thumbprint Cookies with Scary Googly Eyes are already amazing, you can make several fun variations to cater to different tastes. Here are some great ideas:
Different Flavors: Instead of chocolate cookies, use vanilla or almond extract to create a different flavor. You can replace the cocoa powder with an equal amount of flour for a lighter colored cookie.
Spooky Add-ins: Add mini chocolate chips, crushed candy corn, or Halloween-themed sprinkles into the cookie dough for fun bursts of flavor and texture.
Alternative Decor: Rather than using candy melts, experiment with frosting in fun colors or edible glitter to add a unique twist.
Diverse Shapes: Instead of just thumbprints, use cookie cutters for different spooky shapes like pumpkins, ghosts, or bats. You can still create indentations for the candy melts or icing, keeping the essence of the recipe.
Nut Options: For a crunchy touch, consider adding finely chopped nuts such as walnuts or pecans to the dough. This gives your cookies a special twist and a lovely texture.
FAQ: Halloween Thumbprint Cookies with Scary Googly Eyes
What makes Halloween Thumbprint Cookies with Scary Googly Eyes special?
These cookies combine rich chocolate flavor with a fun and whimsical appearance. The addition of colorful candy melts and googly eyes not only makes them fun but also encourages creativity when decorating!
How long can I store Halloween Thumbprint Cookies with Scary Googly Eyes?
If stored in an airtight container at room temperature, these cookies can last up to a week. For longer storage, consider freezing them, which can extend their shelf life to about three months. Just remember to add the googly eyes once you’re ready to serve.
Can I use different types of chocolate in this recipe?
Absolutely! You can incorporate white chocolate or dark chocolate variations for your candy melts, adding a different flavor profile that complements the cookie base.
Is it possible to make these cookies gluten-free?
Yes, you can substitute all-purpose flour with a gluten-free flour blend. Just make sure the blend you choose works well in cookie recipes for the best results.
What can I serve with my Halloween Thumbprint Cookies?
These cookies can be paired with milk, hot chocolate, or even a warm pumpkin spice latte to create a delightful treat during the Halloween season!
Halloween Thumbprint Cookies with Scary Googly Eyes
Equipment
- Mixing Bowl
- Baking Sheet
- Parchment Paper
Ingredients
- 1/2 cup butter softened
- 1/2 cup granulated sugar
- 1/2 cup brown sugar packed
- 2 eggs
- 1 1/2 cups all-purpose flour
- 2/3 cup unsweetened cocoa powder
- 1/4 teaspoon salt
- 1/4 teaspoon baking powder
- 1/4 teaspoon baking soda
- Wilton bright white candy melts
- Wilton vibrant green candy melts
- Wilton orange candy melts
- Wilton purple candy melts
- Wilton large red vein candy eyes


Instructions
- Preheat your oven to 350°F (175°C) and line a baking sheet with parchment paper.
- In a medium bowl, cream together softened butter, granulated sugar, and brown sugar until smooth.
- Beat in the eggs, one at a time, ensuring each is well incorporated.
- In a separate bowl, whisk together flour, cocoa powder, salt, baking powder, and baking soda.
- Gradually add the dry mixture to the wet mixture, mixing until just combined.
- Chill the dough in the refrigerator for 15 minutes.
- Form the dough into 1-inch balls and place them on the prepared baking sheet, spacing them about 2 inches apart.
- Bake for 10-12 minutes. Remove from the oven and press your thumb into the center of each cookie to create a thumbprint.
- Immediately fill the thumbprints with your choice of candy melts.
- Place candy eyes on top of the melted candy.
- Transfer cookies to a wire rack to cool completely.
Send me this recipe!
Just enter your email below and get it sent straight to your inbox!