
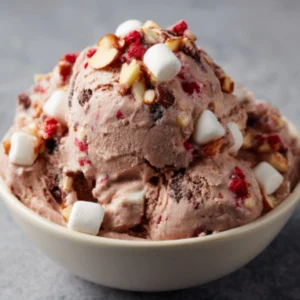
If you love the rich combination of chocolate, fluffy marshmallows, and crunchy nuts, Rocky Road Ice Cream is a dessert you will want to make again and again. This classic treat combines smooth chocolate ice cream with chewy mini marshmallows and toasted almonds for an irresistible texture and flavor. The addition of raspberry candies adds a fun and slightly tart surprise that lifts this ice cream to a new level.
Why You’ll Love This Rocky Road Ice Cream Recipe
You’ll find this recipe delightful because it combines all your favorite elements of rocky road in one easy-to-make ice cream. It’s creamy, yet packed with interesting textures — the softness of marshmallows, the crunch of almonds, and the occasional burst of sweet raspberry candy. You get the rich taste of melted milk chocolate woven through every spoonful, which makes it incredibly indulgent without being too heavy. The method uses simple ingredients and steps that anyone can follow, even if you don’t have much experience making ice cream at home. Plus, it’s completely customizable to suit your preferences, whether you want more nuts or less sugar. You’re sure to impress your family and friends with this crowd-pleasing dessert.
Ingredients for Rocky Road Ice Cream
Here’s everything you need to prepare this creamy rocky road treat. Each ingredient plays an important role in building flavor and texture:
- 4 large egg yolks
- ¼ cup (55 grams) white sugar
- 1 cup (250 ml) full cream milk
- 2 cups (500 ml) thickened cream, heavy cream, or heavy whipping cream
- 1 cup (175 grams) milk chocolate melts
- 1 flat teaspoon (7.5 grams) glucose syrup (optional)
- 2 cups (100 grams) mini marshmallows
- 1 cup (150 grams) natural or roasted almonds
- 1 cup (190 grams) soft raspberry candies (optional)
Make sure you have an electric hand mixer and an ice cream maker ready to help with the preparation. These tools will make the process smoother and ensure a great final texture.
How to Make Rocky Road Ice Cream
You’ll start by warming the milk gently in a saucepan over low to medium heat while separating the egg yolks from the whites. Save the egg whites for another recipe, like meringues or cookies, so nothing goes to waste. Next, use an electric mixer to combine the yolks and sugar until the mixture is light and creamy.
Slowly add the warm milk to the egg mixture, stirring well after each addition. This tempering step is essential to avoid cooking the eggs too quickly and to ensure a smooth custard. Transfer this mixture to a double boiler and add the cream, mixing everything thoroughly.
Now it’s time to melt your chocolate. You can do this carefully in the microwave by heating in short bursts of 30 seconds, stirring in between. Gradually whisk the melted chocolate into the custard in thirds, ensuring it’s fully incorporated before adding more. If you’re using glucose syrup, add it now to help keep the ice cream smooth.
Keep cooking the mixture over the double boiler, stirring frequently until it thickens enough to coat the back of a spoon and hold a clear line when you run your finger through it. This indicates your custard base is ready.
Remove from heat and cool it slightly by placing the double boiler into a colander for five minutes. Then transfer the mixture to a heatproof container, cover it, and chill in the fridge for at least four hours, preferably overnight. This step is important to develop flavor and get the custard fully cold before churning.
While the custard cools, toast your almonds in a dry pan over medium-high heat. Stir constantly and remove as soon as they begin to brown to prevent burning. Let them cool and then chop roughly for texture in the ice cream.
If using raspberry candies and larger marshmallows, cut them into smaller pieces to distribute evenly. Prepare your ice cream maker by chilling the bowl or turning it on 10 minutes before churning if it’s self-refrigerating.
Churn your cold custard in the ice cream maker. It will reach a soft-serve consistency once ready. While it churns, layer the mix-ins in your storage container. Start with a third of the almonds, marshmallows, and raspberry candies at the bottom, add half the churned ice cream and stir lightly, then repeat the layering process. Finish by topping with the remaining mix-ins, pressing lightly to set.
Freeze the layered ice cream for at least four hours until firm. When it’s time to serve, scoop out your delicious homemade Rocky Road Ice Cream and enjoy the perfect blend of creamy, crunchy, and chewy textures in every bite.
How to Serve Rocky Road Ice Cream
Rocky Road Ice Cream is a treat best served on its own or with a simple accompaniment that lets its flavors shine. You can scoop it into classic dessert bowls or cones for a fun snack. It pairs wonderfully with fresh berries or sliced bananas if you want to add a fruity contrast.
For a party, consider serving the ice cream alongside chocolate sauce or caramel drizzle. If you want to make it even more special, add a dollop of whipped cream or a few crushed nuts on top. You can also serve it with warm brownies or chocolate cake for a rich dessert platter that everyone will enjoy.
Keep a small scoop of your ice cream handy for quick enjoyment during warm weather, or impress guests by presenting it in elegant glass cups garnished with a few whole almonds or marshmallows.
Expert Tips for Making Rocky Road Ice Cream
The key to success with this recipe is patience and attention to detail. Make sure to temper your egg yolks properly by slowly adding the warm milk while whisking constantly. This prevents scrambling and helps create a silky custard.
When melting the chocolate, avoid overheating it. Chocolate can seize if exposed to too much heat or moisture, so take your time and stir frequently. Using good-quality milk chocolate melts will greatly improve the final taste.
Roasting your almonds just until they start to brown adds a wonderful nutty flavor and crunch. Keep an eye on them to avoid burning. Chopping the nuts and candies into smaller pieces ensures every spoonful has a good balance of texture.
Don’t skip the chilling step before churning. The custard must be fully cold for the ice cream maker to work well and give you the right consistency. After churning, layering the mix-ins quickly helps prevent them from sinking to the bottom.
Finally, store your ice cream in an airtight container to avoid freezer burn and ice crystals forming. Cover the surface with parchment paper or plastic wrap before sealing to keep it fresh longer.
How to Store Rocky Road Ice Cream
To keep your Rocky Road Ice Cream fresh, store it in an airtight container in the freezer. Make sure the container is properly sealed to prevent it from absorbing any other odors or developing ice crystals.
If you want to maintain the best texture, press a sheet of parchment paper or plastic wrap directly on the surface of the ice cream before closing the container. This limits air exposure.
When you want to serve, remove the ice cream from the freezer about 5 to 10 minutes before scooping to allow it to soften slightly, making it easier to serve.
Properly stored, your ice cream can last up to two weeks in the freezer without losing quality.
Variations of Rocky Road Ice Cream
You can easily customize your Rocky Road Ice Cream to match your tastes. Swap milk chocolate for dark or white chocolate to change the flavor profile. If you prefer a nut-free version, simply omit the almonds and replace them with extra marshmallows or candy pieces.
Try using different types of nuts like pecans or walnuts for a different crunch and flavor. For a healthier twist, substitute full cream milk with lower-fat milk and reduce the sugar slightly.
If you enjoy fruity notes, experiment with other candy flavors such as cherry or orange slices instead of raspberry candies. You could also mix in dried fruit like chopped cherries or cranberries for an interesting texture contrast.
For a vegan or dairy-free option, replace the cream and milk with coconut milk and use a dairy-free chocolate alternative. Keep in mind that this will change the texture slightly, but it can still be delicious.
Frequently Asked Questions About Rocky Road Ice Cream
What makes Rocky Road Ice Cream different from regular chocolate ice cream?
Rocky Road Ice Cream includes added mix-ins like marshmallows, nuts, and candy pieces that provide a combination of chewy, crunchy, and smooth textures, making it more exciting than plain chocolate ice cream.
Can I make Rocky Road Ice Cream without an ice cream maker?
Yes! You can use a no-churn method by freezing the custard mixture in a container and stirring every 30 minutes to break up ice crystals until it’s fully frozen. The texture might be less smooth but still tasty.
Are the egg yolks safe to eat in this recipe?
Because the egg yolks are cooked gently with warm milk and cream until thickened, they are safe to consume. However, if you’re concerned, you can use pasteurized eggs or egg substitutes.
How long does homemade Rocky Road Ice Cream last in the freezer?
Stored properly in an airtight container, your ice cream will stay fresh for up to two weeks. Beyond that, it may develop freezer burn or lose texture quality.
Can I use other nuts besides almonds?
Absolutely! Pecans, walnuts, or even hazelnuts work well in this recipe. Toast them lightly before adding to enhance their flavor.
What is glucose syrup, and do I need to use it?
Glucose syrup helps improve the texture by preventing ice crystals and making the ice cream creamier. It’s optional, so if you don’t have it, you can leave it out without a big difference.
Rocky Road Ice Cream
Equipment
- Saucepan
- Electric Mixer
- Ice Cream Maker
- Double Boiler
Ingredients
- 4 large egg yolks
- ¼ cup white sugar (55 grams)
- 1 cup full cream milk (250 ml)
- 2 cups thickened cream (500 ml)
- 1 cup milk chocolate melts (175 grams)
- 1 flat tsp. glucose syrup (optional, 7.5 grams)
- 2 cups mini marshmallows (100 grams)
- 1 cup natural or roasted almonds
- 1 cup soft raspberry candies (optional, 190 grams)


Instructions
- Warm the milk in a saucepan over low to medium heat. Separate egg yolks from whites and set aside whites for another use.
- Use an electric mixer to beat the egg yolks and sugar until light and creamy.
- Slowly add warm milk to the egg mixture, stirring well after each addition. Transfer to a double boiler and mix in the cream.
- Melt chocolate in the microwave in short bursts, then whisk into the custard. Add glucose syrup if using.
- Cook the mixture over the double boiler until thick enough to coat the back of a spoon. Remove from heat and cool slightly.
- Chill the mixture in the fridge for at least four hours, preferably overnight.
- Toast almonds in a dry pan over medium-high heat until browned, then chop roughly.
- Prepare your ice cream maker and churn the cold custard until it reaches a soft-serve consistency.
- Layer the mix-ins in a storage container: start with almonds, marshmallows, and raspberry candies, then add half the churned ice cream. Repeat layers and finish with remaining mix-ins.
- Freeze the layered ice cream for at least four hours until firm.
- Scoop and serve your delicious Rocky Road Ice Cream.
Send me this recipe!
Just enter your email below and get it sent straight to your inbox!