
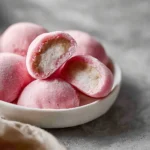
Mochi ice cream is more than just a dessert; it’s an experience that intertwines the chewy goodness of mochi with the creamy delight of ice cream. This unique treat originates from Japan, where mochi—a sticky rice cake made from glutinous rice—has been enjoyed for centuries. In recent years, mochi ice cream has gained popularity around the world, becoming a favorite for those looking for a delightful blend of textures and flavors.
Why We Love This Mochi Ice Cream Recipe
Every bite of homemade mochi ice cream feels like a little piece of heaven. The beauty of this recipe lies not only in its taste but also in the ease of its preparation. The ingredients are simple and can be found at most grocery stores, making it accessible for anyone to create at home. You have control over the flavors, allowing you to experiment and find your perfect combination.
Additionally, this recipe caters to various dietary preferences; you can choose dairy-free ice cream or add natural colors to the mochi dough to inspire colorful creations. The preparation process can also be enjoyed as a fun activity with family or friends, making it a delightful way to bond while indulging in a sweet treat. In short, this mochi ice cream recipe is not just a treat, but an adventure you can embark on any time you crave something special.
Ingredients about Mochi Ice Cream
To get started with your mochi ice cream, gather the following ingredients:
- 1 cup glutinous rice flour (Sweet rice flour, preferably shiratamako or mochiko)
- 1/4 cup sugar
- 2 tablespoons powdered sugar
- 1 cup water
- Food coloring (optional)
- Cornstarch or potato starch (for dusting and rolling)
- Ice cream (your favorite kind)
These straightforward ingredients work together to give you the perfect chewy shell around your ice cream. With these items ready, you’re halfway to creating a delightful dessert that can impress anyone!
How to Make Mochi Ice Cream Directions
Creating your own mochi ice cream at home may sound a bit intimidating, but fear not! The steps are simple and the end result is incredibly rewarding:
Freeze the Ice Cream Balls: Start by preparing small scoops of your favorite ice cream. Line a sheet pan with parchment paper and use a small ice cream scoop to place individual ice cream balls on the pan. Make sure they’re spaced out adequately. Place this pan in the freezer for about one hour until the scoops are firmly frozen. This first step is crucial as it ensures that the ice cream stays intact when wrapped in mochi.
Make the Mochi Dough: In a microwave-safe bowl, combine the glutinous rice flour, sugar, and powdered sugar. Gradually add water, stirring until the mixture is smooth without any lumps. Once combined, cover the bowl with plastic wrap. Microwave it for 1 minute, then remove it, fold the mixture, and cover it again. Microwave for another minute, and after folding it once more, microwave it for an additional 30 seconds. You want the mixture to look glossy and slightly translucent when it’s done.
Roll Out the Mochi Dough: Prepare a flat surface by dusting it with cornstarch. Carefully transfer the hot mochi dough onto the dusted surface and sprinkle some cornstarch on top. With a rolling pin, roll the dough into a rectangle approximately 1/4 inch thick. This thickness is ideal for wrapping around the ice cream without being too thick or too thin. After rolling, refrigerate the mochi dough for about 30 minutes to firm it up before handling.
Fill the Dough with Ice Cream: Once the dough has cooled, use a cookie cutter to cut out circles from the rolled mochi. Gently brush off any excess cornstarch. Place one ice cream scoop in the center of each dough circle. Pinch the edges together to seal the ice cream inside the mochi, ensuring there are no openings. For optimal presentation and to prevent sticking, wrap each completed mochi in plastic wrap.
Final Freezing: Put the wrapped mochi pieces back into the freezer for at least one hour. This step allows the wrapper to adhere firmly to the ice cream. For storage, place the mochi in a freezer-safe bag, where they can last for up to three months. Always remember to allow them to thaw slightly before taking a bite for the best texture and flavor experience.
How to Serve Mochi Ice Cream
Your homemade mochi ice cream is finally ready to be enjoyed! Serving this delightful dessert can be as versatile as your palate. Here are a few serving suggestions to elevate your mochi ice cream experience:
- Plating: Once removed from the freezer, unwrap the mochi. Place them individually on a serving plate or a dessert bowl to highlight their beautiful colors and shapes.
- With Toppings: Consider adding an extra touch with toppings. Drizzle with chocolate or matcha sauce, sprinkle with toasted coconut flakes, or even add a few fresh berries on the side for a refreshing contrast.
- Garnishing: For a more visually appealing presentation, consider garnishing your platter with mint leaves or edible flowers. This not only beautifies the dish but adds an element of freshness to each bite.
- Chilling Base: Serving your mochi ice cream over a chilled plate or bowl can keep them at the ideal temperature for longer. This simple trick can make sure the outer mochi remains soft while the ice cream stays perfectly frozen.
No matter how you choose to serve it, each bite will be a delightful mix of textures and temperatures, enhancing your overall dessert experience.
Expert Tips: Mochi Ice Cream
Here are some expert tips to ensure your mochi ice cream turns out perfectly every time:
- Choose Your Ice Cream Wisely: The flavor of ice cream can dramatically change the experience. Opt for high-quality ice cream for the best flavor and creaminess. Experiment with unique flavors to keep things exciting!
- Don’t Skip the Cornstarch: Liberal use of cornstarch is crucial. It prevents the mochi dough from sticking to surfaces and your fingers while you work with it. Additionally, it helps in rolling out the dough smoothly.
- Work Quickly: The mochi dough is easiest to work with when it’s warm. Be prepared to act quickly as you roll and cut the dough. If it cools too much, it becomes difficult to handle.
- Seal Carefully: Make sure your mochi is sealed properly around the ice cream. Any openings can lead to melting ice cream dripping during freezing and ruining the texture.
- Experiment: Don’t be afraid to play around with food coloring and flavorings in the mochi dough itself. This can elevate the visual appeal, making your mochi ice cream even more enticing.
With these tips in mind, your homemade mochi ice cream is bound to impress.
How to Store Mochi Ice Cream
If you find you have leftovers (though unlikely!), proper storage is key to maintaining that perfect texture. Here’s how to store your mochi ice cream:
- Freezing: Place the wrapped mochi in a freezer-safe bag or airtight container to prevent freezer burn. This ensures they maintain their flavor and texture while stored.
- Keep Track of Time: While mochi ice cream can last for up to three months in the freezer, it’s best consumed within a month for optimal taste.
- Thawing Before Eating: Before enjoying, allow the mochi ice cream to sit at room temperature for a few minutes. This will help soften the mochi, making it easier to chew while keeping the ice cream chilled inside.
Following these storage tips guarantees that each bite remains just as delightful as the first.
Variations of Mochi Ice Cream
Once you’ve mastered the classic version, don’t hesitate to venture into other exciting variations! Here are some ideas to get you started:
- Flavored Mochi Dough: Experiment with different flavors for the mochi dough. Incorporate ingredients like matcha powder, cocoa powder, or even fruit purees to create colorful and flavorful doughs.
- Dairy-Free Options: For those with dietary restrictions, use dairy-free ice cream alternatives made from coconut, almond, or cashew milk. These variations can also add unique flavors to the mochi!
- Mix and Match Fillings: Instead of using just ice cream, consider adding a layer of fruit or even sweetened red bean paste along with your ice cream. This adds another layer of flavor that can take your dessert to the next level.
- Seasonal Flavors: Change up your fillings based on the season. Use pumpkin spice ice cream in the fall or fresh berries in the summer to enjoy the variations of this delightful treat throughout the year.
With these variations, your mochi ice cream can always feel fresh, fun, and exciting!
FAQ
What is mochi ice cream, and what makes it unique?
Mochi ice cream is a dessert consisting of a small ball of ice cream encased in a soft, chewy shell made from mochi. The unique combination of textures—the chewy outer layer and the cold, creamy interior—sets it apart from traditional ice cream.
Can I use other types of flour instead of glutinous rice flour?
Using glutinous rice flour is essential for achieving the characteristic chewy texture of mochi. Other types of flour won’t produce the same effect, so it’s recommended to stick with glutinous rice flour for this recipe.
How do I prevent the mochi from sticking?
Using a generous amount of cornstarch or potato starch is key to preventing the mochi from sticking to surfaces and to your hands. Be sure to coat your work area and the dough thoroughly.
Mochi Ice Cream
Ingredients
For the Mochi Dough
- 1 cup glutinous rice flour Preferably shiratamako or mochiko.
- 1/4 cup sugar To sweeten the mochi.
- 2 tablespoons powdered sugar For dusting.
- 1 cup water To mix with flour.
- Food coloring Optional for coloring the mochi.
- Cornstarch or potato starch For dusting and rolling.
For Filling
- 8 scoops ice cream Your favorite kind.


Instructions
Preparation
- Freeze the ice cream balls by scooping your favorite ice cream onto a lined sheet pan. Space them out properly and freeze for about one hour.
- In a microwave-safe bowl, combine glutinous rice flour, sugar, and powdered sugar. Gradually add water, stirring until smooth.
- Cover the bowl with plastic wrap and microwave for 1 minute. Remove, fold the mixture, cover again, and microwave for another minute. Fold once more and microwave for an extra 30 seconds until glossy and slightly translucent.
- Dust a flat surface with cornstarch, transfer the hot mochi dough, and roll into a rectangle about 1/4 inch thick. Refrigerate for 30 minutes.
Assembly
- Use a cookie cutter to cut circles from the mochi. Place one ice cream scoop in the center, pinch the edges together to seal, and wrap in plastic wrap.
- Freeze the wrapped mochi for at least one hour to ensure they hold their shape.
Send me this recipe!
Just enter your email below and get it sent straight to your inbox!