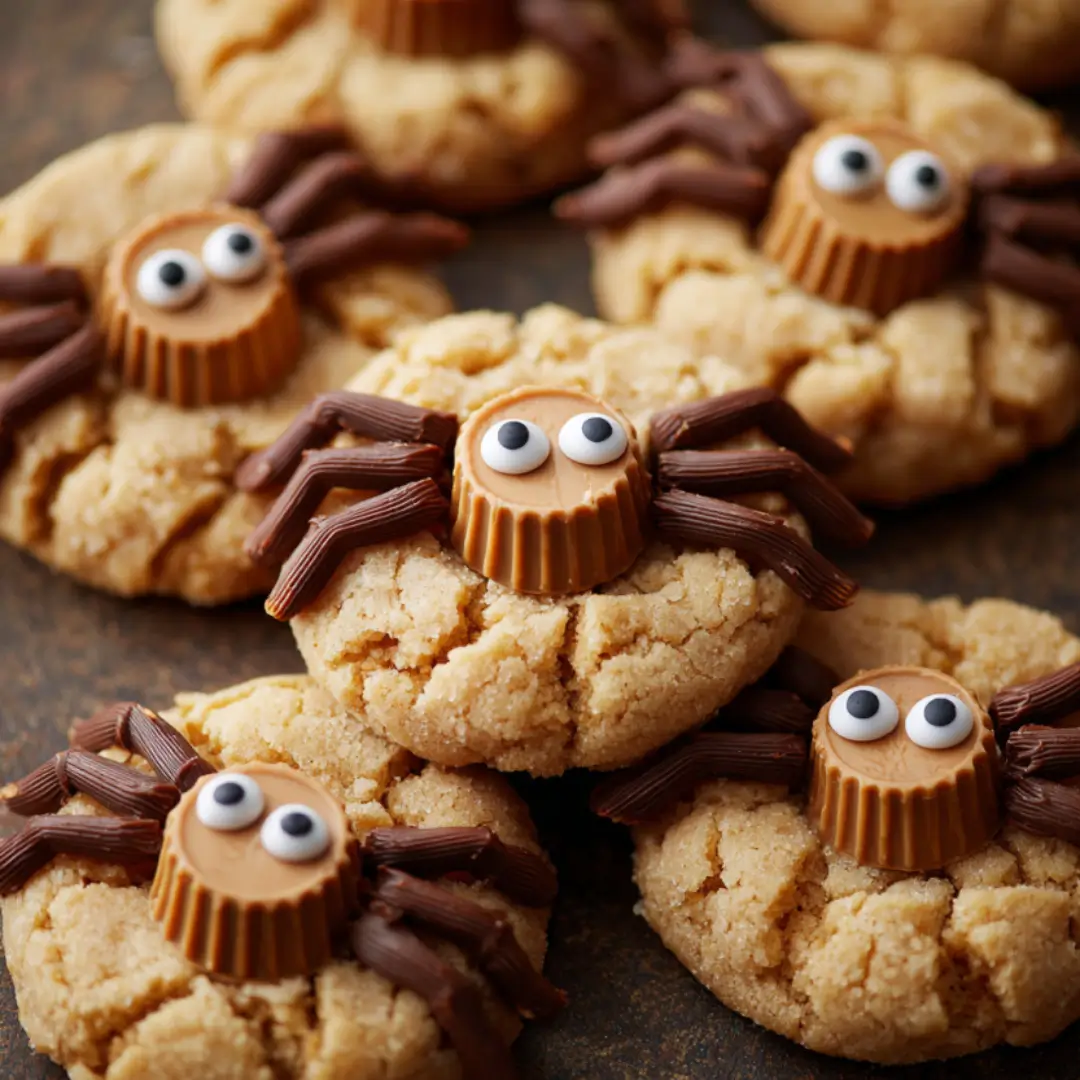
These Peanut Butter Spider Cookies are a fun and easy Halloween treat. They’re soft, chewy peanut butter cookies topped with mini chocolate cups, candy eyes, and chocolate legs. You can make them quickly with simple ingredients, and they’re great for parties, school events, or a spooky dessert at home.
Why You’ll Love These Peanut Butter Spider Cookies
You know that warm, homey comfort of a soft peanut butter cookie? These little spiders double the charm: they maintain that chewy peanut‑buttery base, then surprise you with a melty chocolate web and playful candy‑eyes. The crunchy mini peanut butter cups in the center add extra gooeyness and texture. And here’s the best part: assembling them is easy enough for beginners yet festive enough to impress. You don’t need fancy piping skills—just a little melted chocolate and a squeeze bag. They’re a piece of cake to bake, serve, and enjoy. This is the perfect cookie to show up with when everyone else is handing out plain old chocolate bars.
Ingredients
- ½ cup (113 g) unsalted butter, at room temperature
- ½ cup (107 g) packed brown sugar
- ⅓ cup (66 g) granulated sugar
- ¾ cup (201 g) creamy peanut butter (not the natural, runny kind)
- 1 large egg
- 1 teaspoon vanilla extract
- 1½ cups (180 g) all‑purpose flour
- 1 teaspoon baking soda
- ½ teaspoon baking powder
- ½ teaspoon salt
- Extra granulated sugar, for rolling cookie dough
- About 24 mini peanut‑butter cups (chilled before baking)
- ½ cup (85 g) semi‑sweet chocolate chips, ready to melt
- Candy eyeballs, small size, for decorating
How to Make Peanut Butter Spider Cookies
Here’s your step‑by‑step guide:
Prep the mini cups
Unwrap about 24 mini peanut‑butter cups. Put them in a small bowl, then freeze for about 5–10 minutes. Chilling helps them stay firm when pressed into warm dough later. Preheat your oven to 350 °F (176 °C).
Cream the base
In a mixing bowl, add butter, brown sugar, and granulated sugar. Beat until smooth and fluffy—about 60 seconds on medium‑high speed with your mixer.
Add wet ingredients
Mix in the creamy peanut butter, the egg, and the vanilla. Blend until just combined—no over‑mixing, about 45 seconds.
Combine dry ingredients
In a separate bowl, whisk together flour, baking soda, baking powder, and salt. Add to the wet mixture, mixing low or folding with a spatula until just incorporated. The dough should cling together—not overly stiff or too wet.
Form and roll
Scoop tablespoon‑sized balls of dough. You can use a cookie scoop or two spoons. Roll each between your hands, then dip in extra granulated sugar for a little sparkle. Place 2–3 inches apart on a baking sheet lined with a silicone pad or parchment.
Bake
Slide the baking sheet into your preheated oven. Bake 8–11 minutes, until edges just start to crack and turn light‑golden. You want them soft and chewier—not crisp.
Add the peanut‑butter cup
As soon as cookies come out, press one chilled mini peanut‑butter cup into each center. Let them cool undisturbed for 15–20 minutes so the cups set properly. Don’t nudge them too soon—you want the cookies to gently cradle the cups, not collapse.
Melt chocolate
Put chocolate chips in a microwave‑safe bowl. Heat on 50 percent power for one minute, stir. Continue microwaving in 30‑second bursts, stirring each time, until smooth.
Draw spider legs
Transfer melted chocolate into a squeeze bottle or a plastic bag with a tiny corner snipped. Draw four legs on each side of the peanut‑butter cup to form your spider. Make them as long or short as you like—the kids will love the variety.
Add eyes
Dab a touch of melted chocolate on the back of each candy eyeball and stick two onto the peanut‑butter cup. Let everything fully set before transferring to a platter. That’s it—you’re done!
How to Serve Your Cookies
These spiders look and taste best at room temperature. Arrange them on a fun platter at your Halloween party or put them in a clear container so the legs and eyes show off from the outside. They make great grab‑and‑go treats for kids after school or Thanksgiving table favors. You can also wrap them individually in clear bags tied with festive ribbon to hand out at trick‑or‑treating stations. If you’re hosting an event, pair them with flavored milk—like classic chocolate or even a spiced vanilla almond drink—for a complete, themed snack.
Expert Tips for Perfect Spiders
- Freeze the mini cups. That step is key to keeping them intact when pressed into hot cookies.
- Don’t over-mix. That keeps the cookie texture tender, not tough.
- Roll in sugar. This adds a lovely sparkle and slight crisp shell that balances chewiness.
- Time your chocolate melt carefully. Go slow in the microwave and stir often to ensure smooth, lump‑free drizzle.
- Practice your leg drawing. If you’ve got shaky hands, use toothpicks or a fine pastry brush; the small size adds charm.
- Let them fully set. Try not to pack them away too soon—letting the chocolate harden keeps your artwork intact.
How to Store These Cookies
Once cooled and fully set, store your cookies in an airtight container. Layer them with parchment paper between tiers to prevent legs from sticking. They stay fresh and chewy for up to 3 days at room temperature. Want them to last longer? Refrigerate for up to a week. Just bring them back to room temperature before serving so they’re lovely and soft again. If you’re baking in advance for an event, freeze them (without the eyes and legs) for up to 2 months. Thaw, then decorate before your get‑together.
Variations to Try
- Nut‑free version: Swap creamy peanut butter for sunflower‑seed spread—same texture, safe for nut‑allergy guests.
- White‑chocolate drizzle: Replace semi‑sweet chocolate with white chips or tinted candy melts in orange or green.
- Extra crunchy base: Fold in some chopped peanuts or oats for texture contrast.
- Spiced cookie: Add a dash of cinnamon or pumpkin‑pie spice to the dough for a seasonal twist.
- Double‑deck spider: Top the peanut‑butter cup with a smaller cookie before drawing legs—nice for mini versions.
- Glow‑in‑dark eyes: Use neon candy eyes or scarf them in tinted icing for a glow effect under black‑light.
Frequently Asked Questions
What makes these Peanut Butter Spider Cookies so special?
You’re getting a warm peanut‑buttery cookie base, a soft‑chewy texture, a gooey center from the mini cups, and whimsical chocolate‑leg decorations all in one. Plus, they’re fun to make—even if you don’t have any baking experience.
Can I make these gluten‑free?
Absolutely. Use a 1:1 gluten‑free baking flour mix instead of regular flour. Make sure your baking soda and powder are also certified gluten‑free. The rest of the ingredients are naturally safe.
How do I keep the spider legs from smudging?
Let chocolate set fully before stacking or transporting. Use a cool area of your kitchen. If it’s humid, pop them in the fridge for 5–10 minutes after decorating, then return to room temp before serving.
Can I bake these ahead of time?
Sure! Bake and add peanut‑butter cups a day ahead. Store airtight at room temp. Save the chocolate‑leg details for the day you serve so they look fresh and crisp.
Are they kid‑friendly?
Yes! The recipe is straightforward, and kids enjoy helping scoop dough, add cups, or even draw legs. The result is a cute, shareable sweet everyone loves.
Peanut Butter Spider Cookies
Equipment
- Baking Sheet
- Mixing Bowls:
- Squeeze Bottle or Plastic Bag
Ingredients
- ½ cup unsalted butter (113 g, at room temperature)
- ½ cup packed brown sugar (107 g)
- ⅓ cup granulated sugar (66 g)
- ¾ cup creamy peanut butter (not the natural kind, 201 g)
- 1 large egg
- 1 teaspoon vanilla extract
- 1½ cups all-purpose flour (180 g)
- 1 teaspoon baking soda
- ½ teaspoon baking powder
- ½ teaspoon salt
- Extra granulated sugar (for rolling cookie dough)
- 24 pieces mini peanut-butter cups (chilled before baking)
- ½ cup semi-sweet chocolate chips (85 g, ready to melt)
- Candy eyeballs (small size, for decorating)


Instructions
- Unwrap and freeze the mini peanut-butter cups for 5–10 minutes. Preheat your oven to 350°F (176°C).
- In a mixing bowl, beat butter, brown sugar, and granulated sugar until smooth and fluffy, about 60 seconds.
- Add peanut butter, egg, and vanilla. Blend until just combined, about 45 seconds.
- In a separate bowl, whisk together flour, baking soda, baking powder, and salt. Add to the wet mixture and mix until just incorporated.
- Scoop tablespoon-sized balls of dough and roll them in extra granulated sugar. Place 2–3 inches apart on a baking sheet.
- Bake for 8–11 minutes until edges start to crack and turn light-golden. Press a mini peanut-butter cup into each cookie immediately after baking.
- Let cool undisturbed for 15–20 minutes to set the cups.
- Melt chocolate chips in a microwave-safe bowl, heating at 50% power. Stir until smooth.
- Transfer melted chocolate into a squeeze bottle or plastic bag. Draw four legs on each side of the peanut-butter cup.
- Attach candy eyeballs using a dab of melted chocolate. Let fully set before serving.
Send me this recipe!
Just enter your email below and get it sent straight to your inbox!