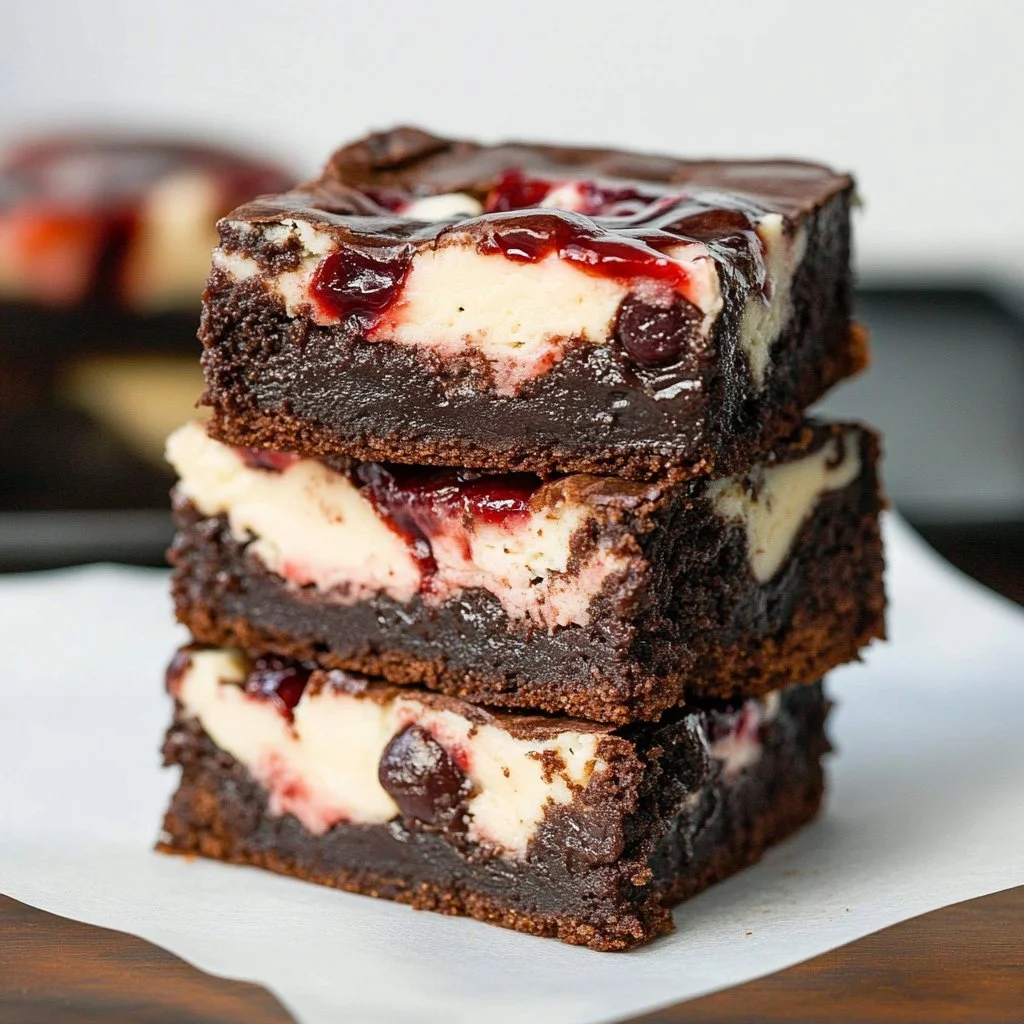
There’s something magical about desserts, especially when they combine the rich decadence of chocolate brownies with the creamy, tangy goodness of cheesecake. Cherry Cheesecake Brownies perfectly encapsulate this experience. With their luscious layers, they bring together the best of both worlds, giving you a sweet treat that’s hard to resist.
Why We Love This Cherry Cheesecake Brownies Recipe
Cherry Cheesecake Brownies are not only visually stunning but also incredibly delicious. They blend the classic taste of rich chocolate brownies with a creamy cheesecake layer, all topped with sweet cherry pie filling. It’s the perfect dessert for any occasion, whether it’s a casual family gathering or a fancy dinner party. You’ll find that these brownies are a fantastic way to impress your guests, showcase your baking skills, and satisfy your sweet tooth in one fell swoop.
Not to mention, they’re versatile and suitable for various dietary preferences. You can easily adapt them to meet gluten-free or dairy-free needs without losing the essence of their delightful taste. Their delightful texture and flavor make them a favorite for both children and adults alike. There’s truly no better way to enjoy a brownie than by enhancing it with creamy cheesecake and cherry topping!
Ingredients about Cherry Cheesecake Brownies
To create these irresistible Cherry Cheesecake Brownies, you’ll need the following ingredients:
- Cream Cheese: 2 packages (8 ounces each)
- Sugar: 1/2 cup (for the cheesecake topping) + 2 cups (for brownie mix)
- Egg: 1 large (for the cheesecake layer)
- Vanilla Extract: 1/2 teaspoon (for the cheesecake layer) + 1 teaspoon (for brownie mix)
- Butter: 1 cup (for brownie mix)
- Unsweetened Chocolate: 6 ounces
- Salt: 1 teaspoon
- Eggs: 4 large (for brownie mix)
- Flour: 1 1/4 cups
- Lucky Leaf® Cherry Pie Filling: 1 can (21 ounces)
How to Make Cherry Cheesecake Brownies Directions
Making Cherry Cheesecake Brownies is a simple yet rewarding process. Begin by preheating your oven to 350 degrees Fahrenheit. This initial step is crucial, as it ensures that your brownies bake evenly.
Next, line a 13×9 inch pan with foil and spray it lightly with cooking spray. This step will help the brownies release from the pan easily after baking, allowing for perfect presentation when serving.
Now, let’s focus on preparing your cheesecake topping. In a mixing bowl, combine the cream cheese and sugar. Beat the mixture until it becomes smooth and creamy. It’s essential to ensure this is well-mixed to avoid any lumps in your cheesecake layer. Once smooth, add in one large egg alongside half a teaspoon of vanilla extract. Beat the mixture again until it’s perfectly blended. Your cheesecake topping is now ready to set aside!
Moving on to the brownie layer, take a microwave-safe bowl and melt the butter with the unsweetened chocolate. Do this in intervals of 30 seconds, stirring in between until the mixture is melted and smooth. Once melted, stir in two cups of sugar, one teaspoon of vanilla extract, and one teaspoon of salt. Mix everything together thoroughly.
Next, add in your four large eggs and the 1 1/4 cups of flour. Stir until fully incorporated, careful not to overmix. This is where you’ll create the rich chocolate brownie base that pairs beautifully with the cheesecake topping.
Spread the brownie mixture evenly into the prepared pan as your bottom layer.
Now, drop spoonfuls of the cheesecake mixture over the brownie layer. Follow this with dollops of the Lucky Leaf® Cherry Pie Filling. For that signature marbled effect, take a knife and gently run it through the mixtures, swirling together for a visually stunning presentation.
Once done, place the pan in the preheated oven and bake for 45 to 50 minutes. The brownies are ready when the cheesecake on top begins to turn lightly golden on the edges. Keep in mind that the center might still jiggle a bit when you take them out; this will set as they cool.
After baking, allow the brownies to cool completely at room temperature. Once they’re cool, cover them and let them chill in the refrigerator for about four hours. This chilling time helps the flavors meld beautifully and makes slicing easier.
How to Serve Cherry Cheesecake Brownies
Serving Cherry Cheesecake Brownies is as enjoyable as making them. After they’ve been chilled, carefully lift the brownies out of the pan using the foil, and place them on a cutting board. Using a sharp knife, slice them into squares or rectangles – however you prefer!
For a stunning presentation, consider serving them on a dessert platter with a drizzle of chocolate sauce or whipped cream. You can also sprinkle some fresh cherries on top or add a mint leaf for a pop of color.
These brownies are delicious on their own but can be served a la mode with a scoop of vanilla ice cream or alongside fresh fruit. The creamy cheesecake and fruity cherry filling pair wonderfully with the cold ice cream, making for a decadent dessert experience.
Expert Tips: Cherry Cheesecake Brownies
To ensure your Cherry Cheesecake Brownies turn out perfectly, keep these expert tips in mind:
Use Room Temperature Ingredients: For the best texture in your cheesecake layer, allow your cream cheese and egg to come to room temperature before mixing. This will help you achieve a smoother consistency and prevent lumps.
Don’t Overmix: When combining your brownie batter, be careful not to overmix after adding the flour. Just mix until combined to maintain a fudgy texture.
Chill Before Slicing: Don’t skip the chilling step. It not only makes slicing easier but also enhances the flavors and texture of the final product.
Experiment with Mix-Ins: Feel free to add nuts or chocolate chips to your brownie layer for added texture and flavor. They can provide a delightful crunch that contrasts beautifully with the creamy cheesecake.
Check for Doneness: Because ovens can vary, keep an eye on your brownies towards the end of the baking time. If you stick a toothpick in the center, it should come out with moist crumbs, not wet batter.
How to Store Cherry Cheesecake Brownies
Properly storing your Cherry Cheesecake Brownies is essential to keep them fresh and delicious. After slicing, place them in an airtight container. You can store them in the refrigerator for up to a week. If you want to keep them for longer, consider freezing them!
To freeze, wrap individual brownie squares in plastic wrap, then place them in a freezer-safe bag or container. They can be frozen for up to three months. When you’re ready to enjoy them, simply thaw them in the refrigerator overnight before serving.
Variation of Cherry Cheesecake Brownies
The versatility of Cherry Cheesecake Brownies allows you to customize them in various ways to suit your preferences. Here are some ideas for variations:
- Different Fruit Toppings: While cherry is a classic, you can explore using strawberry, blueberry, or even mixed berry pie filling on top. This twist can add new and exciting flavors to your brownies.
- Chocolate Chip Brownies: For a richer chocolate experience, you can fold chocolate chips into the brownie batter before spreading it into the pan. This adds a gooey chocolatey burst to each bite.
- Swirl Variations: Instead of just dolloping the cheesecake and cherry filling, consider creating swirls with other flavored cheesecake mixtures like lemon or raspberry. These flavors can complement each other beautifully.
- Gluten-Free Option: If you’re looking to make these brownies gluten-free, substitute regular flour with gluten-free flour blends available at grocery stores.
- Vegan Option: Substitute cream cheese with a dairy-free alternative, use flax eggs or a suitable egg alternative for the cheesecake, and use vegan butter for the brownie layer for a plant-based version.
Frequently Asked Questions
What are Cherry Cheesecake Brownies?
Cherry Cheesecake Brownies are a delicious dessert that combines a rich chocolate brownie base with a creamy cheesecake topping, topped with cherry pie filling. They are a perfect blend of flavors and textures that make for an irresistible treat.
Can I make Cherry Cheesecake Brownies Gluten-Free?
Yes, you can easily adapt this recipe to be gluten-free by using a gluten-free flour blend in place of regular flour. Make sure all your other ingredients are also gluten-free.
How long do Cherry Cheesecake Brownies last?
When stored properly in an airtight container in the refrigerator, Cherry Cheesecake Brownies will last for up to one week. You can freeze them for up to three months for longer storage.
Can I use other fruit toppings?
Absolutely! While cherries are traditional, you can experiment with other fruits like strawberries or blueberries to create variations of this delightful dessert.
How do I know when my brownies are done baking?
Brownies are typically done when the edges appear set and start to pull away from the sides of the pan. The center may still jiggle slightly, but a toothpick inserted should come out with moist crumbs.
Cherry Cheesecake Brownies
Ingredients
For the cheesecake topping
- 2 packages Cream Cheese (8 ounces each) Must be at room temperature
- 1/2 cup Sugar For the cheesecake topping
- 1 large Egg For the cheesecake layer
- 1/2 teaspoon Vanilla Extract For the cheesecake layer
For the brownie mix
- 1 cup Butter Must be melted
- 6 ounces Unsweetened Chocolate Melted with butter
- 2 cups Sugar For the brownie mix
- 1 teaspoon Vanilla Extract For the brownie mix
- 1 teaspoon Salt
- 4 large Eggs For brownie mix
- 1 1/4 cups Flour
Topping
- 1 can Lucky Leaf® Cherry Pie Filling (21 ounces)


Instructions
Preparation
- Preheat your oven to 350°F.
- Line a 13x9 inch pan with foil and spray lightly with cooking spray.
- In a mixing bowl, combine cream cheese and sugar, beating until smooth. Add in the egg and vanilla extract, then beat again until blended.
- In a microwave-safe bowl, melt the butter with unsweetened chocolate in 30-second intervals until smooth.
- Stir in sugar, vanilla extract, and salt into the melted chocolate mixture.
- Add in eggs and flour, mixing until just combined.
Assembly and Baking
- Spread the brownie mixture evenly into the prepared pan.
- Drop spoonfuls of cheesecake mixture over the brownie layer and top with dollops of cherry pie filling.
- Use a knife to swirl the mixtures for a marbled effect.
- Bake for 45 to 50 minutes until the cheesecake is lightly golden on the edges, but the center may jiggle.
Cooling and Serving
- Allow brownies to cool completely at room temperature before refrigerating for about four hours.
- Lift brownies out of the pan using the foil, slice into squares or rectangles, and serve.
Send me this recipe!
Just enter your email below and get it sent straight to your inbox!